Note: To disconnect the solar panel
from the mounting bracket, press
down on the release tab on the
bottom of the mounting bracket.
With the tab firmly pressed, slide
the solar panel upwards and free of
the bracket. Some force may be
required to remove the panel from
the bracket.
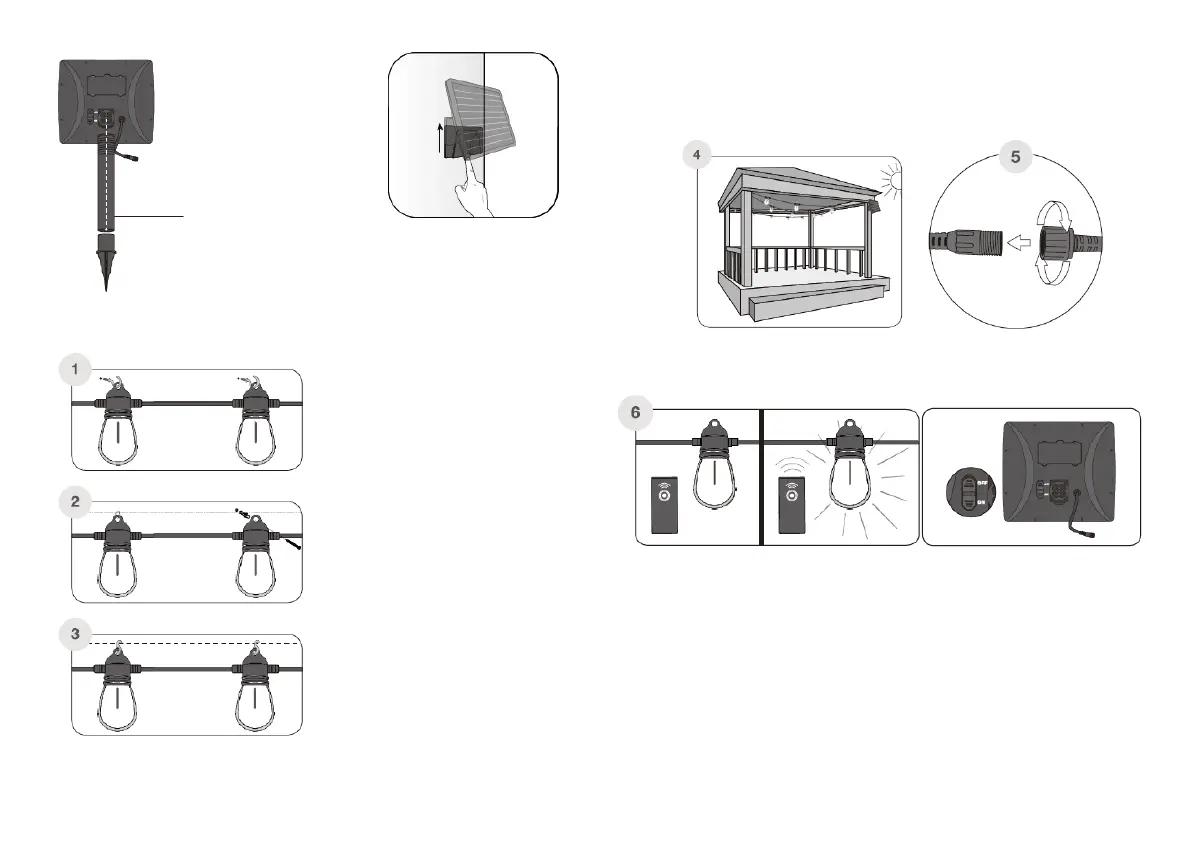
To utilize the ground stake (C), connect the two parts of the stake together.
The grooved section then fits into the protruding arm of the solar panel.
The stake can then be used to mount the panel into the ground.
INSTALLATION OF THE SOLAR STRING LIGHTS
The solar string lights have a variety of
possible ways to be mounted. The following
are examples of the most common ways:
(1) Temporary mounting: Using standard S
hooks (not included) or screw hooks
(not included) the solar string lights can
be mounted utilizing the integrated
mounting loops.
(2) Permanent mounting: Using cable tie
wraps or ‘ zip ties’ (not included) or
using nails or screws into a surface, the
solar string lights can be mounted more
permanently.
(3) Guide wire installation: Using S hooks
(not included) attach the string lights to a
pre-installed guide wire (not included).
(4) Structural installation: To create a
draping effect for the solar string lights
attach the first bulb to a structure, then
only mount every 3-4th bulb to create
the desired effect. Complete the effect
Pull out the included plastic tab to activate the remote control’ s (J)
battery.
NOTE: Using the solar string light during daylight hours will have a negative effect on the length
of time the lights will illuminate in the evening. When not required always use the remote control
to turn the bulbs off to help conserve the battery charge.
(4) Structural installation: To create a draping effect for the solar string lights attach the first bulb to
a structure, then only mount every 3-4th bulb to create the desired effect. Complete the effect by
mounting the last bulb to a structure.
(5) The final step of installation is to connect the solar panel to the string lights. Simply insert the
plug located after the final bulb into the wire coming from the solar panel. Tighten the plug by
screwing the seal over the connection point.
Note: The solar string lights will illuminate for 4-5 hours depending on the charge level of the
batteries.
After an initial 3 day charge in the OFF position the solar string lights are ready to use.
When the solar panel is in the ON position the bulbs should illuminate. Simply press the button on
the remote control to turn the bulbs off. Likewise when the bulbs are off press the button on the
remote control to illuminate the bulbs. It is advisable to leave the solar panel in the ON position for
regular usage. Turning the solar panel to the OFF position disengages the remote control and can
be used when storing or for long periods of intended inactivity.
 Loading...