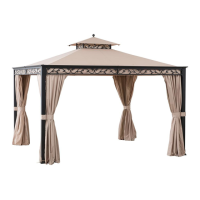
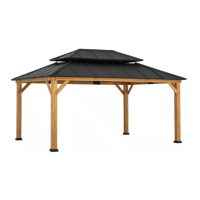
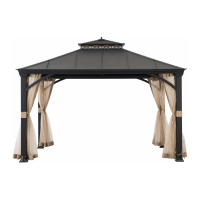
This document describes the 10' x 12' Regency Gazebo DLX with Dark Maroon Canopy, identified by ITEM# A101004105 and SKU# 233865. It serves as a comprehensive guide for assembly, usage, and maintenance of the gazebo.
Function Description:
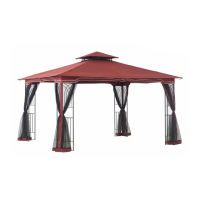
The Regency Gazebo DLX is an outdoor structure designed to provide shade and shelter. It features a robust frame and a dark maroon canopy, making it suitable for various outdoor settings like patios, decks, or gardens. The gazebo is intended for personal, residential use and is designed to be assembled by two or more adults. It includes mosquito netting for added comfort and protection from insects.
Important Technical Specifications:
- Dimensions: 10 feet by 12 feet.
- Canopy Color: Dark maroon.
- Center Hook Maximum Weight Capacity: 26 lbs.
- Frame Material: Steel components, treated with rust-inhibiting paint.
- Canopy Fabric: Meets CPAI-84 specifications for flame resistance (note: not fireproof).
- Ground Securing: Requires provided 7" ground stakes (16+1 included) or 16 appropriate bolts/screws (not included) for securing to a patio/deck.
Parts List (Key Components):
- A1: Corner Panel (4 pcs)
- B: Long Cross Beam 1 (2 pcs)
- C: Long Cross Beam 2 (2 pcs)
- D: Short Cross Beam 1 (2 pcs)
- E: Short Cross Beam 2 (2 pcs)
- F: Oblique Beam (4 pcs)
- G1: Long Middle Beam (2 pcs)
- G2: Short Middle Beam (2 pcs)
- H: Bottom Long Middle Beam (2 pcs)
- J1: Bottom Oblique Beam 1 (2 pcs)
- J2: Bottom Oblique Beam 2 (2 pcs)
- K: Big Roof Connector (1 pc)
- L: Hook (1 pc)
- M: Small Roof Oblique Beam (4 pcs)
- N: Small Roof Connector (1 pc)
- O: Corner Shelf (4 pcs)
- P2: Big Canopy (1 pc)
- Q2: Small Canopy (1 pc)
- R: Mosquito Netting (1 pc)
Hardware Pack:
- S: Knob (12+1 pcs)
- AA: Plastic Ring (52+3 pcs)
- BB: 7" Ground Stakes (16+1 pcs)
Usage Features:
- Outdoor Use Only: The gazebo is strictly designed for outdoor environments.
- Flat, Horizontal Ground Placement: Essential for stability and proper assembly.
- Two-Person Assembly Recommended: To ensure safety and ease of installation.
- No Climbing: Users are warned against climbing on the gazebo to prevent serious injury or death.
- No Open Flames: Open-flame appliances or accessories should not be used near the gazebo due to the fabric's flame resistance, not fireproof nature.
- Secure Connections: All connectors and poles must be firmly secured before use to prevent collapse or damage.
- Weather Precautions: The roof canopy must be removed during severe weather conditions such as strong winds, hurricanes, tropical downpours, and snow to prevent damage to the product and other items. The manufacturer is not liable for losses due to failure to remove the canopy during inclement weather.
- Ground Anchoring: The assembled gazebo must be secured to the ground using either the provided stakes or appropriate bolts/screws for patios/decks.
- Corner Shelves: The gazebo includes four corner shelves (Part O) for convenience.
- Mosquito Netting: Features mosquito netting (Part R) for protection against insects, with zippers for different panels as shown in the assembly instructions.
Maintenance Features:
- Rust Prevention: Steel components are treated with rust-inhibiting paint. To minimize surface oxidation (rusting), care should be taken during assembly and handling to prevent scratching the paint. Immediate touch-up with rust-inhibiting paint is recommended for any scratches or damage.
- Rust Removal: Surface rust can be removed with a light application of common cooking oil. Taking measures to prevent oxidation is important to avoid damaging stains on decks or patios.
- Cleaning: Use a damp cloth to wipe off stains promptly. If necessary, wash with a mild solution of soap and water, rinse thoroughly, and dry completely.
- Bolt Tightness: Periodically check and ensure that all bolts are well-tightened during use.
- Canopy Care: Keep all flame and heat sources away from the tent fabric. The fabric is flame resistant but not fireproof and will burn if in continuous contact with a flame source. Applying foreign substances to the fabric may reduce its flame-resistant properties.
- Read and understand the entire manual before assembly or installation.
- Keep small items and plastic bags away from children.
- Do not use the unit during an electrical storm.
- Ensure all connectors and poles are firmly secured.
- Limited Manufacturer's Warranty: Sunjoy Group provides a 6-month warranty to the original purchaser for defects in workmanship and materials, provided the item was factory-sealed and used for personal, residential purposes.
- Replacement Parts: Defective merchandise or parts will be replaced (at Sunjoy Group's option) upon proof of purchase. Transportation and delivery costs, as well as third-party assembly/disassembly costs, are the purchaser's responsibility.
- "Open Box" or "Clearance" Items: Replacement parts for "open box," previously-returned, or "clearance" items, or for purchases outside the warranty period, can be obtained at nominal cost if the product is still in current production.
- Exclusions: The warranty does not cover items used for commercial, contract, or non-residential purposes; damage due to acts of nature, vandalism, misuse, or improper assembly; or corrosion/rusting of hardware. Proof of purchase (dated register receipt) is required. The warranty is non-transferable. Replacement items will be in the original style/color or a similar style/color if the original is unavailable or discontinued. State-specific rights may apply.
Customer Support:
- Online Purchase Issues: If purchased online, contact the seller directly through your order details ("Ask a Question" or "Contact Seller" button).
- General Inquiries/Website: Visit www.sunjoyonline.com.
- Toll-Free Support: Call 1-866-578-6569, available 24 hours / 7 days a week.
- Missing/Damaged Parts (within 30 days of online delivery): Contact the seller directly for free replacement parts.
- Missing/Damaged Parts (after 30 days or brick-and-mortar purchase): Call 1-866-578-6569.
Assembly Steps Overview:
The manual provides a detailed, step-by-step visual guide for assembly, including:
- Assembling the corner panels (A1).
- Connecting cross beams (B, C, D, E) using knobs (S).
- Attaching the corner panels (A1) to the assembled beams.
- Connecting oblique beams (F) with bottom oblique beams (J1, J2).
- Attaching the big roof connector (K) and the assembled oblique beams.
- Connecting middle beams (G1, H) and (G2, H).
- Attaching the middle beams to the structure and securing with knobs (S).
- Installing the big canopy (P2).
- Assembling the small roof structure with small roof oblique beams (M) and small roof connector (N).
- Installing the small canopy (Q2).
- Attaching the hook (L) to the big roof connector (K).
- Installing the corner shelves (O).
- Attaching the mosquito netting (R) using plastic rings (AA) and matching zippers.
- Securing the gazebo to the ground with ground stakes (BB).