Do you have a question about the Sunjoy A106005400 and is the answer not in the manual?
Lists bolts, washers, and wrench for initial assembly stages.
Detailed instructions for attaching stake, arc beams, and side beams.
Lists bolts and washers required for the second assembly phase.
Guidance on connecting top beams and arc supports to the structure.
Lists bolts, washers, and floor stakes for the final assembly.
Instructions for attaching canopy rods and rail beams to the frame.
Details on inserting canopy rods into rail beams and connectors.
Explains spring buckle mechanism and securing gazebo with floor stakes.
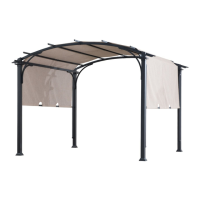
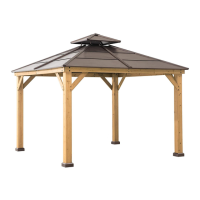
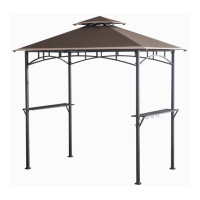
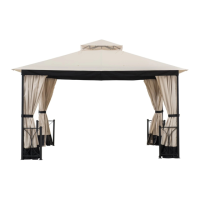
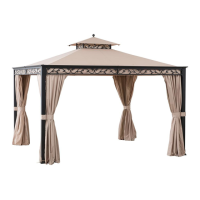
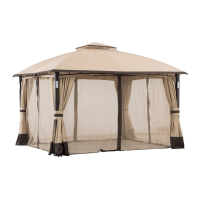
This document outlines the assembly, usage, and maintenance of a gazebo, identified by Item No.: A106005400. The gazebo is designed to provide a shaded outdoor space, offering a functional and aesthetic addition to a garden, patio, or backyard. Its structure appears to be a freestanding unit with a canopy, supported by posts and beams, suggesting a robust design suitable for various outdoor settings.
The primary function of this device is to create a sheltered outdoor area. It serves as a temporary or semi-permanent structure that offers protection from direct sunlight and light rain, making outdoor activities more comfortable. The canopy provides shade, which is essential for reducing heat and UV exposure, allowing users to relax, dine, or entertain outdoors for extended periods. The overall design suggests it is intended for personal, residential use, enhancing the usability and enjoyment of outdoor living spaces.
The assembly process is detailed across several steps, indicating a modular design that can be put together by the user. Key components include top beams, arc beams, long side beams, posts, stakes, stake covers, arc supports, rail connectors, decorate tubes, canopy rods, and a canopy. The use of various bolts, washers, and a wrench (provided in Hardware Pack 1) suggests a secure and stable construction.
Step 1: Initial Frame Assembly: This step focuses on establishing the foundational structure. It involves attaching the stake cover (J) through the posts (H1/H2) and then securing the stake (I) to the bottom of the posts using bolts (CC) and washers (BB). This foundational step ensures stability and proper anchoring of the gazebo. Following this, the arc beams (C/D) are connected to the arc beam connector (E) using bolts (AA) and washers (BB). The long side beams (F1/F2) are then attached to each other using bolts (AA) and washers (BB). Finally, the conners (G) are attached to the top of the posts (H1/H2), and the arc beams (C/D) are fixed to the top of the posts (H1/H2) using bolts (AA) and washers (BB). The decorate tubes (N) are attached to the long side beams (F1/F2). This sequence builds the main skeletal frame of the gazebo.
Step 2: Upper Frame and Support Structure: This stage involves connecting the top beams and arc supports. Top beam 1 (A) is attached to top beam 2 (B) using bolts (AA) and washers (BB). The assembled top beams (A/B) are then fixed to the assembled arc beams (C/D) using bolts (EE) and washers (BB). This forms the upper framework that will support the canopy. Arc support 1 (K) is attached to the short side beams (C1/C2), and arc support 2 (L) is attached to the arc beams (C/D). Both arc supports (K and L) are also connected to the posts (H1/H2) using bolts (EE) and washers (BB). These supports are crucial for the structural integrity and stability of the canopy frame.
Step 3: Canopy Installation and Anchoring: This final assembly step focuses on installing the canopy and securing the entire structure. Canopy rod 1 (O) is attached to canopy rod 2 (P) using bolts (GG) and washers (BB). The canopy (R) is then laid over the tent, and the canopy rods (O/P) are passed through the canopy as shown. The canopy rods (O/P) are inserted into the rail beam (Q), which is then inserted into the rail connector (M). The rail beam (Q) and rail connector (M) are finally locked to the posts (H1/H2) using bolts (EE). To prevent the fabric tubes from moving up, the spring buckle on the rail tube (Q) is pushed, and the hole of canopy rod 1 (O) and canopy rod 2 (P) is pulled underneath the spring buckle. The assembled gazebo is then fixed to the ground using floor stakes (FF). This ensures the gazebo is securely anchored and the canopy is properly tensioned.
The inclusion of a "Warranty Parts" section and contact information (website, email, toll-free number) indicates a commitment to customer support, suggesting that replacement parts and assistance are available. The 24/7 availability of support highlights a user-friendly approach.
The manual provides clear guidelines for the care and maintenance of the gazebo to ensure its longevity and appearance.
Rust Prevention: The steel components are treated with rust-inhibiting paint. However, surface oxidation (rusting) can occur if these protective coatings are scratched. This is explicitly stated as not a defect and not covered by warranty. To minimize rust, users are advised to exercise care during assembly and handling to prevent scratching the paint. Immediate touch-up with rust-inhibiting paint is recommended if any scratches or damage occur. Surface rust can also be removed with a light application of common cooking oil. Preventing oxidation is crucial, as dripping rust can stain decks or patios, and these stains can be difficult to remove.
Cleaning: For general cleaning, a damp cloth should be used to wipe off stains as quickly as possible. If necessary, a mild solution of soap and water can be used, followed by thorough rinsing and complete drying. This ensures the gazebo remains clean and free from dirt buildup.
Structural Integrity Check: Users are advised to periodically check and ensure that all bolts are well-tightened during use. This is a critical maintenance step to maintain the structural stability and safety of the gazebo, preventing loosening of components over time due to weather exposure or regular use.
The "Limited Manufacturer's Warranty" section further details the terms of support, covering defects in workmanship and materials for a period of one year from the date of purchase, provided the item was factory-sealed and used for personal, residential purposes. This warranty underscores the manufacturer's confidence in the product's quality while also setting clear expectations for user responsibility in maintenance and usage. Exclusions from the warranty, such as commercial use, damage from acts of nature, vandalism, misuse, improper assembly, and corrosion or rusting of hardware, reinforce the importance of proper care and adherence to the intended use.
| Product Type | Gazebo |
|---|---|
| Frame Material | Steel |
| Canopy Material | Polyester |
| Color | Brown |
| Dimensions | 10 ft. x 10 ft. |