Do you have a question about the SunnCamp Lodge 200 Motor and is the answer not in the manual?
Choose a flat, smooth, dry location away from wind and sharp objects for awning placement.
Unpack the awning, separate all components, and check for completeness and good condition.
Slot shock-corded pole sections together, ensuring full insertion into adjusting ferrules.
Insert poles into sleeves, secure with clips, and tension poles to bring the awning upright.
Ensure all entrances are closed and zips secured before pegging for proper alignment.
Secure the flysheet to the ground using pegs at a 45-degree angle, hammered in firmly.
Keep a fire bucket handy, note fabric is fire retardant (not proof), and mark trip hazards.
Clean with water/damp cloth only; dry thoroughly after wet pack-up to prevent mildew.
Repairs must be done by manufacturer's agents; unauthorized work voids the warranty.
Site in shade to prevent UV damage; interior moisture is condensation, not leakage.
Do not use BBQs or gas appliances inside due to carbon monoxide poisoning risk.
Reverse erection steps, leave entrance open for air, dismantle poles, and roll carefully.
Suitable for light use in normal weather; not for storms, gales, sub-zero, or tropical conditions.
Covers manufacturing defects for 12 months from purchase; requires proof of purchase.
Excludes wear and tear, misuse, neglect, weather damage, condensation, and unauthorized repairs.
This warranty does not affect your statutory rights.
Report missing or faulty parts before use; return faulty items dry and clean.
This document provides comprehensive instructions and warranty information for the SunnCamp Lodge 200 Motor awning, designed for use with motorhomes or campervans. The manual emphasizes proper setup, maintenance, and safety to ensure the longevity and safe operation of the awning.
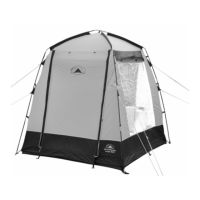
The SunnCamp Lodge 200 Motor is an awning designed to extend the living space of a motorhome or campervan. It provides a sheltered area that can be used for various activities, offering protection from the elements. The awning is constructed with a flysheet, supported by shock-corded poles, and secured to the ground with pegs. It features a main entrance and a rear entrance, the latter designed to be closed when the motorhome/campervan is driven away. The fabric is fire retardant, enhancing safety, though it is not fireproof. The awning is intended for light use in normal weather conditions, providing a comfortable and protected space adjacent to the vehicle.
Pre-Use and Setup: Before initial use, it is a mandatory warranty requirement to unpack and erect the awning at home. This practice allows users to familiarize themselves with the setup process and verify that all parts are present and in good condition. Any missing parts or faults should be reported to a SunnCamp stockist immediately.
Site Selection: The awning should be pitched on flat, smooth, and dry ground. It is recommended to position the awning's main entrance away from prevailing winds. Users should avoid setting up the awning on sharp, rocky, or rough terrain to prevent damage.
Getting Started: Upon arrival at the chosen site, the awning should be unpacked, and the carry-bag stored safely. All components must be separated and checked against the provided list to ensure everything is present.
Pole Assembly: The awning utilizes shock-corded poles. Each pole section must be slotted together, ensuring that the pole body is fully inserted into its adjusting ferrule. These poles are designed to fold down for compact storage.
Awning Erection: The awning should be laid out on the selected ground area with the entrance correctly oriented. Each shock-corded pole is then inserted into its designated sleeve. The awning features two sets of plastic pole clips on each leg, which are secured to the poles to help shape the flysheet. Each pole end is held captive by a pin on a ring, which is part of a webbing strap. This ring also serves as the securing point for the awning peg. To erect the awning, the ring pin is inserted into the end of one pole, then repeated for the other four corners. This action tensions the poles and brings the awning to an upright position.
Entrance Management: Before pegging the awning, all entrances must be fully closed and zipped. Failure to do so will result in the awning being out of alignment when the pegs are inserted.
Awning Pegging: The flysheet is secured to the ground by inserting awning pegs through the designated pegging points. Pegs should be inserted at a 45-degree angle away from the awning. A suitable mallet should be used to hammer the pegs into the ground; pressing them in with a foot is not recommended. All guylines must also be securely pegged out at all times.
Rear Entrance: The awning includes a rear entrance. This entrance should always be closed when the motorhome or campervan is driven away to maintain the awning's integrity and prevent unwanted access or drafts.
Safety Precautions: It is advisable to keep a 'Fire' bucket filled with water outside the awning for emergencies. The awning fabric is fire retardant but not fireproof; therefore, smoking or using naked flames (including traditional campfires) inside or near the awning is strictly prohibited. Guy ropes pose a trip hazard and should be marked clearly to ensure visibility. Awning pegs also present a trip hazard if not fully inserted into the ground.
Dismantling: To dismantle the awning, the erection procedure is simply reversed. It is crucial to leave the entrance open to allow air to escape while rolling up the flysheet. All poles must be dismantled, and the awning should be carefully rolled before being placed back into its carry-bag.
Storm and Weather Suitability: This awning is designed for light use in normal weather conditions. It is not suitable for storms, gales, sub-zero temperatures, or tropical conditions. Using the awning in such conditions may lead to damage and is not covered by the warranty.
Cleaning: Both the interior and exterior of the awning should only be cleaned with fresh, clean water and a damp cloth. Detergents or chemical cleaners should not be used, as they may damage the fabric or coatings.
Storage: The awning is best stored in its original carry-bag. If the awning is dismantled while wet, it is imperative to thoroughly dry it as soon as possible. After a wet pack-up, the awning should be re-erected to allow its flysheet, guy ropes, and carry-bag to fully air dry naturally before repacking. Storing the awning when the flysheet and/or guy ropes are wet will lead to mildew and render the awning unusable. Damage caused by incorrect storage is not covered by the manufacturer's warranty. The valve bodies should be left unscrewed from the air tubes when packing away the awning (if applicable, referring to a separate "VALVES" section for details).
UV Deterioration: Prolonged exposure to direct sunlight can weaken the awning's fabric. To prevent UV deterioration, the awning should be sited in a shaded area, protecting it from strong sunlight. Damage caused by UV degradation is not covered by the warranty.
Moisture and Condensation: Moisture collecting on the inside of the awning is typically condensation caused by the occupants, not a sign of leakage. Damage caused by condensation is not covered by the manufacturer's warranty.
Repairs: Repairs to the awning should only be carried out by agents recommended by the manufacturer. Any repairs performed by an unauthorized third party will void the manufacturer's warranty.
Warranty Information: The SunnCamp Lodge 200 Motor is covered by a Manufacturers Warranty against manufacturing defects for twelve months from the date of purchase. The company undertakes to replace or repair, free of charge, any defect deemed to be due to faulty workmanship or material. Users must retain their receipts and proof of purchase.
Items NOT Covered by Warranty:
Important Note: Any claims regarding missing parts or faulty goods MUST be made before use. The manufacturer is not responsible for claims where the product has not been checked by the user prior to use. If a faulty tent/awning is returned, it must be in a completely dry and clean condition; failure to do so will affect the warranty.
| Brand | SunnCamp |
|---|---|
| Model | Lodge 200 Motor |
| Height | 210 cm |
| UV Protection | Yes |
| Seams | Taped |
| Material | Polyester |
| Depth | 250cm |
| Color | Grey |
| Poles | Steel |