EasyManua.ls Logo

SunnCamp Swift 325 - User Manual

SunnCamp Swift 325
3 pages
Print Icon
To Next Page IconTo Next Page
Loading...
Thank you for purchasing your Awning from SunnCamp. Please read and follow these instructions carefully.
If there is anything you do not understand, please contact your supply retailer for advice.
Awning Flysheet
1
Black Shock Corded
Roof Pole
1
Steel Corner
Adjustable Legs
2
Awning Peg Bag 1
Awning Carry Bag 1
Swift 325, 260 & 220
only Draught Skirt
1
It is a requirement of the warranty that you unpack and erect this awning/canopy at home prior to proper use. This will enable you to familiarise yourself with the
awning/canopy and cheek all parts are present and in good condition. If you find a part missing or a fault with your awning/canopy, contact your SunnCamp stockist
for advice.
SITE SELECTION
Choose a location where the ground is flat,
smooth and dry. Attempt to position the
awning/canopy entrance away from the
directions of any wind. Do not position on sharp,
rocky or rough ground.
GETTING STARTED
Unpack the awning/canopy and place the carry-
bag somewhere safe. Separate all components
and check that everything is present.
AWNING/CANOPY FLYSHEET
Lay the awning/canopy flysheet out on the
selected ground area with the entrance
correctly positioned.
POLES
The black shock corded pole is folded down to
aid storage. When fitting the pole sections
together, make sure that the pole body is fully
inserted into its adjoining ferrule. Next, slot the
steel corner leg poles together. Make sure that
the quick lock bracket is released to allow for
adjustment. Take the black shock corded pole
and slot together. Insert it into the roof sleeve
and connect a leg to either end. Each leg end
slots onto a pin on a ring. The pin and ring are
attached both to an adjustable strap running
from the awning/canopy canvas and to a
spacing strap. The spacing strap runs between
both legs to ensure correct spacing. The
spacing strap may become a trip hazard when
erection is complete and should be ‘pinned
down’ along its length. The ring is also used as
the securing point for the awning/canopy peg.
Starting with one pole, insert the ring pin into
the end of the pole. Next, go to the other end
and insert the ring pin. Extend the end leg
section to bring the pole under tension then
close the quick lock bracket. You can now
attach the pole clips into each pole to bring the
awning/canopy flysheet into the correct shape.
Bring the awning/canopy to an upright position
by pegging out the front guy ropes. (These may
need to be re-pegged at a later stage).
ENTRANCE 325, 260 & 220 AWNING
ONLY
You should now ensure that all entrances to the
awning are closed with all zips fully secured. If
this is not done now, the awning will be out of
alignment when fitting the awning pegs.
AWNING PEGS
Starting with the four corner tags, secure the
awning/canopy to the ground using the awning
pegs. The two rear corner pegging points
should be pegged first followed by the front two
corner pegging points to obtain the correct
awning shape. Peg all remaining pegging points
remembering to cross any zip door opening
points. When inserting into the ground, the peg
should be set at a 45-degree angle away from
the awning/canopy. Pegs should be hammered
into the ground using a suitable mallet NOT
pressed in with the foot.
Most bent pegs are caused by using your foot
rather than a mallet.
GUY ROPES
Secure each guy rope, positioning its peg at a
suitable distance from the awning/canopy. Once
in position, tighten the ropes equally to bring the
awning/canopy to its natural shape. DO NOT
over tighten. To tighten, hold the rope above the
slider and pull the slider up. To release, hold the
rope above the slider and pull the slider down.
Remember that all guy ropes are a trip hazard,
especially in the dark.
FRONT ENTRANCE
The front entrance is single skinned and can be
rolled out of the way or can be raised to create
a porch. Your SunnCamp stockist can supply,
as an additional item, a set of porch poles that
simply slot together.
When used as a porch, insert the spike end of
the porch poles into the eyelet’s at the
entrance’s two corner pegging points, then hook
a guy rope over the spike and secure to the
ground with a peg. Adjust each guy rope
tension to bring the porch square. When closed,
the zip cover/baffle must be carefully secured
into place, ensuring the Velcro tabs are aligned
and the skirt correctly positioned, secured by
awning pegs, to avoid water ingress should it
rain.
SIDE ENTRANCE 260 & 220 ONLY
The side entrances are single skinned and can
be rolled back and retained by a set of loops
and toggles.
When closed, the zip cover/baffle must be
carefully pressed into place ensuring the Velcro
tabs are aligned and the skirt correctly
positioned, secured by awning pegs, to avoid
water ingress should it rain.
SIDE ENTRANCE 325 ONLY
The awning’s two side doors have a secondary
mesh panel allowing the door to be fully open to
provide ventilation whilst keeping insects out.
Both the solid outer door and the inner mesh
door can independently be rolled to the side
and secured with toggle and loop fixings. When
closing any of the doors ensure that the zips are
fully secured and the protective flap is in place
and secured by the velcro tabs to prevent water
ingress. When not is use doors should also be
fully pegged.
WINDOWS 325, 260 & 220 AWNING
ONLY
All windows have curtains, which can be closed
and are secured in place with Velcro tape.
When open, carefully roll the curtain and secure
with toggle and loop.
WEATHER SKIRT 325, 260 & 220
AWNING ONLY
Once the awning has been fully erected, check
that the weather skirting, to the base of the
awning, is correctly laid to help prevent water
ingress. These can be secured in place using
elasticated pegging points.
ADJUSTABLE REAR WEATHER PAD
POLES 325, 260 & 220 ONLY
1. These are an optional extra and can be
purchased from your SunnCamp stockist.
Please quote product code DT0052.
2. Rear weather pad poles should be located
into the pockets at the top rear corner of the
awning canvas.
GROUND SHEET
The awning/canopy is not supplied with a
ground sheet, however we advertise the use of
a breathable ground sheet. A full range of
suitable ground sheets are available from your
SunnCamp stockist.
Question and Answer IconNeed help?

Do you have a question about the SunnCamp Swift 325 and is the answer not in the manual?

Summary

Site Selection and Preparation

Site Selection

Choose a flat, smooth, and dry location away from wind and sharp ground.

Getting Started

Unpack, separate components, and check all parts are present and in good condition.

Awning Setup and Components

Awning Flysheet and Poles

Lay out the flysheet and assemble the shock-corded and steel corner poles.

Pegging and Guy Ropes

Secure the awning with pegs, starting with corners, and adjust guy ropes.

Entrances and Access

Instructions for front and side entrances, including porch options.

Windows and Weather Skirt

Details on window curtains and securing the weather skirt.

Optional Accessories

Information on adjustable rear weather pad poles and ground sheets.

Safety and Maintenance

General Safety Precautions

Advice on fire safety, marking guy ropes, and avoiding trip hazards.

Cleaning and Storage

Proper cleaning methods and ensuring the awning is dry before storage.

Storm and Weather Suitability

Awning is for light use; not suitable for storms, gales, or extreme conditions.

Moisture and Seams

Understanding condensation vs. leaks and seam sealing.

Dismantling

Reverse the erection procedure for dismantling.

Safety Warning: BBQs;Gas Appliances

Warning against carbon monoxide poisoning and using BBQs inside.

Warranty Information

Manufacturers Warranty Coverage

Twelve-month warranty against manufacturing defects.

Items Not Covered by Warranty

Exclusions include wear and tear, misuse, storm damage, and pole breakages.

Statutory Rights and Claims

Note on statutory rights and requirement to check for parts before use.

Overview

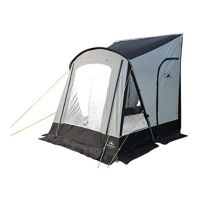
This document describes the SunnCamp Swift 325 / Swift 260 Dlx / Swift 220 Dlx & Swift Canopy, a range of awnings and canopies designed for light use in normal weather conditions.

Function Description

The SunnCamp Swift range provides an extendable shelter solution for recreational vehicles, offering additional living or storage space. These awnings and canopies are designed to be erected alongside a vehicle, creating a protected area. The Swift 325, 260, and 220 models are awnings, while the "Swift Canopy" refers to a simpler canopy structure.

The primary function is to offer shelter from the elements, with features like a flysheet, pole structure, and pegging points to secure it to the ground. Specific models, like the Swift 325 awning, include secondary mesh panels on side doors for ventilation while keeping insects out. Curtains are provided for windows on awning models (325, 260, 220) for privacy. A draught skirt is included with the Swift 325, 260, and 220 awnings to help prevent drafts.

The front entrance of all models is single-skinned and versatile, capable of being rolled away or raised to create a porch using optional porch poles. Side entrances on the 260 and 220 models are also single-skinned and can be rolled back and secured. The Swift 325 awning features two side doors with secondary mesh panels, allowing for independent rolling and securing of both the solid outer door and the inner mesh door.

Important Technical Specifications

The product comes with a list of components:

  • Awning Flysheet: 1 unit
  • Black Shock Corded Roof Pole: 1 unit
  • Steel Corner Adjustable Legs: 2 units
  • Awning Peg Bag: 1 unit
  • Awning Carry Bag: 1 unit
  • Swift 325, 260 & 220 only Draught Skirt: 1 unit

The poles are constructed with a black shock-corded roof pole and steel corner adjustable legs. The flysheet fabric is fire retardant, though not fireproof. All main seams are hot air taped to prevent leakage.

The product is covered by a Manufacturers Warranty for twelve months against manufacturing defects. However, the warranty explicitly excludes general wear and tear, defects from neglect, misuse, unauthorized modifications, damage from storms, winds, or other inclement weather, damage from abuse, dropping, or failure to follow instructions, moisture from condensation, leakage from damaged seam sealant tape, seams coming apart from over-tensioning, broken or damaged zips, broken buckles, damaged carry bags from overloading or misuse, all pole breakages (considered perishable), collateral damage from pole breakage, incorrect pitching or dismantling, damage from cooking inside, UV degradation, unauthorized alterations, and transportation costs for warranty claims. Awnings/tents used on permanent sites or commercial use are also excluded from warranty.

Usage Features

Site Selection:

  • Choose a flat, smooth, and dry location.
  • Position the entrance away from wind.
  • Avoid sharp, rocky, or rough ground.

Getting Started & Erection:

  • Unpack all components and check for presence and condition.
  • Lay the flysheet out with the entrance correctly positioned.
  • Assemble the black shock-corded pole by fully inserting sections into ferrules.
  • Slot steel corner leg poles together, ensuring quick lock brackets are released for adjustment.
  • Insert the shock-corded pole into the roof sleeve and connect legs to each end, with leg ends slotting onto a pin on a ring.
  • The pin and ring are attached to an adjustable strap from the canvas and a spacing strap between legs for correct spacing.
  • The spacing strap should be pinned down to prevent it from being a trip hazard.
  • Extend the end leg section to create tension and close the quick lock bracket.
  • Attach pole clips to bring the flysheet into shape.
  • Bring the awning/canopy upright by pegging out the front guy ropes.
  • For Swift 325, 260 & 220 awnings, ensure all entrances are closed and zips fully secured before pegging to maintain alignment.

Pegging:

  • Start with the four corner tags, pegging the two rear corners first, then the two front corners to achieve the correct shape.
  • Peg remaining points, remembering to cross any zip door openings.
  • Insert pegs at a 45-degree angle away from the awning/canopy.
  • Use a suitable mallet; do not press pegs in with your foot to avoid bending them.

Guy Ropes:

  • Secure each guy rope, positioning its peg at a suitable distance.
  • Tighten ropes equally to bring the awning/canopy to its natural shape; do not overtighten.
  • To tighten, hold the rope above the slider and pull the slider up. To release, hold the rope above the slider and pull the slider down.
  • Be aware that guy ropes are a trip hazard, especially in the dark.

Entrances:

  • Front Entrance: Single-skinned, can be rolled away or raised to create a porch. Optional porch poles can be purchased separately.
  • When used as a porch, insert the spike end of porch poles into the eyelets at the entrance's two corner pegging points. Hook a guy rope over the spike and secure to the ground with a peg. Adjust guy rope tension to square the porch.
  • When closed, the zip cover/baffle must be carefully secured, aligning Velcro tabs and correctly positioning the skirt, secured by awning pegs, to prevent water ingress.
  • Side Entrance (260 & 220 ONLY): Single-skinned, can be rolled back and retained by loops and toggles. When closed, secure zip cover/baffle, align Velcro tabs, and position skirt correctly, secured by awning pegs, to prevent water ingress.
  • Side Entrance (325 ONLY): Two side doors with secondary mesh panels for ventilation. Both solid outer and inner mesh doors can be rolled to the side and secured with toggle and loop fixings. When closing, ensure zips are fully secured and the protective flap is in place, secured by Velcro tabs, to prevent water ingress. When not in use, doors should be fully pegged.

Windows (325, 260 & 220 AWNING ONLY):

  • All windows have curtains, secured with Velcro tape when closed.
  • When open, carefully roll the curtain and secure with toggle and loop.

Weather Skirt (325, 260 & 220 AWNING ONLY):

  • Once erected, ensure the weather skirting at the base is correctly laid to prevent water ingress.
  • Secure with elasticated pegging points.

Adjustable Rear Weather Pad Poles (325, 260 & 220 ONLY):

  • Optional extra (product code DT0052).
  • Located in pockets at the top rear corner of the awning canvas.

Ground Sheet:

  • Not supplied with the awning/canopy.
  • Breathable ground sheets are recommended and available from SunnCamp stockists.

Dismantling:

  • Reverse the erection procedure.
  • Dismantle all poles.
  • Carefully roll the awning before placing it back in the carry-bag.

Maintenance Features

Safety:

  • Keep a 'Fire' bucket filled with water outside the awning/canopy.
  • Do not smoke or use naked flames (including traditional campfires) in or near the awning/canopy.
  • Mark guy ropes to make them visible and prevent trip hazards.
  • Ensure awning pegs are fully inserted into the ground to avoid trip hazards.
  • BBQ's/Gas Appliances: Do not use or leave a used BBQ (even if you think it is not burning) in your awning or tent due to the risk of carbon monoxide poisoning.

Cleaning:

  • Clean both inside and outside of the awning/canopy using only fresh, clean water and a damp cloth.
  • Do not use detergents or chemical cleaners.

Storage:

  • Store the awning/canopy in its original carry-bag.
  • If dismantled wet, thoroughly dry the awning/canopy as soon as possible to prevent mildew.
  • After a wet pack-up, re-erect the awning/canopy as soon as possible and allow the flysheet, guy ropes, and carry-bag to fully dry naturally before repacking.
  • Damage from incorrect storage (e.g., storing while wet) is not covered by the manufacturer's warranty.

Repairs:

  • Repairs should only be made by the manufacturer's recommended agents. Unauthorized third-party repairs will void the warranty.

Storm and Weather Suitability:

  • Designed for light use in normal weather conditions. Not suitable for storms, gales, sub-zero, or tropical conditions.

UV Deterioration:

  • Prolonged exposure to direct sunlight can weaken the fabric.
  • To avoid UV deterioration, site the awning/canopy in a shaded area.

Moisture (Condensation):

  • Moisture collecting on the inside is condensation caused by occupants, not leakage.
  • Damage caused by condensation is not covered by the manufacturer's warranty.

Seams:

  • Main seams are hot air taped to prevent leakage.
  • Remaining seams should be treated with a seam sealant to maximize weatherproofing.
  • Apply seam sealant to main seams where tape has lost adhesion or been damaged (e.g., tie points or suspension points).
  • Seam sealant is available from SunnCamp stockists.

Warranty Claims:

  • Ensure receipts and proof of purchase are retained.
  • Any claim(s) arising due to missing parts or faulty goods MUST be made before use.
  • The manufacturer is not responsible for claims regarding missing parts or faulty items if the product has not been checked by the user prior to use.
  • If returning a faulty tent/awning, it must be sent in a completely dry and clean condition; failure to do so will affect the warranty.

SunnCamp Swift 325 Specifications

General IconGeneral
BrandSunnCamp
ModelSwift 325
CategoryTent
LanguageEnglish

Related product manuals