- 3 -
Inserting batteries
Using a small screwdriver or similar probe, push down
through the hole in the top of the thermostat until some
resistance is felt, then pull forward to split the front of the
thermostat from the backplate.
Insert 2 X AA batteries into the thermostat, observing
correct polarity. When the power is applied for the first
time, the display must show,Time, Day, Room
temperature, P1 and a Sun symbol. If not, press reset
button until the above display appears.
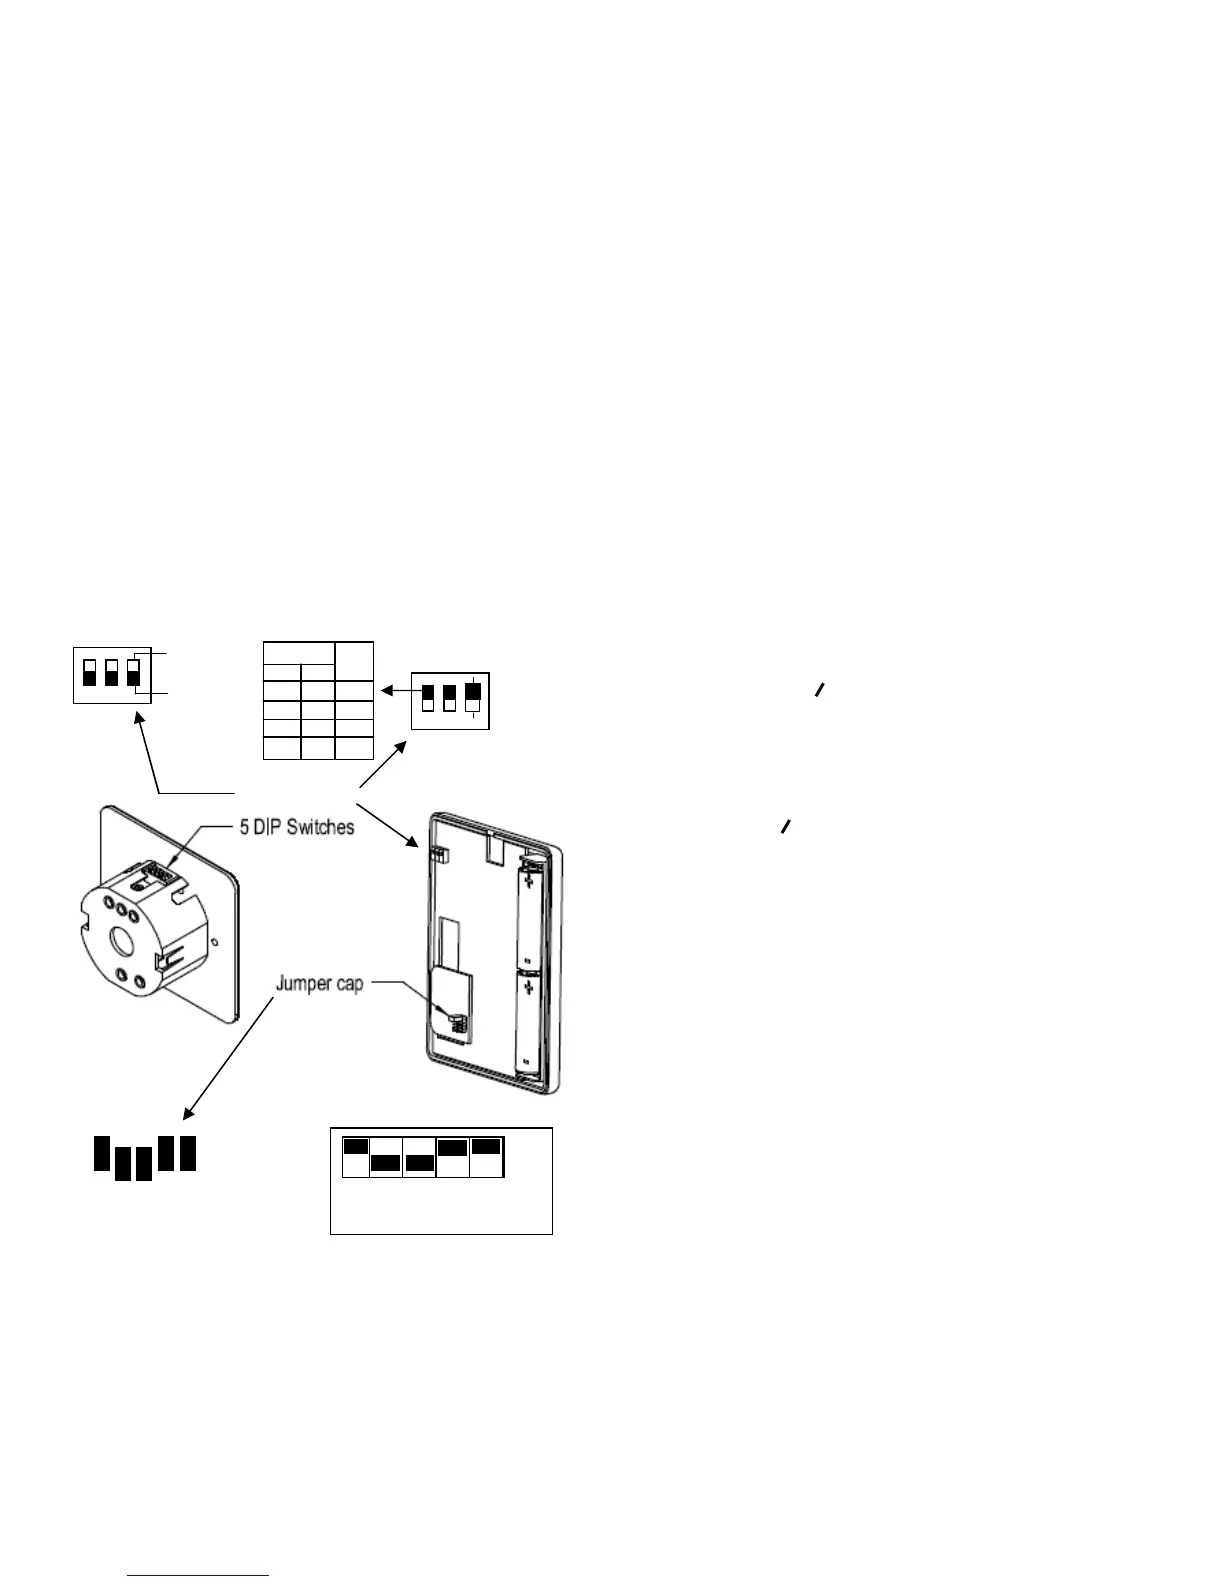
Heater/Cooler selection
Mounted on the left hand side and above centre of the
thermostat PCB are three DIP switches, these are used
to control the differential and the heat/cool system.
The switches must be set before the batteries are
installed. For Heating, switch number 3 must be in the
ON position. For Cooling, switch number 3 must be in the
OFF position. To change from heater to cooler and vice
versa, the batteries must be removed, and the display
cancelled, the reset button must be pressed when the
batteries are re-installed.
Differential setting
Differential is the difference between the unit
switching OFF and switching back ON again. For
example, with a 1ºC differential, if the ‘stat Switches OFF
at 20ºC, it will drop back 1ºC and then switch back ON
again.
RF Address code setting (See Fig. 1 )
Switch off power to the receiver and remove batteries
from thermostat.
To set the address code, remove at least two of the
‘jumpers’ on the thermostat pcb. (park the ‘jumpers’ on
one of the jumper legs). Where a ‘jumper’ is removed, the
corresponding DIP switch on the receiver must be moved
to the OFF position. Replace batteries into the receiver
and press the reset button. Switch on the power to the
receiver. Set the thermostat to demand heat. The rotating
icon will appear on the display to indicate heating
demand and the green light will illuminate on the
receiver. On initial set up, it may take up to two minutes
for this to appear. In a cooling application, it may take up
to four minutes for the icon to appear initially.
SETTING CONTROL TEMPERATURE
1. Press the button to display the set
temperature.
2. Press the / button to toggle between
economy and comfort modes.
3. Press the ▲ or ▼ buttons to change the set
temperature by 0.5ºC increments.
4. Press again to save the set temperature.
5. The unit will return to normal operating mode if
no key is pressed for 10 seconds.
6. The default setting for comfort mode is 21ºC for
heater, and 23ºC for cooler
The economy mode is 18ºC for heater, and 26ºC
for cooler.
The blacked out portion above the numbers indicates
when the thermostat is in 'Comfort' mode and the clear
spaces indicate 'Economy’ mode.
Having set the day number/numbers, press 'P' , and a ‘P’
number will flash at the bottom of the display. Again
using the buttons with the triangles, step through to the
pre-set programmes to select one of these if they are
suitable for your requirements.
USER DEFINED PROFILES
Press ‘P’ and a number will flash at the top of the screen.
If using the 24 Hr set up, then using either of the keys
showing a triangle on it or keep pressing it until all of
the numbers 1,2,3,4,5,6 & 7 are displayed, then follow
setting up procedure as below.
If you are using the 5/2 day set up, press P for the
flashing number at the top of the screen, then using
either of the keys showing a triangle on it keep pressing it
Off cooler
1 2 ºC
On On 1
Off On 2
On Off 3
Off Off 4
1,2 & 3 On (heating)
3 DIP switches
Fig. 1
1 2 3 4 5
 Loading...