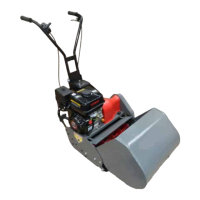
This document is an operator's manual for a SupaSwift Reel Mower, available in 17" and 20" cutting widths. It provides comprehensive instructions for the safe operation, assembly, maintenance, and troubleshooting of the reel mower.
Function Description:
The SupaSwift Reel Mower is designed for cutting grass, providing a precise and clean cut characteristic of reel mowers, which is ideal for achieving a manicured lawn finish. It operates by using a rotating reel with multiple blades that shear the grass against a fixed bottom blade. The mower is powered by an internal combustion engine, allowing for self-propelled operation. It features a grass catcher to collect clippings and various adjustable settings to optimize cutting performance.
Important Technical Specifications:
- Model No.: SSU420ACM
- Cut Size: 20" (508 mm) (also available in 17")
- Engine Oil: SAE 30 Engine Oil
- Fuel: Unleaded fuel
- Drive Cable Adjustment: Features a lock nut (A) and adjustment screw (B) for precise control.
- Blade Drive Chain Adjustment: Allows for 5-6mm up and down movement in the chain.
- Clutch and Drive Wheel Chains Adjustment: Allows for 5-6mm up and down movement in the chain.
Usage Features:
Safety Instructions:
- Always wear protective footwear, long pants, and never wear thongs or sandals.
- Read the instruction manual prior to use and understand controls.
- Keep well clear of blade.
- Stay alert; watch what you are doing and use common sense.
- DO NOT use the mower while tired or under the influence of drugs, alcohol, or medication.
- Always stop the engine and disconnect the spark plug lead before working on the machine.
- Make sure the lawn is clear of loose debris, wire, etc. before using the mower.
- Check all nuts, bolts, and screws and tighten if necessary.
- Do not use the machine near people or pets (15 meters).
- Refuel outside only. Do not refuel near naked flames or people smoking. Always add fuel before starting the machine, not whilst it is running or if the engine is hot. If fuel is spilled, move the machine away from the area of spillage and wait until the fuel has evaporated before starting.
- Avoid excessive noise by replacing worn or faulty silencer.
- Only use the mower when adequate lighting is available.
- Start the engine carefully, ensuring all body parts are clear of the blade or chains.
- Ensure the machine is held firmly when starting as described in the "starting" section.
- Never operate the machine in an enclosed space where exhaust fumes can collect.
- Never leave the machine running or unattended; always stop the machine.
- Not to be used by children or inexperienced operators.
- Store the machine in a well-ventilated room away from naked flames.
- Store fuel only in an approved container in a cool area.
- Should the mower vibrate ABNORMALLY, stop the engine, disconnect the spark plug, and inspect the machine.
- Always stop the engine when moving the machine from one area to another. Never push the mower across paths or driveways whilst it is running.
- Improper use of this machinery can cause injury or property damage. Read the instructions thoroughly before operating this machine.
- Follow instructions carefully to avoid damage and possible loss of warranty.
Getting Started:
- Ensure the mower is on level ground.
- Fill the oil to the top of the crankcase with SAE 30 Engine Oil.
- Fill the fuel tank with Unleaded fuel.
- Check spark plug cap is connected.
- Inspect all nuts, bolts, and screws and tighten if required.
- Fit the catcher by hooking its base over the support studs on the mower body.
Starting the Mower:
- Ensure the engine switch is "ON".
- Slide the throttle to the Turtle position.
- Slide the choke (A) to the "ON" position.
- Slide the fuel (B) to the "ON" position.
- Place the left hand on the handle and pull the starter handle with the right hand.
- After successfully starting the engine, slide the choke (A) to the "OFF" position.
Mowing:
- Lift the blade driver lever to engage the position.
- Squeeze the hand clutch to commence the rear drive roller.
- Slide the throttle to the Rabbit position.
Stopping:
- Slow the engine RPM back to Turtle on the throttle control.
- Release the hand clutch.
- Disengage the blade driver lever.
- Turn the engine switch "OFF".
- Turn the fuel off.
Fitting and Emptying the Catcher:
- Ensure the engine is stopped prior to removing the catcher.
- The grass catcher is fitted by holding the top of the drum and hooking the bottom section to the locating pegs (A). The catcher then sits on the rubber stops (B) either side of the chassis.
- To remove the catcher, disengage the blade driver lever and stop the engine.
- Lift the catcher from the top section and empty.
Grass Deflector Adjustment:
- The angle of the grass deflector can be adjusted to direct the flow of cut grass into the catcher.
- Loosen thumbscrews, move the deflector up or down to alter the direction of flow, and then re-tighten the thumbscrews.
Cutting Height Adjustment:
- The cutting height is adjusted with the front roller adjustment knob.
- Turn the knob clockwise to raise the cutting height.
- Turn the knob anti-clockwise to lower the cutting height.
Blade Setting and Adjustment:
- It may be necessary to reset the blade after continued use. The rotating blade should be correctly adjusted when it is lightly touching the bottom blade.
- Checking the Blade Setting: Empty the fuel tank, ensure the engine is switched off and the spark plug lead is disconnected, tilt the mower back on its handles, slip a piece of paper between the rotational blade and the bottom blade, turn the rotational blade. If the blade cuts the paper, it is adjusted correctly. Repeat the process at several points along the blade.
- Blade Adjustment: Loosen bolts on both sides of the mower, loosen nuts on the bottom of the adjustment screw, turn the adjustment screw on both sides to cause the rotational blade to make contact with the bottom blade. The blade must only 'just' make contact, whilst still allowing it to rotate freely. Re-tighten nuts and bolts. Test the cutting action with paper as previously described. If the paper is not cut satisfactorily, the cylinder may need to be sharpened.
Maintenance Features:
Engine Maintenance:
- Check the oil levels on the engine regularly. Refer to the owner's manual for specific instructions.
General Maintenance:
- Regularly check and tighten all nuts and screws to ensure the mower remains secure and safe.
- Remove grass from around the bearings on the blade shaft to prevent blockages and ensure smooth operation.
Blade Drive Chain Adjustment:
- Remove the chain cover screws.
- Loosen the lock nut.
- Push the nylon chain adjusted up until there is a 5-6mm up and down movement in the chain.
- Re-tighten the lock nut.
Clutch and Drive Wheel Chains Adjustment:
- Loosen the two lock nuts.
- Slide the large sprocket upwards until the chain has 5-6mm up and down movement.
- Re-tighten the lock nuts.
Lubrication:
- Apply oil to the clutch (1).
- Apply oil to the front roller (2) shaft.
- Apply oil to the height adjuster knob (3) thread.
Handle Adjustment:
- Remove the chain cover.
- Loosen four bolts on the lower handle.
- Adjust the handle to the required height (up or down).
- Re-tighten the handle bolts and re-install the chain cover.
Drive Cable Adjustment:
- Loosen lock nut-A and adjust screw-B in or out for adjustment.
- The engine warranty may differ from other components; refer to the engine owner's manual.
- For other items, the warranty period is 4 years for domestic use and 90 days for commercial use and hire.
- The warranty does not cover transport costs, fair wear and tear, or damage from misuse/abuse. Parts like blades, blade bolts, V-belts, and spark plugs are excluded.
- The warranty is void if non-genuine parts are used or if repairs/alterations are made without manufacturer's written authority.
- Under Australian Consumer Law, goods come with guarantees for replacement/refund for major failure and compensation for foreseeable loss/damage, or repair/replacement if the goods fail to be of acceptable quality but not a major failure.
- Proof of purchase is required for warranty work. Repairs must be carried out by an authorized dealer/agent using genuine spare parts to maintain warranty validity.
- The manufacturer reserves the right to make product changes and improvements without notice or obligation and to discontinue manufacturing products at its discretion.