• 6 •
OPERATING INSTRUCTIONS
IMPORTANT: Do not start the vehicle with the charger connected to the AC
outlet, or it could damage the charger.
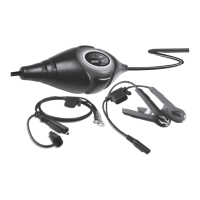
CHARGING A BATTERY IN THE VEHICLE
1. Turn off all the vehicle’s accessories.
2. Keep the hood open.
3. Clean the battery terminals.
4. Place the charger on a dry, non-ammable surface.
5. Lay the AC/DC cables away from any fan blades, belts, pulleys and other
moving parts.
6. For a negative-ground vehicle (as in most vehicles), connect the
charger’s POSITIVE (RED) clamp to the POSITIVE (POS, P, +) battery
post. Next, connect the charger’s NEGATIVE (BLACK) clamp to the
vehicle chassis or engine block, away from the battery.
7. For a positive-ground vehicle, connect the charger’s NEGATIVE (BLACK)
clamp to the NEGATIVE (NEG, N, -) battery post. Next, connect the
charger’s POSITIVE (RED) clamp to the vehicle chassis or engine block
away from the battery. NEVER connect any clamps to the carburetor, fuel
lines or sheet-metal body parts.
8. Connect the charger to an electrical outlet. The AC POWER (red) LED
will light.
9. If you’ve connected everything correctly, the CHARGING
(
yellow/
orange) LED should be lit, indicating that the charger is charging, and the
AC POWER (red) LED will go off. If the CHARGING
LED does not
light, check the connections or have the battery checked/replaced.
10. When the battery is fully charged, the CHARGED/MAINTAINING
(green)
LED will pulse.
11. When charging is complete, disconnect the charger from the AC power,
remove the clamps from the vehicle’s chassis, and then remove the clamp
from the battery terminal.
CHARGING A BATTERY OUTSIDE OF THE VEHICLE
1. Place battery in a well-ventilated area.
2. Clean the battery terminals.
3. Connect a 24-inch long, 6-gauge (AWG) insulated battery cable to the
NEGATIVE (NEG, N, -) battery post (i.e., jumper cable) (not provided).
4. Connect the POSITIVE (RED) clamp to the POSITIVE (POS, P, +) battery post.
5. Position yourself and the “negative post extension” cable as far away
from the battery as possible, and connect the NEGATIVE (BLACK) clamp
to the cable’s free end.