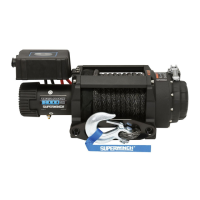
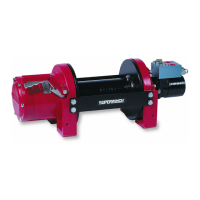
The Superwinch Tiger Shark 66.7kN EN 24V Winch (P.N.: 75-1518100-RevB) is a heavy-duty winching device designed for vehicle recovery and load pulling applications. This manual provides detailed instructions for installation, operation, and maintenance, emphasizing safety throughout.
Function Description:
The Superwinch Tiger Shark 66.7kN EN 24V Winch is an electrically powered winch used to pull loads. It operates by winding a rope onto a drum, generating significant pulling force. The winch is designed for underwound rope installation, meaning the rope is routed underneath the winch drum. It features a free-spool operation for quickly pulling out the rope without using motor power, and a clockable gearbox for flexible mounting options and easier clutch handle access. The wired remote control allows for safe operation from a distance, controlling both "winch in" and "winch out" functions.
Important Technical Specifications:
- Model: 1518100: Tiger Shark 66.7kN EN 24V Winch
- Motor: Series wound 6.8hp/5.0kw, 24V DC
- Gear Ratio: 345:1
- First Layer Rated Line Pull: 66.7 kN
- Drum Diameter: 127mm
- Drum Length: 212mm
- Dimensions:
- Overall Length: 619mm
- Overall Height: 308mm
- Overall Width: 264mm
- Mounting Bolt Pattern (approximate): 229mm x 135mm, 255mm x 171mm, 255mm x 114mm (refer to diagram for exact measurements)
- Hardware: Utilizes M6 and M12 hex head bolts, split lock washers, flat washers, and hex nuts for mounting and assembly.
Usage Features:
Installation:
- Unpacking and Inspection: Carefully remove all contents from the box and verify that all parts are present and free from damage. The control box will be loose during initial removal.
- Control Box Installation: The control box is installed using supplied M6 hardware (items 14-16). It slides onto the drum support and beneath the tie bar bracket, then secured with M6 socket head bolts, split lock washers, and flat washers.
- Winch Mounting: A heavy-duty winch mount/bumper rated for the vehicle's weight and the winch's pulling power is required. Spacers (item 7) are placed between the drum supports and the winch mount. The winch is then loosely assembled to the mounting location using supplied M12 hardware. Medium M12 bolts (item 9) are used for the inner bolt pattern, and long M12 bolts (item 8) for the outer bolt pattern.
- Torque Specifications: M12 bolts must be torqued to 50-55 ft-lbs. All stainless steel fasteners require anti-seize lubricant to prevent thread damage and galling.
- Fairlead Installation: The roller fairlead (item 3) is mounted to the winch plate or bumper using supplied M10 hardware.
- Wiring: The red battery cable connects to the positive terminal, and the black battery cable connects to the bottom of the motor side and then to the battery's ground terminal. Cables must be routed away from hot spots or sharp edges.
- Remote Control: The wired remote (item 4) plugs into the control box. It has "OUT" (winch out) and "IN" (winch in) buttons and a strap loop for storage.
Rope Installation (Rope Not Included):
- Rope Routing: The winch rope is routed underneath the winch drum, over the top, through the first drum hole, around the drum, and through the second drum hole on the right.
- Securing Rope: Once the rope is in place, tighten the set screws to secure it to the drum.
- Underwound Operation: The rope must be routed under the winch (underwound) to prevent damage.
- Fairlead Connection: Pull the cable through the fairlead and connect the hook to the fairlead using a clevis pin and cotter pin.
- Tensioning: Connect the hook to a tow point or shackle on the vehicle, winch in until the rope is tight, and rotate the hook to sit flush on the fairlead.
- Hand Saver Strap: Install the hand saver strap on the hook.
Free-Spool Operation:
- Ensure No Tension: Verify there is no tension on the rope or clutch.
- Disengage Clutch: Lift the safety latch and flip the clutch lever towards the front of the winch.
- Pull Cable: Use the supplied hand saver to pull out the cable as needed.
- Engage Clutch: Once the cable is spooled to the desired position, flip the clutch lever back to the engaged position and close the safety latch to re-engage the winch.
Clocking the Gearbox:
The gearbox can be rotated ("clocked") every 30 degrees or through every bolt hole for optimal clutch handle access.
- Disconnect Power: Disconnect the winch from the power supply.
- Free-Spool Position: Flip the clutch handle to the free-spool position.
- Remove Bolts: Remove the 11 M6 bolts attaching the gearbox cover, ensuring the cover does not fall.
- Rotate Gearbox: Carefully rotate the gearbox to the desired position without removing it.
- Secure Bolts: Secure the M6 hardware back into place and torque to 7-8 ft-lbs. Ensure the gasket is properly lined up.
Winching Operations (Safety Guidelines):
- Read Manual: Always read the owner's manual before operation.
- Safety Gear: Wear personal protection gear, including heavy protective gloves and safety glasses or goggles.
- Handsaver Strap: Always use a handsaver strap.
- Clearance: Keep clear of the winch, rope, and load during operation.
- Hook Seating: Properly seat the load in the throat of the hook; never apply load to the hook tip or latch.
- Anchor Points: Use a shackle or strap when attaching the hook to an anchor point. Ensure the anchor point is solid and will withstand the load.
- Straight Pulls: Aim for straight pulls to prevent damage to the winch or rope.
- Winch Dampener: Use a winch dampener (blanket or heavy jacket) over the rope to direct energy to the ground in case of rope breakage.
- Rope Condition: Never allow the rope to chafe against sharp edges. Inspect the rope/cable before each use and replace if damaged.
- Minimum Wraps: Never operate with less than 5 turns of wire rope or 8 turns of synthetic rope around the drum.
- Free-Spool Safety: Never disengage free-spool while the winch is under load.
- Load Capacity: Never exceed the winch's rated capacity.
- Mounting: Mount the winch so the rope feeds through the fairlead parallel to the mounting surface and does not rub against the housing or base.
- Electrical Safety: Be aware of electric shock and fire/burn hazards.
- Moving Parts: Be cautious of moving parts and sharp edges.
- No Hoisting/Securing: Never use the winch as a hoist or to secure a load in place during transport.
- No Personnel Lifting: Never use the winch to lift or move people.
- No Overwinding: Never wind rope over the top of the drum.
- Explosion Risk: Be aware of the risk of explosion.
Maintenance Features:
Troubleshooting Guide:
The manual includes a comprehensive troubleshooting guide for common issues:
- Motor will not operate or runs in one direction only:
- Possible Causes: Bad connections/broken wires, damaged/stuck solenoid, inoperative handheld switch, damaged motor, ungrounded solenoid, weak/dead battery.
- Corrective Actions: Check and clean all wiring, replace damaged wires, check handheld controller, tap solenoid to free stuck contacts, apply voltage to solenoid terminals, replace switch, repair/replace motor, check ground path, recharge/replace battery.
- Winch will not shut off:
- Possible Cause: Solenoid stuck "on."
- Corrective Action: Reverse direction and hold trigger switch until power lead can be disconnected.
- Motor runs extremely hot:
- Possible Causes: Long period of operation, damaged motor, damaged brake.
- Corrective Actions: Allow to cool, repair/replace motor, repair/replace brake.
- Motor runs but with insufficient power or line speed:
- Possible Causes: Weak battery, battery to winch wire too long, poor battery connection, poor ground, damaged brake.
- Corrective Actions: Recharge/replace battery (consider dual battery setup), use larger gauge wire, check/clean battery terminals, check/clean connections, repair/replace brake.
- Motor runs but drum does not turn:
- Possible Cause: Free-spool not engaged.
- Corrective Action: Engage free-spool.
- Winch runs backwards:
- Possible Causes: Motor wires reversed, solenoid wired incorrectly, winch rope overwound.
- Corrective Actions: Recheck wiring, re-wrap rope underwound.
- Will not hold load:
- Possible Causes: Excessive load, worn/damaged brake.
- Corrective Actions: Reduce load/double line, repair/replace brake.
General Maintenance:
- Fasteners: All Superwinch supplied fasteners must be installed and torqued to specifications. Double-check all fasteners before initial use and periodically thereafter.
- Anti-Seize: Use anti-seize lubricant on all stainless steel fasteners to prevent thread damage and galling.
- Cable Care: Ensure the cable is not kinked or coiled up. Uncoil as necessary to prevent damage.
- Hook Storage: Secure the hook to its stowed position (shackle or tow hook) and jog the winch in slowly until the cable is snug. Do not attach the hook to any part of the winch itself.
This comprehensive guide ensures safe and effective operation and maintenance of the Superwinch Tiger Shark 66.7kN EN 24V Winch.