EasyManua.ls Logo

Suzuki MDG-100 - User Manual

Suzuki MDG-100
8 pages
Print Icon
To Next Page IconTo Next Page
Loading...
IF YOU HAVE ANY QUESTIONS OR PROBLEMS,
DO NOT CALL OR RETURN PRODUCT TO THE STORE
Visit www.suzukipianos.com
CALL THIS TOLL FREE HELP LINE
STOP!
DO NOT ASSEMBLE YOUR PIANO
BEFORE READING THIS GUIDE!
1
8OO
854
1594
Easy
Assembly
Guide
The Name You Know
Micro Digital Grand Piano
MDG-100
Question and Answer IconNeed help?

Do you have a question about the Suzuki MDG-100 and is the answer not in the manual?

Summary

Unpacking Your New Grand Piano

Unpacking Piano Legs and Pedal Assembly

Piano Leg and Lyre Carton

Remove the Leg and Pedal Assembly Box (the top box) from the Master Piano Carton.

Handle Piano Parts Carefully

Instructions on carefully lifting and handling piano parts to avoid scratches.

Parts and Pieces Checklist

List of all parts and hardware expected after unwrapping.

Remove the Piano from the Piano Box

Remove Piano from Master Carton

Instructions on how to lift the piano out of the master carton using two people.

Stand Piano Upright

Guidance on placing the piano upright on a soft, scratch-free surface.

Remove the Plastic Cover

Plastic Cover Removal

Instructions for removing the protective plastic cover from the piano bottom.

Attaching the Legs to the Piano

Assembly Positions

Identification of areas on the piano bottom for leg and pedal assembly.

Install Top Leg

Procedure for attaching the top piano leg using bolts and washers.

Tighten Bolts

Tightening the bolts used for leg attachment with the provided tool.

Install Back Leg

Procedure for installing the back piano leg following the same method as the first leg.

Pedal Assembly Attachment

Pre-Pedal Assembly

Initial steps for the pedal assembly, involving tightening a knob.

Pedal Assembly Preparation

Preparing the pedal assembly by locating and attaching support rods.

Pedal Assembly Attachment

Connecting the pedal assembly to the piano bottom using threaded lugs and bolts.

Attach Pedal Support Rods

Attaching pedal support rods to the piano bottom with brass screws.

Attach Pedal Cable

Connecting the pedal cable to the pedal cable socket on the piano bottom.

Installing The Left Leg

Prepare for Left Leg Installation

Using a pad to pivot the piano onto its side for left leg installation.

Install Final Left Leg

Installing the final left leg while the piano is supported, then lifting.

Positioning Your New Grand Piano

Adjust Pedal Feet

Adjusting the pedal feet to ensure firm contact with the floor.

Install Power Cord

Connecting the power cord to the piano and a wall receptacle.

Hiding Pedal Cable

Using plastic clips to neatly attach the pedal cable to the piano.

Overview

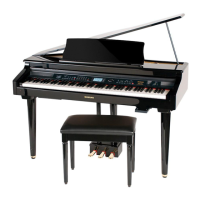
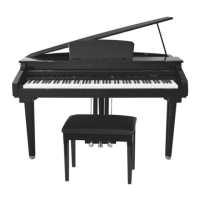
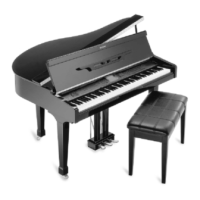
The Suzuki MDG-100 is a Micro Digital Grand Piano, designed for easy assembly and home use. This guide focuses on the unpacking, assembly, and initial setup of the instrument, ensuring a smooth experience for the user.

Function Description:

The MDG-100 is a digital grand piano that aims to replicate the experience of an acoustic grand piano in a more compact and manageable form. As a digital instrument, it offers various features and functionalities not typically found in traditional acoustic pianos, such as different instrument voices, recording capabilities, and connectivity options. The "Micro" in its name suggests a design that is smaller than a full-sized grand piano, making it suitable for spaces where a larger instrument might not fit. The "Digital" aspect indicates that it produces sound electronically, offering consistency and versatility without the need for tuning or the environmental sensitivities of an acoustic piano. The "Grand Piano" designation implies a design that mimics the aesthetic and, to some extent, the playing feel of a traditional grand piano, including a full-sized keyboard and a pedal assembly.

Usage Features:

The assembly guide emphasizes several key aspects related to the initial usage and handling of the piano.

  • Careful Handling: Throughout the unpacking and assembly process, the guide repeatedly stresses the importance of careful handling due to the piano's high gloss lacquer finish. Users are advised to avoid scratching or hitting parts against each other or other items. This suggests that the piano's aesthetic appeal is a significant feature, and maintaining its pristine condition is a priority for the manufacturer.
  • Two-Person Assembly: The assembly process is designed for two people, particularly when lifting the piano out of its carton and attaching the legs and pedal assembly. This highlights the weight and size of the main piano body, indicating a sturdy construction. The instruction "One person must hold the piano as indicated, while the other person attaches the legs and pedal assembly" underscores the need for stability and safety during installation.
  • Soft Surface Placement: When removing the piano from the master carton and standing it upright, users are instructed to place it on a soft, scratch-free surface such as carpet or a blanket. This further reinforces the need to protect the piano's finish during setup.
  • Leg and Pedal Assembly: The piano features three legs and a pedal assembly. The guide details the installation of two legs first, followed by the pedal assembly, and then the final leg. This sequential approach ensures structural integrity during assembly. The pedal assembly includes two brass support rods and a pedal cable, which connects to a socket on the bottom of the piano. The pedal feet are adjustable, allowing users to stabilize the pedals once the piano is in its final position.
  • Power Cord Installation: The power cord is installed into a receptacle on the bottom left of the piano, and its male end connects to a wall receptacle. This indicates standard electrical operation.
  • Cable Management: For cosmetic reasons, the guide suggests using supplied black plastic clips to attach the pedal cable to the bottom back of the pedal assembly and the top of the piano. This feature helps maintain a neat appearance and prevents the cable from being a tripping hazard or an eyesore.
  • Positioning the Piano: A crucial usage instruction is "DO NOT PUSH PIANO!" when moving it to its final position, as this "may cause the legs to break!" Instead, users are advised to "carry it to the final position." This emphasizes the structural design of the legs, which are meant to support vertical weight but not lateral pushing forces, a common characteristic of grand piano designs.
  • Bench Assembly: The piano comes with a bench that includes four legs and fastening hardware, implying that the bench also requires some assembly.

Maintenance Features:

While the guide primarily focuses on assembly, it touches upon a few points related to the initial care and potential long-term maintenance.

  • Polish Cream and Cloth: The packaging includes an AC power cord, polish cream, and a cloth. The inclusion of polish cream and a cloth suggests that the high gloss lacquer finish, which is repeatedly mentioned as needing careful handling, is also intended to be maintained by the user. This implies that regular polishing might be recommended to keep the piano looking its best, protecting its aesthetic value over time.
  • Adjustable Pedal Feet: The adjustable knobs on the bottom of the pedal assembly are designed to stabilize the pedals once the piano is in its final position. This feature allows for minor adjustments to compensate for uneven floor surfaces, ensuring a stable playing experience and potentially preventing wear and tear on the pedal mechanism due to rocking.
  • Toll-Free Help Line and Website: The front cover prominently displays a toll-free help line (1-800-854-1594) and a website (www.suzukipianos.com) for questions or problems. This indicates a commitment to customer support, which is a form of long-term maintenance support, allowing users to troubleshoot issues or obtain replacement parts if needed. The instruction "DO NOT CALL OR RETURN PRODUCT TO THE STORE" reinforces that initial support and problem-solving are handled directly by the manufacturer, streamlining the maintenance and support process.

In summary, the Suzuki MDG-100 Micro Digital Grand Piano is presented as a user-friendly instrument with a focus on elegant design, requiring careful handling during assembly. Its digital nature offers versatility, while its grand piano aesthetic and pedal system aim to provide an authentic playing experience. The included maintenance items and robust customer support indicate a product designed for long-term enjoyment and care.

Suzuki MDG-100 Specifications

General IconGeneral
CategoryDigital Grand Piano
Number of keys88
Built-in SpeakersYes
MIDI CompatibilityYes
Weight60 kg
TypeDigital
Touch Sensitivity3 levels
PedalsSoft, Sostenuto
KeysScaled Hammer Action Keyboard
Polyphony64 notes

Related product manuals