This document is a quick installation guide for Sweex Wireless 150N and 300N routers, specifically models LW160/LW161 and LW320/LW321. It provides step-by-step instructions for setting up the router for both wireless and wired connections, along with troubleshooting information and details about the package contents.
Function Description:
The Sweex Wireless 150N and 300N routers are networking devices designed to create a connected home environment. Their primary function is to provide internet access to multiple devices, either wirelessly or through wired Ethernet connections. These routers act as a central hub, allowing computers, notebooks, and other network-enabled devices to share a single internet connection from an ADSL or cable modem. The "150N" and "300N" designations likely refer to the maximum theoretical wireless data transfer rates (150 Mbps and 300 Mbps, respectively), indicating their capability for faster wireless networking. The devices are part of the "Connected Home" product series by Sweex, emphasizing ease of use and integration into a modern home network.
Important Technical Specifications (Inferred from images and typical router features):
- Wireless Standards: Supports N-standard wireless networking (IEEE 802.11n), with variants for 150 Mbps and 300 Mbps speeds. This implies backward compatibility with older standards like 802.11b/g.
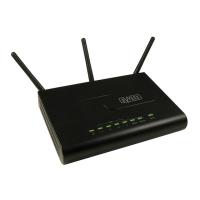
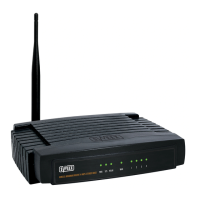
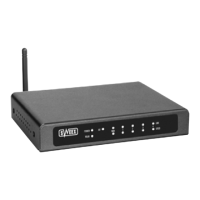
- Ethernet Ports: The routers feature multiple LAN ports (labeled 1-4) for wired connections and a single WAN port for connecting to the modem. The images show four yellow LAN ports and one blue WAN port. These are standard RJ-45 Ethernet ports, likely supporting 10/100 Mbps (Fast Ethernet) or potentially 10/100/1000 Mbps (Gigabit Ethernet) for the 300N model, though not explicitly stated.
- Power Input: Requires an external power adapter, indicated by a "POWER IN" port.
- Control Buttons/Switches:
- "POWER ON/OFF" button/switch for controlling the router's power.
- "WLAN" button/switch, likely for enabling/disabling the wireless function.
- "WPS" (Wi-Fi Protected Setup) button, used for easy and secure wireless connection setup without manually entering passwords.
- LED Indicators: The router features several LED indicators on the front panel:
- "POWER" LED: Indicates the power status.
- "READY" LED: Likely indicates the router is ready for operation.
- "WIRELESS" LED: Indicates wireless activity.
- LEDs for LAN ports 1-4: Indicate activity on the respective wired connections.
- "WAN" LED: Indicates activity on the WAN port.
- "WPS" LED: Indicates the status of the WPS function, blinking during connection attempts and burning constant when connected.
- Physical Design: The router has a sleek, horizontal design, suitable for desktop placement. It also includes a wall mount guide, suggesting it can be mounted vertically to save space.
Usage Features:
- Quick Installation: The guide emphasizes a "Quick Installation Guide" approach, designed for users to set up the router with minimal technical knowledge.
- Wireless Connectivity:
- WPS (Wi-Fi Protected Setup): This is a key feature for easy and secure wireless connections. Users can connect their notebook or PC to the wireless network by simply pressing the WPS button on both the router and the client device (if supported) for 2 seconds. The WPS LED blinks during the connection process and becomes solid upon successful connection. This eliminates the need to manually enter complex Wi-Fi passwords.
- Supports both 150N and 300N wireless speeds, offering flexibility based on user needs and internet speed.
- Wired Connectivity: Provides four Ethernet LAN ports for connecting devices like desktop computers, gaming consoles, or smart TVs directly to the router for stable and high-speed connections.
- Internet/WAN Connection: Connects to an ADSL, cable, or Ethernet modem via a dedicated WAN port, allowing the router to distribute the internet connection.
- User-Friendly Setup Process: The guide uses clear, visual steps with diagrams to illustrate each connection, making it accessible for non-technical users.
- Step 1: Disconnect Existing Setup: Instructs users to switch off and unplug the computer, ADSL/cable modem, and disconnect the existing Ethernet cable from the modem.
- Step 2: Connect Router to Modem (WAN): Guides users to connect the Ethernet cable from the modem's ADSL/Cable/Ethernet port to the router's WLAN (WAN) port.
- Step 3: Connect Router to Modem (LAN): (This step seems to be a slight misinterpretation in the guide's diagram, as the cable from the modem's ADSL/Cable/Ethernet port is shown connecting to the router's WAN port, which is correct for the internet connection. The text "Connect ethernet cable to ADSL/Cable/Ethernet port of modem" is referring to the source of the internet connection, not a connection from the router's LAN to the modem's LAN.)
- Step 4: Power On Modem: Instructs users to plug in the power adapter and switch on the ADSL/Cable modem.
- Step 5: Power On Router: Guides users to plug in the power adapter and switch on the router, waiting 2 minutes for it to initialize.
- Wired Connection Setup: For wired connections, users simply connect an Ethernet cable from one of the router's LAN ports (1-4) to their PC or notebook, then switch on the computer.
Maintenance Features:
- Troubleshooting Guide: The manual includes a troubleshooting section that directs users to refer to the full manual on the included CD for assistance with any problems encountered during setup or operation. This suggests that the full manual contains more in-depth diagnostic and resolution steps.
- Firmware Updates (Inferred): While not explicitly mentioned in the quick guide, routers typically support firmware updates to improve performance, add features, or fix security vulnerabilities. The full manual on the CD or the Sweex website would likely provide instructions for this.
- Online Resources: The guide provides links to the Sweex website (www.sweex.com/connectedhome) for more products and a dedicated page for CE declaration, as well as social media links (twitter.com/sweexeurope, facebook.com/sweexeurope) for support and community interaction. These online resources can be valuable for ongoing maintenance and support.
- CD with Drivers and Full Manual: The inclusion of a CD with drivers and a full manual ensures that users have access to comprehensive documentation and necessary software for their device, even without an internet connection initially. This is crucial for troubleshooting and advanced configurations.