Do you have a question about the Swimline HYDROTOOLS 55000 and is the answer not in the manual?
Instructions for loosely assembling and securing extruded tubes for a 3-inch range pole set.
Instructions for assembling 4 and 5-inch range pole sets, securing tubes with bolts.
Attaching strap plates and straps to the aluminum tube assembly using self-drilling screws.
Connecting the solar blanket to the reel straps for various pool orientations.
Details on standard and heavy-duty pole sets available for different pool widths.
Guidance on placing reel stands for rectangular and irregular shaped pools.
Instructions on how to trim the solar blanket to fit the pool shape.
Information on assembling hexagon shaped aluminum tubing for cross poles.
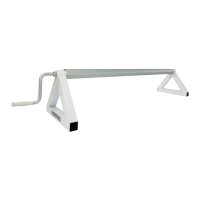
The device is a commercial solar reel system designed for in-ground solar pool covers, specifically the "HYDROTOOLS™ Solar Reel." This system is intended to facilitate the deployment and retrieval of a solar blanket over an in-ground pool, making the process of covering and uncovering the pool more convenient.
The primary function of the Solar Reel system is to provide a mechanical means to manage a solar pool blanket. Instead of manually folding and unfolding a large, cumbersome solar cover, this reel system allows users to roll the blanket onto a central pole for storage and unroll it back onto the pool surface when needed. This not only saves time and effort but also helps to prolong the life of the solar blanket by reducing wear and tear from manual handling. The system is designed to be a fixed-height unit, meaning its vertical position above the ground remains constant once assembled.
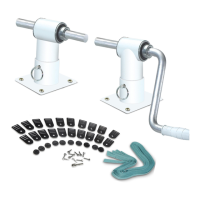
The assembly process begins with the extruded aluminum tubes, which form the central pole of the reel. These tubes are designed to slide into each other, allowing for length adjustment to match the width of the pool. A minimum of 9 inches of overlap between adjoining tubes is required for structural integrity. Once the desired length is achieved, the tubes are locked together by rotating them in opposite directions, a crucial step to eliminate excess play before securing them with self-drilling screws. Each adjoining tube is secured with at least one screw. The tube assembly then connects to the crank handles and tubing plugs, with a metal axle bolt and nut provided for secure attachment. For the 3-inch range pole sets, pre-drilled holes are used to join the large and small tubing sections, spaced approximately 1-1/2 inches and 7-1/2 inches from each end, and 120 degrees apart. These holes are secured with self-drilling and tapping stainless steel screws. Larger holes at the ends of the tubes are used to anchor the tubing to the crank handles with axle bolts.
For the 4 & 5-inch range pole sets, the assembly process is similar, but larger outer tubes are used. Pre-drilled holes in these outer tubes serve as templates for drilling through from each side with a supplied drill bit. Two bolts and nuts are used at each join, positioned at right angles to each other, to secure these larger tubes.
The positioning of the solar reel depends on the shape of the pool. For rectangular pools, the stands are placed at either end of the pool, allowing the blanket to unroll in a single direction. For irregular-shaped pools, the stands are positioned at a convenient midway point. This setup requires the blanket to be folded and then allowed to unwind in two directions, accommodating the pool's unique shape.
Once the tube assembly is complete, straps are attached to the aluminum tube. These strap plates are positioned approximately 6 inches from each tube end and secured using self-drilling screws along the pre-drilled lines on the tube. There are six such lines on each tube, and the remaining strap plates are evenly distributed along the length of the tube assembly. The straps themselves are then threaded through the strap plates.
The solar blanket is attached to these straps using plastic screws. If the reel is placed at the end of the pool, the cover is attached directly to the strap plate. However, if the reel is in an offset position, the cover is attached to the strap plate in a way that forms a fold, acting as a hinge. This involves the plastic screw passing through two layers of the solar blanket. It is important to ensure that the bubbles on the solar blanket face down when attached.
The crank handle, equipped with a grip and lock collar, is used to manually rotate the central pole. This rotation either rolls the solar blanket onto the pole for storage or unrolls it onto the pool surface. The wheel bearings ensure smooth operation, reducing friction during rotation.
Before attaching the blanket to the reel, it must be laid on top of the water. For irregular-shaped pools, the solar cover needs to be folded at the point where the stands are placed, allowing it to unroll to the left and right of the stands and the cross pole. An additional 6 inches of material on the length is recommended to allow for a fold where straps will be attached, providing wind resistance for the reel system. The blanket is then trimmed with scissors to fit the exact shape of the pool, ensuring it clears the pool edge coping.
The device is explicitly stated not to be a safety cover. Users are instructed to completely remove the solar blanket and reel assembly from the pool before swimming. Additionally, the solar blanket should not be stored on the ground in direct sunlight, as this can cause damage to the lawn.
While the manual does not detail specific maintenance schedules, the design implies several aspects that contribute to the system's longevity and ease of maintenance:
Durable Materials: The use of aluminum tubing, stainless steel self-drilling screws, and axle bolts suggests resistance to corrosion, particularly important in a pool environment. Replaceable Components: The parts list includes items like plastic end caps, wheel bearings, and rubber feet, which are likely replaceable if they wear out or are damaged. The availability of an optional casters set (#55001) also indicates modularity and the ability to upgrade or replace specific functionalities. Simple Fastening: The reliance on self-drilling screws and bolts for assembly means that components can be easily tightened or replaced if necessary using common tools like an Allen key (for the locking collar) and a Phillips screw gun bit. Clear Assembly Instructions: The detailed instructions and illustrations for assembly, including specific measurements for overlap and screw placement, help ensure correct setup, which is fundamental to the system's proper functioning and durability. Incorrect assembly can lead to premature wear or failure. Protection Against Wear: The design of the strap attachment, particularly the folding method for offset reels, aims to minimize stress on the solar blanket, potentially extending its life. The smooth operation provided by wheel bearings also reduces strain on the mechanical components.
In summary, the HYDROTOOLS™ Solar Reel is a practical and robust system designed to simplify the management of in-ground solar pool covers. Its features focus on ease of assembly, flexible positioning, and durable construction, aiming to provide a long-lasting solution for pool owners.
| Model Number | 55000 |
|---|---|
| Brand | Swimline |
| Category | Lighting Equipment |
| Voltage | 12V |
| Bulb Type | LED |
| Color | White |
| Warranty | 1 year limited |
| Cord Length | 25 feet |