1. Congratulation on your purchase of our PREMIUM METAL Solar Reel System for Above Ground Pools.
Please follow the instructions carefully so as to not void our warranty.
2. Please use your solar blanket and reel assembly in the manner it was intended for:
a. Your solar blanket is not a safety cover
b. Remove the solar blanket and Solar Reel assembly from the pool completely before swimming use.
c. Do not store the solar blanket on the ground in direct sunlight, as it will burn the lawn
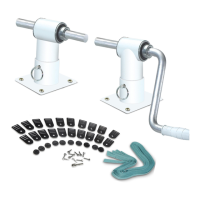
3. Preparation & Assembly: Check inventory of all items and assemble as illustrated below:
4. Depending upon the size of your pool you will also require one of the following tube kits:
(Tube Assembly is detailed below and on back cover)
PARTS LIST
(2) Metal Bases
(1) Crank
(2) Metal Base Posts
(4) Axle Bearings (Installed)
(2) Lock collars w/ Allen screws
(1) Allen Wrench for lock collar
(1) 3” Metal Tube Insert
(1) 3” Metal Tube Insert w/ Axle
(2) Base Safety Caps
(2) Quick Release Pins
(1) Strap Kit
(8) Self Drilling Mounting Screws
(2) 2.83” SS Axle Bolts & Nuts
(1) Phillips Driver Bit
STRAP KIT
(11 Pcs.)
Plastic Screw
(1 extra piece)
(21 Pcs.)
Plastic Strap Plate
(1 extra piece)
(1 Pc.)
Driver Bit
(11 Pcs.)
Stainless Steel
Self-Drilling Screws
(1 extra piece)
7. Assembling The Tube Kit:
All tube kits consist of 6 sided Hexagon shaped metal tubing. There are two sizes of tubing, the smaller size nesting
into the larger size. All tube kits begin and end with the smaller diameter tubes. The Metal tube inserts require
CAREFUL ALIGNMENT! (See illustration below for proper insertion).
End View
Small
Metal Tube
End View
Small
Metal
Tube Insert
METAL
TUBE INSERT
MUST ENGAGE
TEETH INSIDE
SMALL
METAL
TUBE!
Fig. B
(10 Pcs.) Fabric Straps
(1 extra piece)
Metal
Tubing
(Depending On Your Tube Kit
Pre-Drills & Hardware May Vary)
Crank
Base
Safety
Cap
Metal
Base
Metal
Base
Post
Metal
Base
Post
Metal
Base
Lock
Collar
Lock
Collar
Axle
Bolt
Quick Release
Pins
Axle
Bolt
Axle
Bearings
Axle
Bearings
(2 Pcs.)
Metal Tube
Inserts
Allen
Screw
Allen
Screw
Allen
Wrench
Axle
Base
Safety
Cap
5. Positioning Your Solar Reel:
For Rectangular pools, place top-rail brackets at either end of pool. Secure each bracket with 4 SS screws supplied.
For Oval pools, place top-rail brackets at either end of pool where radius begins. Secure each bracket as above.
For Round pools, place top-rail brackets at center of pool. Secure each bracket as above. (See Illustrations below)
6. Trimming Your Solar Blanket:
• Lay your Solar Blanket (not provided) on top of water.
IMPORTANT! Oval & Round Pool owners will need to fold their solar covers at point of placement
of brackets! The cover will unroll left and right of brackets & cross pole. Please allow 6 inches more
material on length to allow for a fold where straps will be attached for wind onto reel system. (See Fig A above)
• With scissors trim blanket to fit shape of pool. Be sure to clear the inside top rail of pool.
Item #51240 3” Tube Kit
Fits up to 24’ width pool
(2) 68" x 2.920" Diameter
extruded metal shaft
(3) 68" x 2.745" Diameter
extruded metal shaft
(8) Through Bolts
(1) Drill Bit
(2) 24” Storage Straps
(2) Wood Screw Storage Hooks
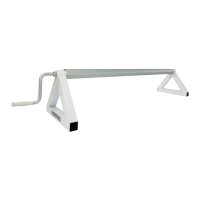
Item # 50050
Metal Reel System
For In Ground
Solar Pool Covers
Item #51120 3” Tube Kit
Fits up to 12’ width pool
(1) 59-1/2" x 2.920" Diameter
extruded metal shaft
(2) 59-1/2" x 2.745" Diameter
extruded metal shaft
(4) Through Bolts
(1) Drill Bit
(2) 24” Storage Straps
(2) Wood Screw Storage Hooks
Item #51160 3” Tube Kit
Fits up to 16’ width pool
(1) 72" x 2.920" Diameter
extruded metal shaft
(2) 72" x 2.745" Diameter
extruded metal shaft
(4) Through Bolts
(1) Drill Bit
(2) 24” Storage Straps
(2) Wood Screw Storage Hooks
Fig. A
RECTANGULAR OVAL ROUND
Unroll Unroll Unroll Unroll Unroll
Item #51200 3” Tube Kit
Fits up to 20’ width pool
(2) 59-1/2" x 2.920" Diameter
extruded metal shaft
(3) 59-1/2" x 2.745" Diameter
extruded metal shaft
(8) Through Bolts
(1) Drill Bit
(2) 24” Storage Straps
(2) Wood Screw Storage Hooks
Item #51164 4” Tube Kit
Fits up to 16’ width pool
For larger pools and/or heavy
gauge solar covers
(1) 72" x 3.80" Diameter
extruded metal shaft
(2) 72" x 3.725" Diameter
extruded metal shaft
(6) Through Bolts
(2) 6” Long Metal Inserts
(1) Drill Bit
(2) 24” Storage Straps
(2) Wood Screw Storage Hooks
Item #51204 4” Tube Kit
Fits up to 20’ width pool
For larger pools and/or heavy
gauge solar covers
(2) 59-1/2" x 3.80" Diameter
extruded metal shaft
(3) 59-1/2"" x 3.725" Diameter
extruded metal shaft
(10) Through Bolts
(2) 6” Long Metal Inserts
(1) Drill Bit
(2) 24” Storage Straps
(2) Wood Screw Storage Hooks
Item #51284 4” Tube Kit
Fits up to 28’ width pool
For larger pools and/or heavy
gauge solar covers
(3) 58" x 3.80" Diameter
extruded metal shaft
(4) 58" x 3.725" Diameter
extruded metal shaft
(14) Through Bolts
(2) 6” Long Metal Inserts
(1) Drill Bit
(2) 24” Storage Straps
(2) Wood Screw Storage Hooks