Do you have a question about the Swiss Madison Cascade and is the answer not in the manual?
Inspect for damage, observe codes, and measure vanity before starting installation.
Lists all package components and recommended tools/materials for installation.
Step 1 covers initial frame preparation and assembly of the vanity structure.
Steps 2-5 detail the assembly of various frame panels using specific hardware.
Steps 6-9 focus on assembling the vanity legs and attaching them to the base panel.
Steps 10-12 guide the assembly of doors and installation of corner brackets.
Steps 13-14 cover anchoring the vanity to the wall and installing the vanity top.
Details what the warranty covers and the conditions that will void it.
Specifies limitations of liability and provides contact information for concerns.
A critical warning about potential hazards from product contents for users.
This document provides comprehensive installation instructions and warranty information for a Swiss Madison freestanding vanity. It is designed to guide users through the assembly and installation process, ensuring proper setup and long-term functionality. The manual emphasizes the importance of safety, adherence to local codes, and professional installation for optimal results and to maintain warranty validity.
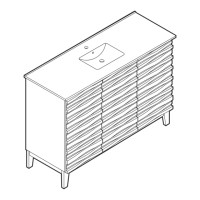
The freestanding vanity serves as a functional and aesthetic fixture in a bathroom, providing storage space and supporting a vanity sink. Its primary function is to organize bathroom essentials within its drawers and to house the sink, creating a complete and integrated wash station. The design allows it to stand independently on its legs, offering flexibility in placement within the bathroom layout. The vanity is intended to be a durable and long-lasting addition to a bathroom, enhancing both its utility and visual appeal.
The vanity is designed for ease of use and practicality in a bathroom setting. Its multiple drawers provide ample storage for toiletries, towels, and other bathroom items, helping to keep the space tidy and organized. The top surface is designed to accommodate a vanity sink, which is a central component for daily washing routines. The freestanding nature of the vanity means it does not require wall mounting for support, though anchoring to the wall is recommended for stability and safety, especially in households with children or in areas prone to seismic activity.
The assembly process, detailed in the manual, involves several steps, starting with preparing the frame and progressively adding components like side panels, middle panels, bottom panels, and crossbars. The use of cam bolts, cam locks, wood dowels, and various screws ensures a secure and robust construction. The inclusion of hinges for the doors suggests easy access to stored items, and the door pads help to prevent slamming and reduce noise, contributing to a quieter bathroom environment.
The vanity's design incorporates elements that facilitate its integration into various bathroom styles. The detailed instructions for assembling the frame, attaching the legs, and installing the doors and corner brackets are all geared towards creating a stable and functional unit. The final step of installing the vanity top involves applying silicone compound, which not only secures the top but also creates a waterproof seal, protecting the vanity base from moisture damage.
The manual implicitly suggests several maintenance practices through its installation guidelines and warranty information. Proper installation is the first step in ensuring the longevity of the vanity. By following the instructions carefully, users can prevent issues that might arise from improper assembly, such as loose components or structural instability. The recommendation to use a licensed professional for installation underscores the importance of expert handling to avoid damage and maintain the product's integrity.
Regarding ongoing maintenance, the installation of the vanity top with silicone compound is a key feature for protecting the vanity from water damage. Regular inspection of this seal and reapplication if necessary would be a crucial maintenance task to prevent moisture from seeping into the wood or composite materials of the vanity base. The manual's emphasis on removing excess silicone compound with a wet rag during installation suggests that regular, gentle cleaning with appropriate materials will be beneficial for maintaining the vanity's appearance.
The warranty section highlights conditions that could void the warranty, which indirectly points to best practices for maintenance and care. For instance, the warranty is voided if the product is subjected to "improper maintenance, abuse, misuse, excessive use of chemicals, accidents, or other damages." This implies that users should avoid harsh cleaning agents that could damage the vanity's finish or materials. Gentle, non-abrasive cleaners are likely recommended for routine cleaning.
Furthermore, the warranty's mention of the product being moved from its initial place of installation as a voiding condition suggests that once installed, the vanity should ideally remain in place to prevent structural stress or damage that could occur during relocation. Regular checks of all screws and connections, especially after the initial installation period, could help ensure that the vanity remains sturdy and functional over time.
The overall design and material choices, while not explicitly detailed in the provided text, are intended to be "well made forever," as indicated by the brand's tagline. This implies a certain level of durability and resistance to wear and tear under normal use, reducing the need for frequent repairs or replacements. Adhering to the installation guidelines and practicing gentle, consistent cleaning will contribute significantly to the vanity's lifespan and continued aesthetic appeal.
| Bowl Shape | Elongated |
|---|---|
| Flush Type | Dual Flush |
| Material | Vitreous China |
| Seat Included | Yes |
| Color | White |
| Product Type | Toilet |
| Flush Rate | 1.28/0.8 GPF |
| Rough-In | 12 inches |