Rev 2.0 Jan. 2024
10
o Note: This feature is typically used for fans, oil coolers or lighting that must remain on for a set
period of time, after the ignition is turned off.
7.13 Output Overcurrent Values
• This function allows for adjustment of the amperage each circuit will trip at.
• Switches 1-4 have a maximum current limit of 20 Amps, and switches 5- 8 have a maximum current
limit of 35 Amps.
• Overcurrent values can be adjusted in 5A increments.
• Since battery voltage and amperage draw are inversely related, when battery voltage drops, amperage
draw will increase. Do not reduce current limits too low, or the circuits will trip unnecessarily.
o Note: Any current draw, over the current limit, for longer than 0.5 seconds, will trip the circuit.
When a circuit is tripped, the LED indicator, above the switch, will flash 3 times. Only the affected
switch output will turn off and reset.
7.14 SPDT and SP3T Switch Configuration
• This function creates a relationship between 2 or 3 switches, disallowing any of them from being on at
the same time. If Output 1 is on, and Output 2 is turned on, Output 1 will automatically be shut off.
o Note: This function is commonly used for lights with a high and low beam that cannot be on at the
same time, or other accessories with multiple modes.
7.15 Restore Settings to Default Values
• This function removes all programming from the system and restores it to default values.
o Note: This does not remove the Bluetooth password.
7.16 Dual System Connection
• Enabling this function allows Bluetooth connection to 2 Switch-Pros systems at once.
o Note: Once enabled, exit out of Settings and click “Panel 2”, in the virtual panel, to connect to
another unit.
7.17 Summary of Programmed Functions
• This screen provides a complete summary of the functions programmed into the system.
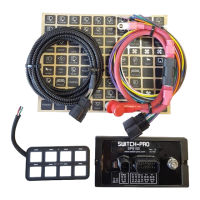
SPECIAL FUNCTIONS CONTROLLED THROUGH THE SWITCH PANEL
8. The following functions can be turned on and off through the Switch Panel. The referenced Programming
Switch is in the center of the Switch Panel, behind the Switch-Pro logo. The Programming LED, in the
top, center, of the Switch Panel, will flash 3 times for confirmation of the action performed.
8.1 Bluetooth
• Off: Programming Switch and Switch 1
• On: Programming Switch and Switch 2
8.2 Sleep Mode
• Off: Programming Switch and Switch 3
• On: Programming Switch and Switch 3
• Sleep Mode Instantly On: Programming Switch and Switch 5
o Note: This will disable Bluetooth. Bluetooth will need to be enabled again (See Section 8.1).
o Note: For the system to enter Sleep Mode, the Light Blue Ignition Wire, Lights/T2 Wire, and Pink
Trigger 2 Wire inputs must be off, all switches must be off, and no Bluetooth connection may be
present.
8.3 Pink Trigger 1
• On and Off: Programming Switch and Switch 7
o Note: Trigger 1 must be enabled in the App before being able to be turned on and off through the
Switch Panel.
8.4 White Lights/T2
• On and Off: Programming Switch and Switch 8
o Note: Trigger 2 must be enabled in the App before being able to be turned on and off through the
Switch Panel.
 Loading...