EasyManua.ls Logo

Taco 5000-HX Series - User Manual

Taco 5000-HX Series
3 pages
Print Icon
To Next Page IconTo Next Page
Loading...
Instruction Sheet
5000-HX Heat Only Series Mixing Valve
A Taco Family Company
1
02-489
SUPERSEDES: AUGUST 1, 2013 EFFECTIVE: OCTOBER 27, 2016
Plant I.D. 001-4203
WARNING: The 5000-HX is a heat only mixing valve and is designed for use in heating systems only. Do not
use in a domestic water application. Water temperatures above 120°F can cause serious injury.
WARNING: The 5000 Series must not be installed on steam systems (water systems only).
CAUTION: Check valves are integrated in the hot and cold water inlets of union style valves (straight NPT
valves, non-union, do not have checks). For correct and safe system functionality ensure that the check valves
are clean of debris and functioning correctly.
GENERAL:
The Taco 5000-HX Model is NOT certified for ASSE 1017 applications.
NOTE: Non-union NPT valve does not have check valves.
All installations should be carried out by a qualified professional. Failure to comply with all aspects of these instructions
may result in unsatisfactory performance. All installations must comply with relevant state and local codes or authorities.
Ensure compatibility of valve installation, e.g. temperature of hot water, inlet pressure, flow rates, etc. - refer to spec-
ification section. If the site conditions are outside of the specifications for the valve, the site conditions must be cor-
rected or a valve that meets the conditions must be selected.
Install in accordance with markings on the valve body, i.e. hot water inlet - marked “H”, cold water inlet - marked “C”
and mixed outlet - marked with directional arrow.
Valve may be installed in any position.
Any inconsistency between these instructions and any specific instructions, bylaws or codes issued by local authorities
must be referred back to Taco, Inc. prior to any installation taking place.
During startup ensure that the valve is set to the desired temperature (valve preset at 105-115°F (41-46°C) with 150°F
(66°C) hot water inlet temperature). If the valve temperature needs to be adjusted please refer to the instructions below
(SETTING VALVE OUTLET TEMPERATURE).
NOTE: If the water supply is of poor quality a filter or strainer should be fitted at the system inlet so that the mixing
valve is protected from dirt and debris.
FITTING VALVE TO PIPING SYSTEM:
Flush all piping thoroughly before installing the valve (using water only). Not flushing the system properly is the most
common cause of improper valve performance.
Union valves come complete with union type connections for ease of installation and service. Non-union versions are
available and have NPT threads built into the body.
Valve must be removed from the piping prior to soldering the end connections. It is recommended to use a spacer piece
while soldering.
For models using the temperature gauge and adaptor on the mixed outlet, attach the adaptor to the mixing valve body,
insert the temperature gauge into the adaptor well and then attach the union connector to the adaptor.
SETTING VALVE OUTLET TEMPERATURE:
The Taco Series 5000-HX Mixing Valve is supplied factory set at 105-115°F with 150°F hot water inlet tem-
perature. It will need to be altered depending on operating requirements.
1. Remove the green knob by inserting a small screwdriver in the notch and gently prying up. (See Figure 1)
2. The boiler or other heat source should be up to temperature and at least 27 degrees above the desired
mixing valve set temperature. Using the groove on the top of the cover provided to fit over the adjustment
nut, adjust the knob counterclockwise to increase temperature and clockwise to decrease temperature.
(See Figure 2)
CAUTION: An accurate means of measuring output temperature of the valve is necessary in
order to prevent damage to property in some heating installations (for example, radiant slabs
with hardwood flooring).
3. Once the desired outlet temperature has been achieved refit the knob so that it snaps onto the body.
This helps to prevent tempering with the set temperature.
4. A temperature strip is provided with each mixing valve and can be used as a reference to set the tem-
perature, however a more accurate device should be used to ensure a correct temperature setting.
Question and Answer IconNeed help?

Do you have a question about the Taco 5000-HX Series and is the answer not in the manual?

Summary

General Operation and Installation Notes

System Warnings and Model Certification

Provides warnings on heating-only use, avoidance of steam systems, and non-certification for ASSE 1017.

General Installation Guidelines

Covers professional installation, site condition checks, valve orientation, startup settings, and water quality notes.

Fitting Valve to Piping System

Piping Preparation and Connections

Details flushing pipes, union connections, soldering precautions, and temperature gauge attachment.

Setting Valve Outlet Temperature

Temperature Adjustment Procedure

Explains how to remove the knob, adjust temperature with the boiler at temperature, and refit the knob.

Temperature Measurement and Accuracy

Highlights the need for accurate measurement to prevent property damage and use of temperature strips.

Installation Diagrams and Troubleshooting

Installation Schematics

Illustrates low temperature/radiant and primary/secondary installation configurations for the mixing valve.

Troubleshooting Common Issues

Provides a table to diagnose and resolve common faults like incorrect temperature, flow issues, or valve noise.

Specifications and Maintenance

Technical Specifications

Lists operating temperatures, pressures, flow rates, and accuracy for the mixing valve.

Maintenance and O-Ring Replacement

Details routine checks and the procedure for replacing the O-ring/piston sub-assembly.

Limited Warranty Statement

Outlines the product warranty terms, exclusions, and purchaser responsibilities.

Overview

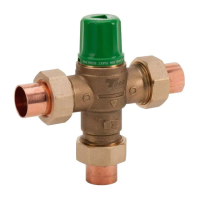
The Taco 5000-HX Heat Only Series Mixing Valve is designed for use exclusively in heating systems, not for domestic water applications. It is crucial to note that water temperatures above 120°F can cause serious injury, and the valve must not be installed on steam systems. Union-style valves include integrated check valves in the hot and cold water inlets, which must be kept clean and functioning correctly for safe system operation. Straight NPT valves and non-union versions do not have these integrated check valves. The 5000-HX Model is not certified for ASSE 1017 applications.

Function Description:

The 5000-HX mixing valve blends hot and cold water to deliver a consistent mixed water temperature for heating applications. It is supplied factory-set at 105-115°F (41-46°C) with a 150°F (66°C) hot water inlet temperature, but this can be adjusted to meet specific operating requirements. The valve can be installed in any position, and its body is marked to indicate the hot water inlet ("H"), cold water inlet ("C"), and mixed outlet (with a directional arrow). Proper installation by a qualified professional is essential, adhering to all relevant state and local codes. During startup, the valve should be set to the desired temperature. If the water supply is of poor quality, a filter or strainer should be fitted at the system inlet to protect the mixing valve from dirt and debris.

Important Technical Specifications:

  • Hot Water Inlet Temperature: 120-180°F (49-82°C)
  • Cold Water Inlet Temperature: 39-80°F (4-27°C)
  • Maximum Design Pressure: 230 psi
  • Minimum Flow Rate: 1 GPM (3.8 L/min)
  • Maximum Flow Rate: 20 GPM (76 L/min)
  • Factory Preset: 115-120°F (46-49°C)
  • Outlet Water Temperature Range: 85-176°F (29-80°C)
  • Minimum Temperature Differential (between hot supply and outlet): 10°F (5.6°C)
  • Allowable Supply Pressure Variation: ±20% (Maximum allowable variation in either supply pressure to control outlet temperature within ±3°F. Pressure variations outside this range may cause changes in outlet temperature.)
  • Accuracy of Outlet Temperature: ±3°F (±2°C)

Usage Features:

  • Installation: All piping must be thoroughly flushed with water before installing the valve to prevent improper performance. Union valves come with union-type connections for easy installation and service. Non-union versions have NPT threads. The valve must be removed from piping before soldering end connections, and a spacer piece is recommended during soldering. For models with a temperature gauge and adaptor, the adaptor should be attached to the valve body, the gauge inserted into the adaptor well, and then the union connector attached to the adaptor.
  • Temperature Adjustment:
    1. Remove the green knob by gently prying it up with a small screwdriver in the notch.
    2. Ensure the boiler or heat source is at least 27 degrees above the desired mixing valve set temperature.
    3. Use the groove on the top of the cover to fit over the adjustment nut. Adjust counterclockwise to increase temperature and clockwise to decrease temperature.
    4. An accurate means of measuring output temperature is necessary, especially for installations like radiant slabs with hardwood flooring, to prevent property damage.
    5. Once the desired outlet temperature is achieved, refit the knob so it snaps onto the body, preventing tampering.
    6. A temperature strip is provided for reference, but a more accurate device should be used for precise setting.
  • Troubleshooting: A comprehensive table is provided to diagnose and resolve common issues such as inability to obtain desired mixed water temperature, unstable mix temperature, no flow, reduced flow rate, and noisy operation. Solutions include ensuring inlet temperatures are within specifications, checking for reversed hot/cold supplies, cleaning strainers, installing pressure regulating valves, and cleaning check valves.

Maintenance Features:

The Taco 5000-HX Series mixing valve does not require routine maintenance but should be checked annually to ensure proper functioning. For installations with poor water quality, more frequent inspection may be necessary. Replacement element assemblies are available.

  • O-Ring/Piston Sub-Assembly Replacement:
    1. Isolate the valve from the water supply.
    2. Unscrew union nuts (or remove from piping for non-union valves) to remove the valve body.
    3. Pry off the green cap with a screwdriver.
    4. Secure the valve body and unscrew the brass cap to access the internals.
    5. Remove the piston assembly from the top (or push from the outlet port) of the valve.
    6. Gently wipe out the valve body, paying attention to the o-ring halfway down the inside.
    7. Remove the o-ring from the cap. Lightly grease the new cap o-ring and the o-ring halfway down the inside of the valve body using the provided grease packet.
    8. Reassemble in reverse order.
    9. Do not overtighten the brass cap, as it is an o-ring seal.
    10. Reinstall the valve into the piping system and reset the outlet mix temperature.

Limited Warranty:

Taco, Inc. offers a one-year warranty from the date of start-up or one year and six months from the date of shipment (whichever comes first) for any product or part proven defective under normal use. To obtain service, the purchaser must promptly notify a local Taco stocking distributor or Taco in writing and deliver the product prepaid. The warranty does not cover products installed or operated contrary to instructions, subject to misuse, misapplication, or the addition of petroleum-based fluids or certain chemical additives. Taco reserves the right to provide replacement products that are substantially similar and functionally equivalent. The warranty is in lieu of all other express or statutory warranties and does not cover special, incidental, indirect, or consequential damages.

Taco 5000-HX Series Specifications

General IconGeneral
BrandTaco
Model5000-HX Series
CategoryControl Unit
LanguageEnglish

Related product manuals