Section 6
Installation
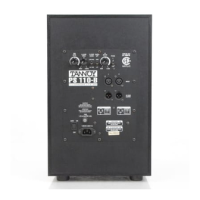
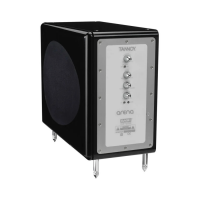
With the AC power off, place the subwoofer in, or close to
its chosen final position, making sure that there is easy
access to the amplifier panel and controls. Plug the sub-
woofer into the wall outlet, preferably the same outlet, or
at least the same circuit as your main speaker amplifier.
Connect your signal source outputs to the input connec-
tors of your subwoofer. Here is where there are two
choices:
a: (Recommended) Another set of cables can be used to
connect the outputs of the subwoofer to the L and R
inputs of the main speaker amplifier. Please, don•t use
cheap cables to connect the subwoofer. Buy quality com-
ponents for your audio installations. It will pay off in the
final experience. Using this connection method allows
use of the subwoofer•s built-in high pass filter network to
provide smooth transition of frequencies between the
subwoofer and the main speaker system.
b: (Optional) You may choose to allow your main speaker
system to operate full bandwidth, in which case you will
not require the cables from the subwoofer outputs to the
main speaker amplifier inputs. Connect the subwoofer
from either the signal source "sub out" or LFE connector,
Section 7
Applications
a): One PS350/350B with powered receiver
1. Connect a cable from the receiver line level "LFE" or
"Sub Out" to the LFE input of the PS350B. The LFE
input has a fixed low pass crossover of 120 Hz. If a vari-
able crossover is required, use the Left or Right input.
You can use the Center input but, make sure the 1 Sub/2
Sub switch is in the 1 Sub position or the signal will be by
attenuated by 6 dB. If you decide to use the variable
crossover, a good starting point is to between 80 Hz and
100 Hz.
2. Phase set to O deg. Note: Refer to Phase Switch
(4.M.) for further details.
3. Bass boost set to Min. Note: Refer to LFE Boost (4.K.)
for further details.
4. Set the Sub Level control on the PS350/PS350B to Min
initially.
LF E
R R
R F
C
LR
LF
C enter
L
C
R
LF E
In
R ight R ear
R ight F ront
R eceiver
Left Front
Left R ear
In
Out
1 S ub
2 S ubs
P S 350B
or from a discrete channel output within the audio sys-
tem. This method does not require any wiring changes to
your current main speaker set-up, but does not use the
subwoofer•s high pass filter network. It may, or may not,
offer the best performance characteristics. Some experi-
mentation will be required to achieve optimum results.
Ensure that your left and right channels have been con-
nected correctly through the chosen signal chain. Turn
the gain control to minimum. Turn the subwoofer amplifi-
er "On" and look for the green LED to show power pres-
ent. Note that the unit features an auto on/off circuit,
which will turn the subwoofer off if there is no input signal
for more than two minutes (indicated by the green LED
turning to red). The sub will instantainiously turn on
again, (Indicated by the red LED turning green) as soon
as an input signal is received. Start your program mate-
rial and adjust your main speakers to a normal listening
level. If you have high passed your main speakers, do
not be alarmed that they sound thinner, all the energy
below 80 Hz has been taken out of them for use by the
subwoofer. Now, adjust the subwoofer gain control until
you•re satisfied with a suitable level to match the main
speakers. If something isn•t working at this stage, you
can go ahead to the troubleshooting section (section 10),
get it running, and then come back to find out how to
make it work even better.
figure 1
LF E /
S ub Out
 Loading...