29
I25 I24 I23 I22 I21 I20 I19 I18 I17 I16 I15 I14 I13 tr sl pt no it hr fr fi es en de da
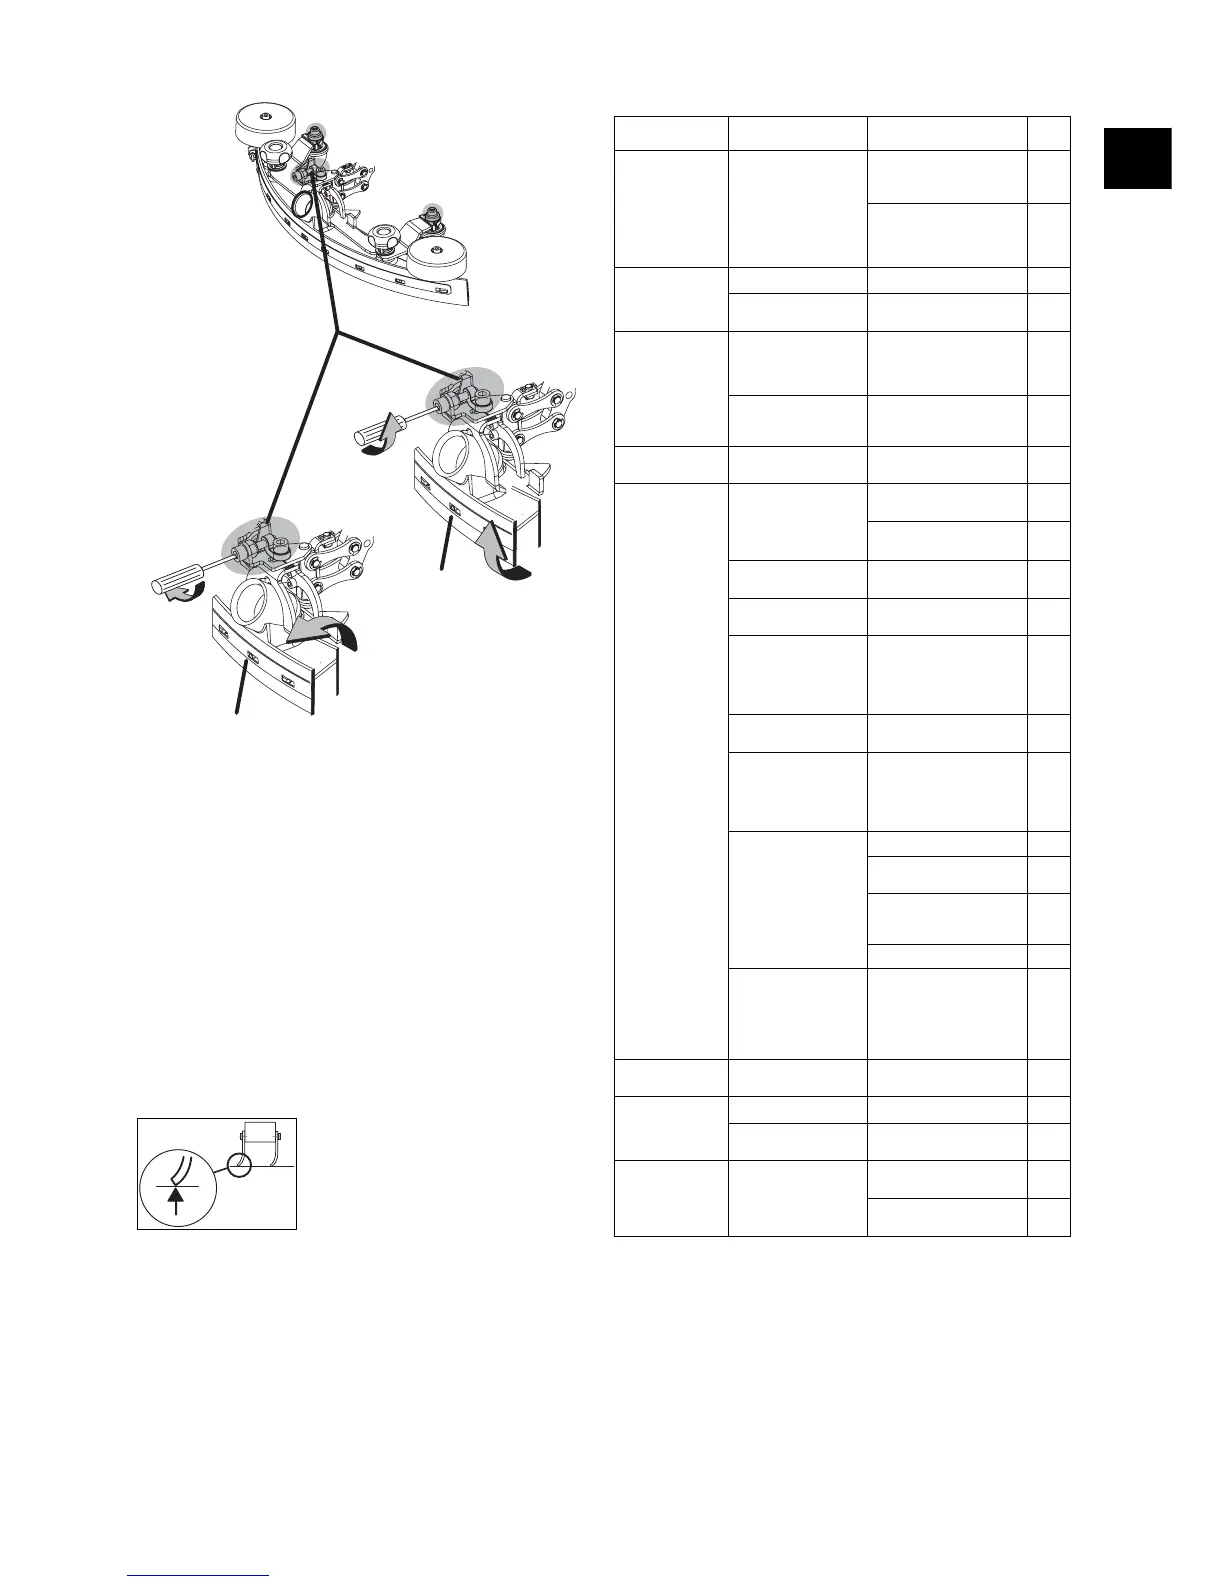
Squeegee settings
If you experience an uneven suction result, the settings of the suction unit
should be corrected. Proceed as follows:
Before carrying out the adjustment, check that:
• the blades are not damaged (replace).
• the suction unit is not damaged.
Height setting (Fig. A)
• First check the distance between the floor and the running or support
wheels.
The distance between running wheels number 1 and 2 and the floor must be
between 1 mm and 3 mm in each case (with the blades standing vertically).
• Switch the machine off using the keyswitch and then lower the squeegee.
• To correct, loosen the hexagonal nuts number 1 and 2, and then adjust the
height by turning the Allen screw. Then firmly re-tighten the hexagonal nuts
Number 1 and 2.
• Check the result while cleaning (see illustration below) and go to "Angle of
Inclination" (Fig. B) if the result is unsatisfactory.
Angle of inclination(Fig. B)
• Switch the machine off.
• Lower the squeegee and move the machine forward by a few centimetres
so that the blades can adopt their working position.
• To correct, loosen Allen screw number 3 and adjust the angle of inclination
by turning Allen screw number 4.
Note: Carry out the correction with gradual adjustments!
Firmly retighten Allen screw number 3 after the correction has been made. Then
move the machine forward by a few centimetres and check the setting of the
scraper edge that has been achieved. Repeat this procedure until the correct
inclination is obtained.
Malfunctions
Transport
• Disconnect the battery from the machine using the battery disconnection
mechanism.
Transport the machine in an upright position and disconnect/remove the
batteries for transportation.
Make sure that the machine is securely fastened within the transportation
vehicle.
Refer to Page 30 for the dimensions and weights.
A correct angle has been achieved when the tip
of the rear blade (x) is distributed over the
complete width of the suction unit.
B
A
x
x
4
3
1
2
4
3
Malfunction Possible causes Troubleshooting page
Machine does not
run
Maschine switched off
• Switch on the
keyswitch.
23
• Connect the battery to
the machine with the
battery disconnection
socket.
23
Battery/mains
unit malfunction
(display on
control panel)
Discharged batteries
• Recharge batteries
24
Batteries/battery
charger defective
• Call for technical
assistence
Batteries not
sufficiently
charged
Power cord not
plugged in or
defective
• Plug in the power cord
• Call for technical
assistence
Batteries or battery
charging unit
defective
• Call for technical
assistence
Brush does not
turn
Motor runs but not
tool
• Call for technical
assistence
Poor vacuum
performance
Floor remains
wet
Soiled solution
not picked up
Float closes the air
inlet at the vacuum
motor (overfill
protection recovery
tank)
• Check the recovery
tank is not full
27
• Check that the float is
functioning correctly.
28
Squeegee not on the
floor
• Lower the squeegee.
26
Suction hose not
connected
• Connect suction hose
26
Check the seal on the
tank lid for cracks/dirt
• Clean the seal, or
replace if defective
Vacuum air filter
blocked
• Remove the blockage
Hose or nozzle
blocked (e.g. by
pieces of wood or
residual material)
• Remove the blockage
The blades do not
adjust well to the floor
consistancy
• Clean the squeegee
• Change/turn the
blades
28
• Check that the
squeegee suspension
is functioning correctly
• Squeegee adjustment 29
Dirt sieve full (yellow)
• Remove the dirt sieve
• Knock out the coarse
dirt from the sieve and
rinse it under running
water.
27
Vacuum switched
off
Recovery tank full
• Empty the recovery
tank
27
Insufficient
outflow of
cleaning solution
Solution tank empty
• Fill the solution tank
26
Solution tank filter
blocked
• Clean solution tank
filter
27
Foam or liquid
leaking from the
machine
Float malfunction
• Turn off the suction
aggregate
23
• Check that the float is
functioning correctly.
28