EasyManua.ls Logo

Tavool TH511 - User Manual

Default Icon
4 pages
Print Icon
To Next Page IconTo Next Page
Loading...
Stud Center Finder, Metal and
AC Live Wire Detector (TH511)
This stud finder is designed to find the wooden or metal stud and avoid
the metal and AC wires. This item features five scanning modes:
Stud 1⁄2 in. Scan Mode: Locates the center and edges of wood and
metal studs up to 1⁄2 in. (12 mm) deep
Stud 1 in. Scan Mode: Locates the center and edges of wood and metal
studs up to 1 in. (25 mm) deep
Stud in. Scan Mode: Locates the center and edges of wood and
metal studs up to 1½ in. (38 mm) deep
Metal Scan Mode: Detects metal up to 2.36 in. (60 mm) deep
AC Scan Mode: Detects live unshielded AC wires up to 2 in. (51mm)
deep
INSTALLING THE BATTERY
There is no battery in the tool. Please install the battery firstly
Push the battery cover at the bottom of the tool and
open it. Insert a new 9-volt battery, matching the
positive (+) and negative (-) terminals to the battery
wire. Snap the battery into place and close battery
cover.
Low Battery Indicator: The Low Battery Indicator icon displays when
the battery level is getting low.When the low battery indicator icon
appears on the screen, the battery level is too low and not sufficient to
power the tool for proper operation. Please replace the 9-volt battery with
a brand new battery immediately.
PRODUCT DISPLAY
1. The Center Pointing
System
2. AC Wire Warning
3. Low Battery Indication
4. Metal Mode Indication
5. Stud Mode Indication
6. AC Mode Indication
7. Stud edge indicator
8. Stud 1 1⁄2 in. Scan
mode
9. AC Scan mode
10. Metal Scan mode
11. Power Button & Mode
Switch Button
12. Direction indicator
13. Stud center indicator
14. Stud 1⁄2 in. Scan mode
15. Stud 1 in. Scan mode
16. Calibrate Button
17. Battery case (Back of unit)
18.Magnet
additional function
Please note:
1. Press the mode button (NUMBER 11) to choose the mode.
2. Press the scan button on the side of the tool (NUMBER 16) to
calibrate the tool. After calibrate it, you dont have to pressing the
scan button all the time when scanning the wall
3. The Magnet (NUMBER 18) is an additional function. it can be
used to to confirm the metal position twice.But please note, this
function is only a reference for the second confirmation of the
location of the metal or metal stud, not as a basis for judgment.
Note: The target size and distance determine the size of the magnetic
force. If the distance is too far or the metal is too small, the magnetic
force may not change.
Work Principle
Because the stud finders are looking for a change in density behind wall
in Stud Scan Modes and Deep Scan Modes, not a particular material. The
detector will react to metal studs the same as it would for wooden
studs. We can only hang things to wooden stud and cant drill to the metal
stud.
It is important to Confirm it is a metal stud or wooden stud before you act
ually drill to the wall.After you detect the center of a stud, Please Put the
bottom magnet on the center mark to recheck whether it is metal or wood
stud, or Use Metal Scan Mode (refer to the description of Metal Scan Mode
below) to determine whether the previous reading in Stud scan was a
wooden stud or metal stud.
Stud Scan Mode 1
Use this stud scan mode to find the center and edges of wood or metal
studs up to 12 in. (12 mm) deep. For best results, always start in this
mode when looking for studs.
Step 1: Press the mode button to choose thestud mode
Step 2
Put the scanner on the wall and Press the Scan Button on the
side of the tool to calibrate. After a short beep sounds, confirming
calibration is complete.
Note: Be sure not to move the scanner while calibrating.
Calibrate the tool on the wall before every scan.
Step3: Move it flat against the wall to scan.
Note: If it finds metal or wooden stud, the screen will show as the picture
and it beeps.
If it finds nothing, please repeat the above steps ( calibrate it and move it
to scan)
Question and Answer IconNeed help?

Do you have a question about the Tavool TH511 and is the answer not in the manual?

Summary

Installing the Battery

Low Battery Indicator

Icon displays when battery level is low, indicating the need for replacement.

Work Principle and Modes

Stud Scan Mode 1 Operation

Finds center and edges of wood/metal studs up to 1/2 in. deep. Calibrate before each scan.

Stud Scan Mode 2 Operation

Scans wood/metal studs up to 1 in. deep, offering increased accuracy for deeper targets.

Stud Scan Mode 3 Operation

Locates wood/metal studs up to 1 1/2 in. deep, ideal for initial stud finding.

Deep Scan Mode Operation

Doubles scanning depth for wood/metal studs to 1 in. for deeper targets.

Metal Scan Mode Operation

AC Wire Scan Mode Operation

Scanning Different Surfaces and Warnings

General Safety Warnings

Advises turning off power, gas, water supplies before penetrating surfaces to prevent hazards.

Overview

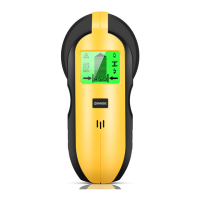
The Stud Center Finder, Metal and AC Live Wire Detector (TH511) is a versatile tool designed to locate wood or metal studs and detect live AC wires behind walls. It offers multiple scanning modes to accommodate various depths and material types, ensuring accurate and safe drilling or hanging.

Function Description

The TH511 stud finder incorporates five distinct scanning modes:

  • Stud 1/2 in. Scan Mode: Detects the center and edges of wood and metal studs up to 1/2 inch (12 mm) deep. This is the recommended starting mode for general stud detection.
  • Stud 1 in. Scan Mode: Locates the center and edges of wood and metal studs up to 1 inch (25 mm) deep.
  • Stud 1 1/2 in. Scan Mode: Identifies the center and edges of wood and metal studs up to 1 1/2 inches (38 mm) deep. This mode is also useful for scanning over textured walls or ceilings by placing thin cardboard on the surface.
  • Metal Scan Mode: Detects metal objects up to 2.36 inches (60 mm) deep. This mode is crucial for identifying metal studs, pipes, or other metallic hazards, and for differentiating between wood and metal studs after an initial stud scan. It can also be used to locate nails or drywall screws in problematic situations like lath and plaster walls.
  • AC Scan Mode: Detects live, unshielded AC wires up to 2 inches (51 mm) deep. This mode helps prevent accidental contact with electrical wiring.

The device utilizes a "Center Pointing System" with a direction indicator and a stud center indicator to guide the user to the precise location of objects. It also features an "AC Wire Warning" indicator that flashes on the screen when a live, unshielded wire is detected in any mode, enhancing safety.

A unique "Magnet (additional function)" is integrated into the tool. This magnet can be used to confirm the metal position twice after an initial scan, serving as a reference for secondary confirmation of metal or metal stud locations. However, it's important to note that this function is a reference and not a primary basis for judgment, as magnetic force can vary with target size and distance.

Important Technical Specifications

  • Detection Depth:
    • Wood/Metal Studs: Up to 1/2 in. (12 mm), 1 in. (25 mm), 1 1/2 in. (38 mm)
    • Metal: Up to 2.36 in. (60 mm)
    • Live AC Wires: Up to 2 in. (51 mm)
  • Power Source: 9-volt battery (not included).
  • Indicators:
    • Low Battery Indication
    • Metal Mode Indication
    • Stud Mode Indication
    • AC Mode Indication
    • Stud Edge Indicator
    • Stud 1 1/2 in. Scan Mode
    • Stud 1 in. Scan Mode
    • Stud 1/2 in. Scan Mode
    • AC Scan Mode
    • Metal Scan Mode
    • Direction Indicator
    • Stud Center Indicator
    • Signal Strength Indicator (bars on screen)
  • Buttons: Power Button & Mode Switch Button, Calibrate Button.

Usage Features

The TH511 is designed for ease of use with a clear, step-by-step operational process:

  1. Battery Installation: A new 9-volt battery must be installed by pushing open the battery cover, matching positive and negative terminals, and snapping it into place.
  2. Mode Selection: The "Mode Button" (NUMBER 11) is used to select the desired scanning mode (Stud 1/2 in., Stud 1 in., Stud 1 1/2 in., Metal, or AC).
  3. Calibration: Before each scan, the tool must be calibrated. This is done by placing the scanner flat against the wall (or in the air for maximum metal sensitivity in Metal Scan Mode) and pressing the "Scan Button" (NUMBER 16) on the side of the tool. A short beep confirms successful calibration. It is crucial not to move the scanner during calibration.
  4. Scanning: After calibration, the tool is moved flat against the wall. The screen displays indicators for stud edges, center, and signal strength.
  5. Stud Confirmation (Wood vs. Metal): When a stud is detected in Stud Scan Mode, it's important to confirm if it's wood or metal. This can be done by:
    • Using the bottom magnet on the detected center mark.
    • Switching to Metal Scan Mode to re-scan the area.
  6. Wire Warning: The "WireWarning" indicator flashes whenever a live, unshielded AC wire is detected, regardless of the active scanning mode.
  7. Troubleshooting: The manual addresses common issues like no readings, inconsistent results, or difficulty finding studs, often attributing them to improper calibration technique (e.g., calibrating too close to a stud or metal).

Maintenance Features

  • Low Battery Indication: The "Low Battery Indicator" icon appears on the screen when the battery level is too low for proper operation, prompting immediate replacement with a new 9-volt battery.
  • Surface Considerations: The device's performance can be affected by various wall conditions:
    • Moisture: High moisture content in materials, wall texture, or paint can impact sensing depth and accuracy. Freshly painted walls may need several weeks to dry.
    • Wallpaper: Functions normally unless the wallpaper contains metallic foil, metallic fibers, or is still wet.
    • Lath & Plaster: Due to irregularities, locating studs in Stud modes can be difficult. Metal Scan Mode is recommended to locate nail heads. If plaster has metal mesh reinforcement, detection may be impossible.
    • Extremely Textured Walls/Acoustic Ceilings: Place thin cardboard on the surface and scan over it in Stud 1 1/2 in. mode. If irregular results persist, switch to Metal Scan Mode to find nails or drywall screws.
    • Wood Flooring/Subflooring/Gypsum Drywall over Plywood Sheathing: Use Stud 1 1/2 in. mode and move slowly. Signal strength may be limited through thick surfaces.
  • Electrical Safety: Users are warned to always turn off electrical power, gas, and water supplies before penetrating a surface. The device should not be exclusively relied upon to locate items; other information sources (construction plans, visible entry points of pipes/wiring, standard stud spacing) should also be consulted. Electrical field locators may not detect live AC wires if they are too deep, in concrete, encased in conduit, behind plywood shear walls, or if moisture is present.

For any questions or issues, users are encouraged to contact support@tavool.com for replacement or refund, emphasizing the company's commitment to customer satisfaction.

Tavool TH511 Specifications

General IconGeneral
BrandTavool
ModelTH511
CategorySecurity Sensors
LanguageEnglish

Related product manuals