T
T
a
a
y
y
l
l
o
o
r
r
®
®
9
9
7
7
1
1
5
5
L
L
T
T
h
h
e
e
r
r
m
m
o
o
m
m
e
e
t
t
e
e
r
r
O
O
p
p
e
e
r
r
a
a
t
t
i
i
n
n
g
g
I
I
n
n
s
s
t
t
r
r
u
u
c
c
t
t
i
i
o
o
n
n
s
s
Thank youfor purchasing a Taylor® infrared thermometer. Please read thisinstruction manual carefully before use.
Keeptheseinstructionshandyforfuturereference.
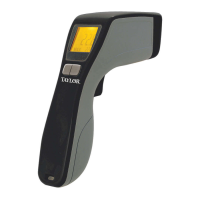
Thethermometerisanoncontactinfraredthermometer.Simplyaimthethermometeratthetargetandpressthe‘Scan
key’ todisplaythesurfacetemperature.
Temperature Reading Operation
Press the ‘Scan key’ to take a temperature
reading. The unit will display the
temperature of the target for 10 seconds
then turn off automatically.
CAUTION!
1. WHEN DEVICE IS IN USE, DO NOT
LOOK DIRECTLY INTO THE LASER
BEAM–PERMANENT EYE DAMAGE
MAY RESULT.
2. USE EXTREME CAUTION WHEN
OPERATING THE LASER.
3. NEVER POINT THE DEVICE TOWARDS
ANYONE’S EYES.
4. KEEP OUT OF REACH OF ALL CHILDREN.
Continuous Temperature Reading Operation
1.Press andholddown the “Scan”key.
2. Theunitwilldisplaycontinuallyupdatedrealtime temperature readingswhilethe “Scan” keyishelddown.Whenthe
keyisreleased,thelasttemperaturewilldisplayfor10seconds,and thentheunitwillturnoffautomatically.
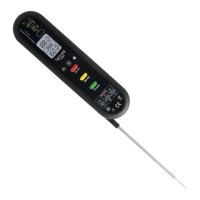
HACCP CHECK
The “HACCP CHECK” feature is incorporated in our thermometer
temperaturetographicallyindicatecriticaltemperaturezone.Theiconsand
LED indicatorslocated abovethe displayindicate ifafoodproductisina
safeorunsafeHACCP “DangerZone”temperature.ThegreenandredLED
lightwillalwaysbelitbefore the power isturned off.
A Green LED light with a ” ” icon indicates a safe cool or frozen
condition below 40
o
F (4
o
C), while a” ” icon indicates a safe holding
temperatureabove 140
o
F (60
o
C).
When the temperature is between 40
o
F (4
o
C) and 140
o
F (60
o
C), the red
LEDwith a” ”iconwillappearandindicatethatthetemperatureisfallenwithintheHACCP“DangerZone”from40
o
to 140
o
F (4~60
o
C).
°C OR °F MODE
Tochangethethermometerfrom‘°C’to‘°F’orfrom‘°F’to‘°C’,firstturntheinstrumentonbypressingthe‘Scankey’,
thenpressthe ‘Modekey’onetime. The‘°C’ or ‘°F’ symbolwillflash. Pressthe ‘Scankey’ tochangetoscale.
EMISSIVITY RANGE
The infrared thermometer is supplied with a default emissivity of 0.95. The emissivity of the thermometer can be
changed from 0.05 (5E) to 1 (100E). Changesshould only be carried out by experienced personnel.Tochange the
emissivity, firstly turn the instrument on by pressing the ‘Scan’ button, then press the ‘Mode’ button two times for
emissivityfunction.The95EwillflashontheLCDscreen,thenpressthe‘Meas.’buttontoadjusttheemissivityvalue,
pressthe ‘Mode’buttonagainto exitthesetupscreen.Forinformationrelatingto theemissivityofspecificmaterials,
pleasecontactthenearestretailer.Note:noncontactinfraredthermometersarenotrecommendedforuseinmeasuring
the temperatureofshinyorpolishedmetals.
BAR DISPLAY: The fixed setting range for bar display is 68428°F (20~220°C) and Center=248°F (120°C).
Thebardisplaywillbeupdatedcomplywiththemeasurementreadingchanged.
LCD ERROR MESSAGES
Thethermometerincorporatesvisualdiagnosticmessagesasfollows:
「 」
「 」
‘Hi’ or ’Lo’ is displayed when the temperature being measured is outside of the range of the
instrument, ‘Hi’ whenhigherthan+662°F (+350°C)and ‘Lo’ whenlowerthan 67°F (–55°C).
「 」
「 」
‘Er2’isdisplayedwhenthethermometerisexposedtorapidchangesintheambienttemperature.
‘Er3’is displayed when theambienttemperature of the thermometer EXCEEDS 32°F(0°C) OR
+122°F (+50°C). In both cases you should allow plenty of time (minimum 30 minutes) for the
thermometerto stabilize totheworking/roomtemperature.
「 」
Forallothererrormessagesitis necessarytoresetthethermometer. Toresetthethermometer,
turnthe instrument off, remove the battery and wait for aminimum ofone minute, reinsert the
battery and turn on. If the errormessage remains, please contact Customer Servicefor further
assistance.
BATTERIES
Thethermometerincorporatesvisuallowbatteryindicationasfollows:
‘BatteryOK’:
measurements
arepossible
‘BatteryLow’:batteryneedsto
bereplaced,measurements
arepossible
‘BatteryExhausted’:
measurementsare
notpossible