7
In this step, we’ll make sure all systems are a GO!
Connect your power cable to the TV, then plug
it into the wall outlet.
Power Tip! Always replace depleted batteries with two
same brand-new batteries from the same manufacturer.
Never use damaged batteries.
If your remote gets warm/hot during use, discontinue
use and contact customer support immediately at
support.tcl.com/us.
Review the Battery CAUTION & Disposal Information on page 3.
Power your Voice Remote with Alexa by inserting
the included batteries.
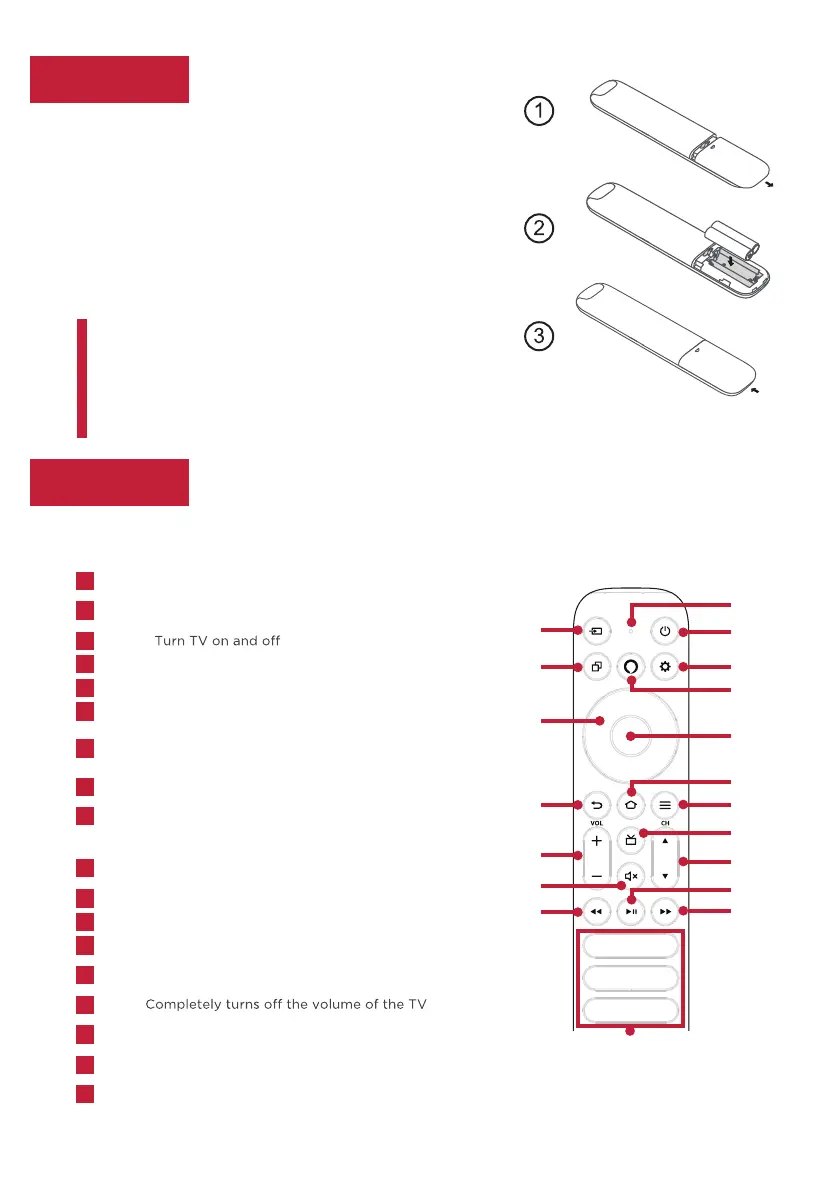
remoteGrab yourStep 3
The Voice Remote with Alexa should feel right at home in your hand. We designed
it to be incredibly intuitive for watching TV and navigating on-screen menus.
Channel +/-
Increases/Decreases channel number in Live
TV mode
N
Options
Displays setting options (where available)
K
Pause/play
Pauses/Plays the selected media
Q
Rewind
Moves frames backwards in media such as movies,
scrolls back a day in the channel guide
P
Home
Opens the Home screen. Press and hold to display
quick settings menu
J
Back/Return
Returns to previous menu screen, goes one
step back, closes open windows, returns to main screen or
Home tab
I
Guide
Displays the channel guide
M
Power
C
Input Select input source
A
Fast forward
Moves frames forward in media such as
movies, scrolls forward a day in the channel guide
R
Volume +/-
Increases/decreases the volume level
L
Direction
Navigate up/down or left/right through content
(Navigates menus, setting options, moves the focus or
cursor etc. Follow the on-screen instructions)
G
D
O
Step 2 Power up
G
K
H
B
C
E
Connect external devices by referencing port
label and descriptions on the next page.
A
F
Voice button Activates the microphone on the remote
H
Select
Confirms selections, enters sub-menu
I
M
L
N
R
P
Mute
O
Settings
Enter the setting
E
Recents
Displays recently content
D
Featured Apps shortcut
Lets you directly access
featured channels.
Note: Apps are subject to the
actual remote control.
B
Microphone opening Speak into the microphone when
using Alexa, including voice search
Insert batteries in the correct polarity as
indicated in the battery compartment.
F
J
Q

 Loading...