Do you have a question about the Teccpo TDCD03P and is the answer not in the manual?
Explains various symbols used in the manual for safety and product information.
Guidelines for maintaining a safe and hazard-free work environment during tool operation.
Precautions to prevent electric shock, including proper grounding and avoiding wet conditions.
Advice on user alertness, using PPE, and preventing unintentional starts for user protection.
Instructions on correct usage, maintenance, and safe storage of the power tool to prevent damage.
Guidelines for safe charging, handling, and storage of battery packs to prevent fire hazards.
Recommendation to use qualified personnel for servicing and repairs to maintain tool safety.
Warnings and guidelines for safe handling, storage, and charging of Li-Ion batteries to prevent hazards.
Instructions for correct and safe usage of the battery charger to prevent overheating and fire.
Explains how to change the drill's rotation direction using the forward/reverse switch.
Details how to adjust the torque setting using the torque selector for different applications.
Describes how to select gears for driving screws or drilling based on torque and speed needs.
Instructions on how to start, stop, and control the speed of the drill using the trigger switch.
Guidance on using screwdriver bits, selecting torque settings, and avoiding drill mode for screws.
Steps for drilling into wood, including gear selection, bit choice, and dust precautions.
Instructions for drilling metal, including bit suitability, cooling, and safety precautions.
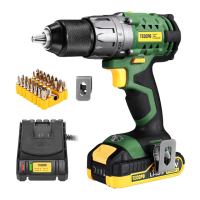
This document provides an instruction manual for the TECCO 20V Max LI-ION Cordless Drill/Driver Kit, model TDCD03P, covering operation and safety instructions.
The TECCO TDCD03P is a 20V Max Li-ion cordless drill/driver designed for drilling and driving screws. It features a chuck for securing drill bits and accessories, a torque selector for adjusting the driving force, and a gear switch for selecting between different speed and torque ranges. The tool is powered by a removable Li-ion battery pack and includes a charger for recharging. A forward/reverse switch allows for changing the direction of rotation, and a trigger switch controls the tool's operation and speed. For user convenience, it incorporates a working light to illuminate the work area and a belt clip for temporary hanging.
Getting Started: Before use, ensure the battery is properly fitted. To install a battery, slide it onto the battery slot until it clicks and locks. To remove, press the battery release button and slide the battery out. Always ensure the battery and tool contacts are clean and undamaged.
Charging the Battery: The battery charger is designed for indoor use only. Insert the battery charger's mains plug into a suitable socket. The green LED on the charger indicates it's ready to charge. Slide a fully or partially discharged battery onto the charger. The red LED will illuminate during charging and turn off, with the green LED illuminating, when fully charged. The battery has a built-in charge indicator; pressing the button will show the charge level. A high charge level is indicated by the right LED, while a low charge level (left LED) means the battery needs charging soon. It's important to charge batteries at ambient temperatures between 10 and 40°C (ideally 20°C) and allow 15 minutes for the battery to cool after charging. Do not leave batteries on charge for extended periods.
Fitting Drill Bits and Accessories: Always remove the battery from the drill before attaching, adjusting, or removing accessories. To fit a drill bit or accessory, rotate the chuck anti-clockwise to open the jaws, place the bit centrally into the chuck, and then rotate the chuck collar clockwise to tighten securely. After fastening, run the machine carefully to ensure the bit runs centrally and smoothly. If it wobbles, release the chuck, check for damage, correct the position, retighten, and test again. Never attempt to tighten bits by gripping the chuck and switching the tool on, as this can cause injury and damage. Ensure any accessory or bit has a maximum speed rating not lower than the tool's no-load speed.
Direction Control: The forward/reverse switch controls the direction of rotation. Push the switch to the right for anti-clockwise rotation and to the left for clockwise rotation. Never change the direction while the tool is running, as this can cause permanent damage. When the switch is in the central position, the drill is locked and cannot be switched on, serving as a safety feature.
Torque Control: The cordless drill is equipped with a torque control clutch, allowing the user to set the correct torque for specific applications. The clutch settings are indicated by symbols on the torque selector. Rotate the torque selector to choose the desired setting; a higher number on the torque ring corresponds to higher torque.
Gear Selection: Use the gear switch to select between two gears. Gear 1 provides higher torque and is generally more suitable for driving screws and fasteners. Gear 2 provides lower torque but higher speed, which is ideal for drilling and should not be used for driving screws and fasteners.
Switching On/Off and Speed Control: To start the drill, squeeze the trigger switch. The built-in work light will illuminate when the trigger is squeezed. If the trigger cannot be pressed, check that the forward/reverse switch is not in its middle (locked) position. The speed of the drill is controlled by the trigger's movement; pressing it further increases the speed. Release the trigger switch to stop the machine.
Screwdriver Use: Always use a universal bit holder with screwdriver bits; do not mount bits directly into the chuck. Select gear 1 and adjust the drill to the appropriate torque setting. Never use the machine in drill mode when driving screws. If unsure about the best torque setting, start with a low setting and increase if more torque is needed.
Drilling Wood: Select the appropriate gear (gear 2 for higher speed) and rotate the mode selector to the drill position. Ensure drill bits are suitable for wood and within the machine's maximum capacity. Wear adequate breathing protection as wood dust can be toxic.
Drilling Metal: Select the appropriate gear (gear 2 for higher speed) and rotate the mode selector to the drill position. Ensure drill bits are suitable for the metal grade and within the machine's maximum capacity. Mark the intended hole position with a hammer and center punch for accuracy. The drill bit and workpiece will become very hot, so avoid touching them or allowing contact with combustible materials. Use a suitable lubricant or cutting fluid and drill at appropriate speeds. Apply moderate pressure to prolong drill bit life. Use a countersink bit to remove sharp burrs from the hole.
Belt Clip Installation: The belt clip can be installed into a groove in the tool housing and secured with a screw, providing a convenient way to temporarily hang the tool.
General Maintenance: Always disconnect the charger from the mains power supply and remove the battery from the drill before performing any maintenance or cleaning. Neither the drill nor the charger contains user-serviceable parts; if the device malfunctions, return it to an authorized service center. Regularly check that all fixing screws are tight. Inspect the supply cord of the tool and any extension cords for damage or wear before each use; repairs should be carried out by an authorized service center.
Cleaning: Keep the tool clean at all times to prevent dirt and dust from causing wear and shortening its service life. Clean the body of the machine with a soft brush or dry cloth. If available, use clean, dry, compressed air to blow through the ventilation holes. Clean the tool casing with a soft damp cloth and mild detergent; do not use alcohol, petrol, strong cleaning agents, or caustic agents on plastic parts.
Lubrication: Slightly lubricate all moving parts at regular intervals with a suitable spray lubricant.
Storage: Store the tool carefully in a secure, dry place out of the reach of children. For long-term storage of lithium-ion battery packs, store them in a high charge state, disconnected from the power tool, to prevent damage to the cells. Do not store discharged battery packs for long periods.
Battery Safety: Li-ion batteries are a fire, burn, and explosion hazard if incorrectly used, stored, or charged. Keep batteries out of reach of children. Only use the provided charger and specifically designated Li-ion batteries. Allow batteries to cool for 15 minutes after charging or heavy use to prevent overheating. Store batteries at room temperature (approximately 20°C) when not in use. Ensure battery contacts do not short accidentally by keeping them clean and away from other metal objects like paperclips, coins, keys, nails, and screws. If liquid is ejected from the battery, avoid contact; if contact occurs, flush with water and seek medical help if it contacts eyes. Do not open, disassemble, crush, heat above 60°C, or incinerate batteries. Do not dispose of them in fire.
Battery Charger Safety: Refer to the manual section on battery charger use. Do not use the charger with any batteries other than those supplied. Keep the charger clean to prevent shorts or blocked air vents. If the supply cord is damaged, it must be replaced by the manufacturer or a qualified person to avoid hazards. Never attempt to recharge non-rechargeable batteries.
| Battery Type | Lithium-ion |
|---|---|
| Charging Time | 1 Hour |
| Chuck Size | 1/4 inch |
| Torque Settings | 18+1 |
| Chuck Type | Keyless |
| LED Light | Yes |
| Battery Capacity | 2.0Ah |