ENGLISHENGLISH
Version 3 November-07 Instruction manual 50100XXX Page 23
Neither the manufacturer nor the distributor will assume any responsibility for the dama-
ges produced to the equipment during its installation or damages to persons suffered by the
improper use of the electric connection. The tension should be 220V 50Hz ±10%.
If you are not using the microscope for a long period of time please make sure it is dis-
connected from the net and protected from dust (this way you will avoid accidents and
will extend its working-life).
Setting up
The operator has to assume a comfortable, upright position with the back straight. It is
convenient to work in a dark table in order to avoid an awkward fatigue and parasite
light, as it may dazzle the operator or decrease the image sharpness.
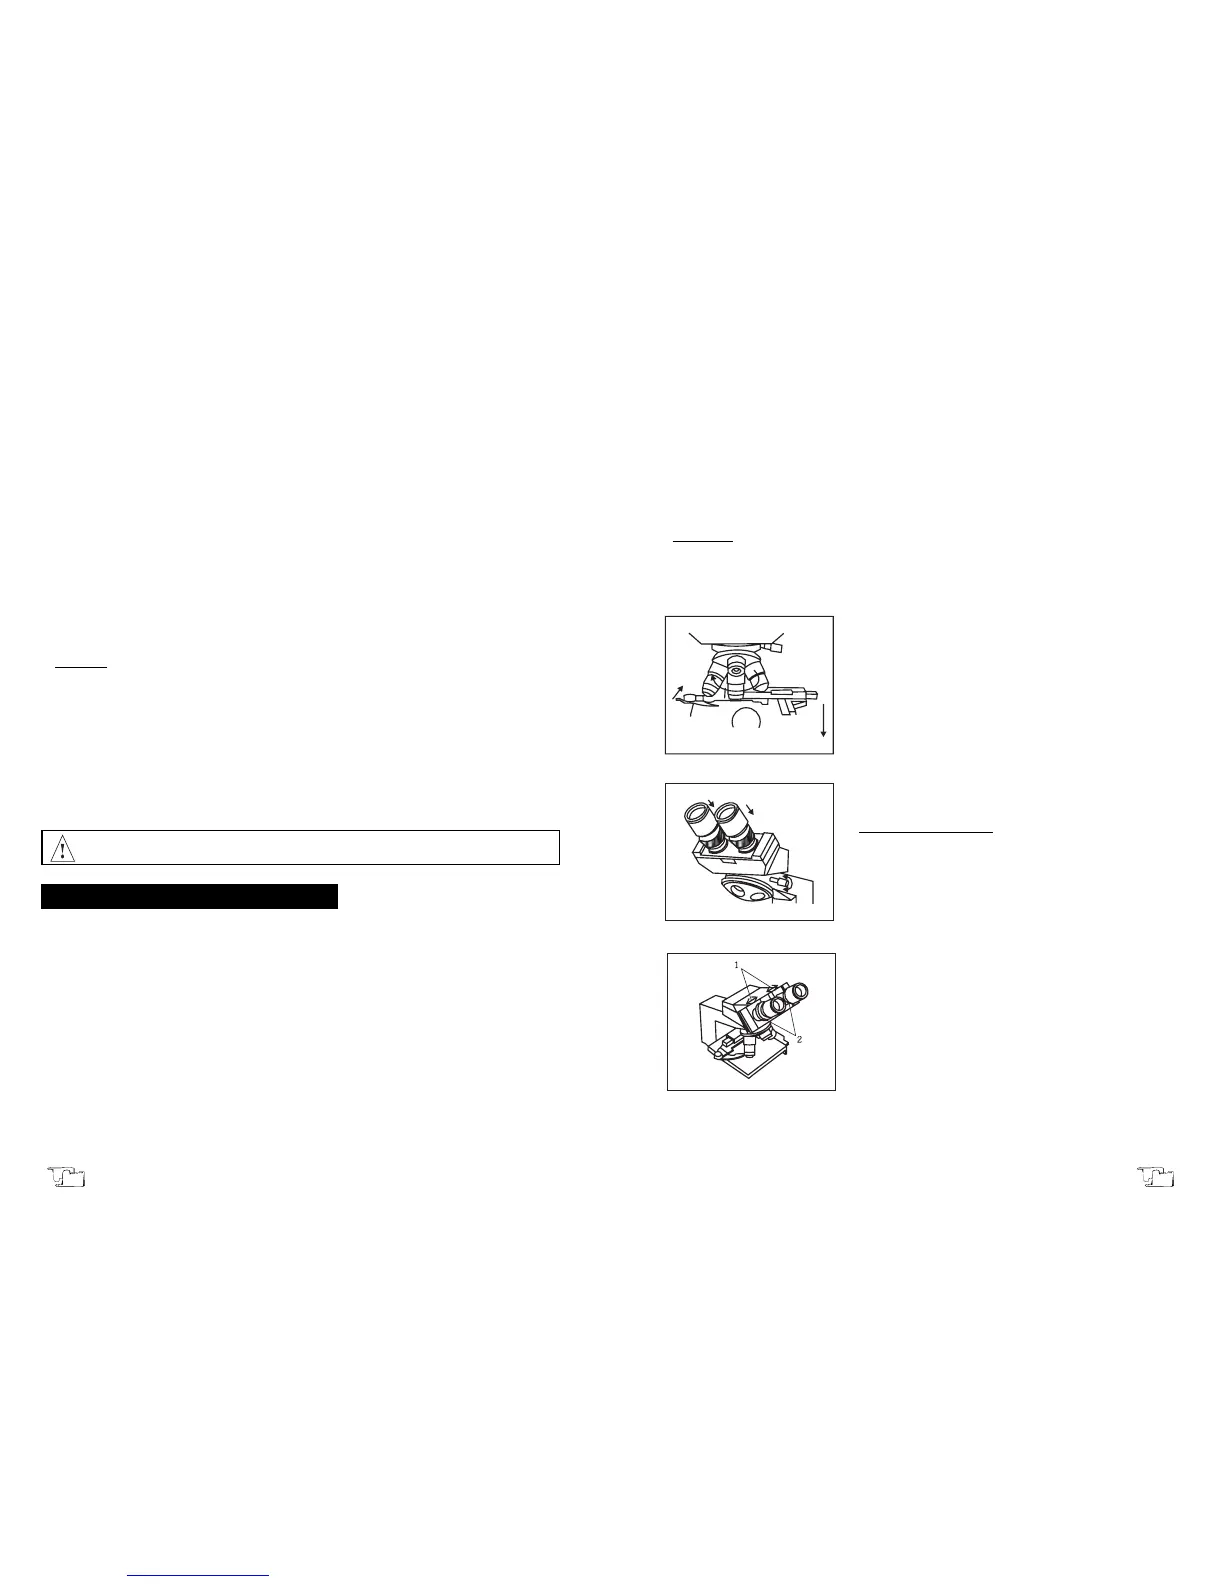
Lower the stage with the help of the coarse control. Notice objectives in the nosepiece
must be placed clockwise (4x-10x-40x-100x) in an ascen-
dant way (pic. 3).
VERY IMPORTANT: Never hold the microscope by
the stage nor the tube, as all the equipment's weight
would fall on the fine screw and mechanical and preci-
sion parts would be slowly eroded.
Mount the head and tighten it with the screw provided.
Insert the eyepiece/s (WF10x, P16x) as shown in picture 4.
Binocular tube is normally facing the front of microscope,
but you can place it in any other direction if necessary.
Always use the microscope's plastic cover when you are
not using it for long periods of time so as to avoid dust
laying on the optics.
Operating instructions
In those models provided with binocular observation
system, the eyepieces should be properly adjusted. This
will depend on:
a) Interpupillary distance (pic. 5): Adjust the interpupi-
llary distance by separating or joining the eyepieces until
you obtain a total fusion of the two images.
b) Dioptric compensation of the tubes: By closing first
one eye and then the other you will notice quite a differen-
ce if focusing. To correct this defective image you should
adjust the dioptric compensation ring to zero by looking
through the right eyepiece and focusing the sample with
coarse and fine adjustment knobs. Once you have focused
the sample you should look through the left eyepiece and
adjust the dioptric compensation ring until you obtain a
sharp image. Should the observer suffer from astigmatism,
he will have to keep his glasses on previously checking
there is enough distance to the eyepiece so as to avoid the
glasses brush the tube.
Once you have find out these values it will be very useful to memorize them to avoid
repeating this process each time you are using the microscope, above all in case the equip-
ment is shared by more than a user.
Picture 3
Picture 4
Picture 5
Page 26 Instruction manual 50100XXX Version 3 November-07
IMPORTANT: Before changing the lamps/bulbs or fuses please make sure it is discon-
nected from the net. You must not use lamps with a higher power, as they could provoke
over heating or any malfunction. For changing the lamps the microscope is provided with
a device on the lower part. You should take off the screw, loosen the lamp holder screws
and then change the lamp holding it firmly. Then, centre the lamp holder again if neces-
sary.
If it is necessary to change the fuse you should do as follows: Loosen the protective
cover that is on the base of the microscope (FUSE), change the 0.5 A fuse and place it in
the same position, screwing the protective cover again.
Please use the plastic cover provided to keep the microscope away from dust lying on
the optical parts when it is not used for a long period of time.
Please keep the original packaging either to transport the equipment, when it is not
being used for a long time or when you send it for an overhaul.
Cleaning
Never use scourers or substances that can grate for cleaning metallic parts such as stain-
less steel, aluminium, coatings, etc. as they damage the microscope and produce an early
ageing of the equipment.
Use a fluff-free cloth dampened with soaped water that does not contain abrasives.
Lenses must not be disassembled by the user. Were there any dust or dirt to be cleaned,
you should clean it with a natural horse hair brush or a smooth piece of cloth, fluff-free,
dampened with a bit of xilol or toluene.
You should use non-corrosive lubricants in metallic parts, being careful of not touching
optical parts.
ATTENTION!! IF EQUIPMENTS ARE NOT PROPERLY CLEAN AND DISINFECTED
THEY WOULD NOT BE ALLOWED TO REPAIR BY OUR TECHNICAL SERVICE.
6. CHOICE OF OBJECTIVES AND EYEPIECES
The observed image loses surface and sharpness as magnification increases. The men-
tioned increase should be done by changing objectives and putting each time a more
powerful one and not by changing eyepieces to a higher magnification, as eyepieces only
magnify the image obtained with the objective. Thus, the more magnification the eyepie-
ce has, the higher will be the loss of sharpness, clarity and surface of the resulting image.
For routine observations you should use the eyepiece with lesser magnification with
more powerful objectives. The eyepiece with the higher magnification should be kept
back for particular occasions, bearing in mind that it decreases definition and does not
increase resolution.
 Loading...