EasyManua.ls Logo

Techno Line WT 188

Techno Line WT 188
2 pages
To Next Page IconTo Next Page
Loading...
INSTRUCTION MANUAL WT 188
FEATURES:
- Radio controlled clock
- Manual time setting
- 12-or 24-hour time display
- Calendar display
- Time zone (+/- 12 hours)
- Indoor temperature in °C/°F
- Alarm snooze function
- 5 languages selectable display in Day-of –week: German, English, Spanish, Italian and French
- Jumbo LCD
- Back-light
SETTING UP:
1. Firstly, open the battery cover at the back of the clock.
2. Checking the correct polarization, insert 2 x AA, LR06, 1.5V batteries into the compartment and
replace the cover.
3. When the batteries are inserted, the clock will be automatically scanning for the radio controlled
time signal.
4. If after 6 minutes the DCF time has not been received, you can manually set the time. (see chapter
manual time setting)
5. If the clock cannot receive the signal at the first time, it will automatically attempt to receive the
signal again one hour later.
6. The clock will automatically receive the signal everyday 2.00 am.
7.
MANUAL TIME SETTING:
In some cases after inserting the batteries, the clock may not be able to receive the DCF signal. In this
situation, the time should be set manually.
1. Press and hold the TIME key for 3 seconds and the “hour” digits will start flashing, press or
key to adjust the hour.
2. Press the TIME key again and the “minute” digits will start flashing, press the or key to
adjust the minute.
3. Press the TIME key again and the “second” digits will start flashing, press the or key to clear
the “second” to 0.
4. Press the TIME key again and the “year” digits will start flashing, press or key to adjust the
year.
5. Press the TIME key again and the “dash” between “date” and “month” will start flashing, press
or key to shift the position of “date” and “month”.
Question and Answer IconNeed help?

Do you have a question about the Techno Line WT 188 and is the answer not in the manual?

Techno Line WT 188 Specifications

General IconGeneral
TypeDigital table clock
Form factorRectangular
ThermometerYes
Product colorBlack
Display typeLCD
Battery typeAA
Number of batteries supported2
Quantity per pack1 pc(s)
Weight and Dimensions IconWeight and Dimensions
Depth75 mm
Width115 mm
Height73 mm

Summary

Manual Time Setting

Adjust Hour

Press and hold TIME for 3 seconds, then use ▲ or ▼ to adjust the hour.

Adjust Minute

Press TIME, then use ▲ or ▼ to adjust the minute.

Set Seconds to Zero

Press TIME, then use ▲ or ▼ to set seconds to 0.

Adjust Year

Press TIME, then use ▲ or ▼ to adjust the year.

Configure DateMonth Format

Press TIME, then use ▲ or ▼ to shift date and month position.

Adjust Month

Press TIME, then use ▲ or ▼ to adjust the month.

Adjust Date

Press TIME, then use ▲ or ▼ to adjust the date.

Set Time Zone

Press TIME, then use ▲ or ▼ to set the time zone offset.

Select Day of Week Language

Press TIME, then use ▲ or ▼ to choose the language for the day of week.

Alarm Setting

Initiate Alarm Setting

Press the ALARM ON/OFF key to begin alarm setup.

Adjust Alarm Minute

Hold ALARM for 3s, then use ▲ or ▼ to adjust alarm minute.

Adjust Alarm Hour

Press ALARM again, then use ▲ or ▼ to adjust alarm hour.

ActivateDeactivate Alarm

Use ALARM ON/OFF to activate alarm, snooze, or deactivate.

Function Keys

SnoozeLight Key

Pause alarm for 5 minutes or illuminate the LCD for 3 seconds.

CF Key

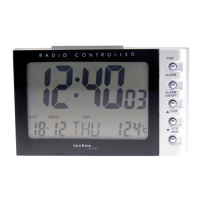
Toggle temperature display between Celsius and Fahrenheit.

1224 Key

Toggle time display between 12-hour and 24-hour format.

Wave Key

Activate or inactivate DCF signal scanning by holding for 3 seconds.

Related product manuals