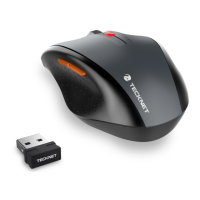
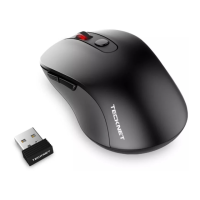
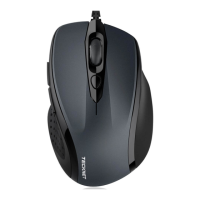
1. Left Button
2. Scroll Wheel
3. Right Button
4. Status Indicator
5. Magnetic Removable Cover
6. USB-C Charging Port
7. USB-A Receiver
8. 2.4GHz/Off/Bluetooth 3-mode Switch
9. sensor
10. Round Button (Bluetooth Connection Switch/DPI Switch)
Specifications:
1. DPI: 600/1200/2400/4000 (default 1200)
2. Battery: 550mAh 3.7V
3. Charging input: USB-C port, 5V
4. Charging cable: black; USB-A to USB-C; length: 80cm;
material: PVC
5. Connection mode: Bluetooth 3.0/5.0, 2.4GHz connection
6. Bluetooth device name: "BT5.0 Mouse" or "BT3.0 Mouse"
7. Receiver type: USB 2.0
8. Color of sensor light: blue
9. Working voltage: 3.7V
10. Working current: ≤15mA
11. Standby power consumption: 20 uA
12. Transmission distance: ≤15 m
13. Button durability: about 5 million clicks
14. Color: silver gray
15. Size of the mouse: 4.3*2.4*0.9 in (110*61*24 mm)
16. Mouse net weight: 2.5 oz (72 g)
17. Casing material: PC+ABS
18. Surface processing technique: texturing, lacquer spray
System Requirements:
Windows 2000/2003/XP/Vista, Win7, Win8, Win10, Mac OS X 10
(or higher).
Note:
The scroll wheel only works with the operating systems listed
above. If you use the mouse with other operating systems, the
mouse may either not work or lose its enhanced features.
The mouse has a built-in 550mAh polymer rechargeable lithium
battery, which requires no replacement. It takes about 2.5 hours
to reach a full charge from zero power. In the case of using for 2
hours a day, and the rest of the time is in standby/sleep mode, it
can be used for about 90 days after a full charge. When the
mouse runs out of power, the indicator light on the top keeps
flashing. Charge the mouse through the charging port inside
the mouse.
Follow the charging steps below:
1. Open the cover of the mouse, take out the USB-A receiver and
you can see the USB-C charging port.
2. Plug a charger with a USB-A port into a power source (charger
not supplied).
3. Connect the mouse to the charger or a laptop with a USB-A
port with the supplied USB-A to USB-C charging cable. When
connected to power, the status indicator on the top of the
mouse lights red, indicating that the mouse is charging, and
the red light is off when charging is complete.
⑦
⑧
⑨
⑩
4. After charging is complete, put away the charging cable for
further use, and close the mouse cover.
Tip:
If the mouse will not be used for a long time, slide the 3-mode
switch to the middle to turn off the mouse for saving power
and increasing battery life.
EN-2 EN-3
EN