ÂÂ ENGINE SPEED:
NEVER TAMPER WITH ENGINE GOVERNOR WHICH IS FACTORY
SET FOR PROPER ENGINE SPEED. OVERSPEEDING ENGINE
ABOVE FACTORY HIGH SPEED SETTING CAN BE DANGEROUS.
CHANGING OF ENGINE GOVERNED SPEED WILL VOID ENGINE
WARRANTY.
For engine adjustments and/or repairs not covered in this “OPERATOR’S
MANUAL” see “WARRANTY & REPAIR” on Page 6.
STORAGE
NEVER STORE ENGINE WITH FUEL IN TANK INDOORS OR IN
ENCLOSED, POORLY VENTILATED AREAS, WHERE FUEL FUMES
MAY REACH AN OPEN FLAME, SPARK OR PILOT LIGHT AS ON A
FURNACE, WATER HEATER, CLOTHES DRYER OR OTHER GAS
APPLIANCE IF ENGINE IS TO BE UNUSED FOR 30 DAYS OR
MORE, PREPARE AS FOLLOWS:
À À DRAIN FUEL SYSTEM:
A. Remove all gasoline from carburetor and fuel tank to prevent gum
deposits from forming on these parts and causing possible malfunc-
tion of engine.
DRAIN FUEL INTO APPROVED CONTAINER OUTDOORS, AWAY
FROM OPEN FLAME. BE SURE ENGINE IS COOL. DO NOT
SMOKE.
B. Run engine until fuel tank is empty and engine stops due to lack of
fuel.
NOTE: If “Gasohol” has been used, complete above instructions
and then put 1/2 pint of “Unleaded” gasoline into fuel tank and repeat
above instructions.
NOTE: Tecumseh SMART START
TM
gasoline preservative and
stabilizer is an acceptable alternative in minimizing the formation of
fuel gum deposits during storage. Add stabilizer to gasoline in fuel
tank or storage container. Always follow mix ratio found on stabilizer
container. Run engine at least 10 minutes after adding stabilizer to
allow it to reach carburetor.
ÁÁ DRAIN CARBURETOR (if so equipped):
Drain carburetor by pressing upward on bowl drain (see Figure 11,
which is located below carburetor (see Figure 1).
DRAIN FUEL INTO APPROVED CONTAINER OUTDOORS, AWAY
FROM OPEN FLAME. BE SURE ENGINE IS COOL. DO NOT SMOKE.
ÂÂ CHANGE OIL:
Change oil if it has not been changed in the last three (3) months. See
“CHANGE OIL” instructions in “MAINTENANCE” section.
ÃÃ OIL CYLINDER BORE:
A. Remove spark plug. Squirt one (1) oz. (30 ml) of clean engine oil
into spark plug hole.
B. Cover spark plug hole with a rag.
C. Crank engine over, slowly, several times.
AVOID SPRAY FROM SPARK PLUG HOLE WHEN CRANKING
ENGINE OVER SLOWLY.
D. Install spark plug. Do not connect spark plug wire.
ÄÄ CLEAN ENGINE:
Remove any clippings, dirt, or chaff from exterior of engine.
ÅÅ BATTERY (if so equipped):
See equipment manufacturer’s instructions for proper storage of battery.
ÄÄ SPARK PLUG (see Figure 9):
This spark ignition system meets all requirements of the Canadian
Interference-Causing Equipment Regulations. This engine complies
with all current Australian and New Zealand limitations regarding
electromagnetic interference.
Check spark plug yearly or every 100 operating hours.
A. Clean area around spark plug.
B. Remove and inspect spark plug.
C. Replace spark plug if electrodes are pitted, burned or porcelain is
cracked. For replacement use Champion RJ-19LM only.
NOTE: A resistor spark plug must be used for replacement.
D. Check electrode gap with wire feeler gauge and set gap at .030 if
necessary.
E. Install spark plug, tighten securely.
Figure 9
ÅÅ CHECK ENGINE AND EQUIPMENT OFTEN FOR LOOSE NUTS, BOLTS
AND ATTACHMENTS AND KEEP THESE ITEMS TIGHTENED.
ADJUSTMENTS
DO NOT MAKE UNNECESSARY ADJUSTMENTS. FACTORY SET-
TINGS ARE SATISFACTORY FOR MOST CONDITIONS. IF ADJUST-
MENTS ARE NEEDED, PROCEED AS FOLLOWS:
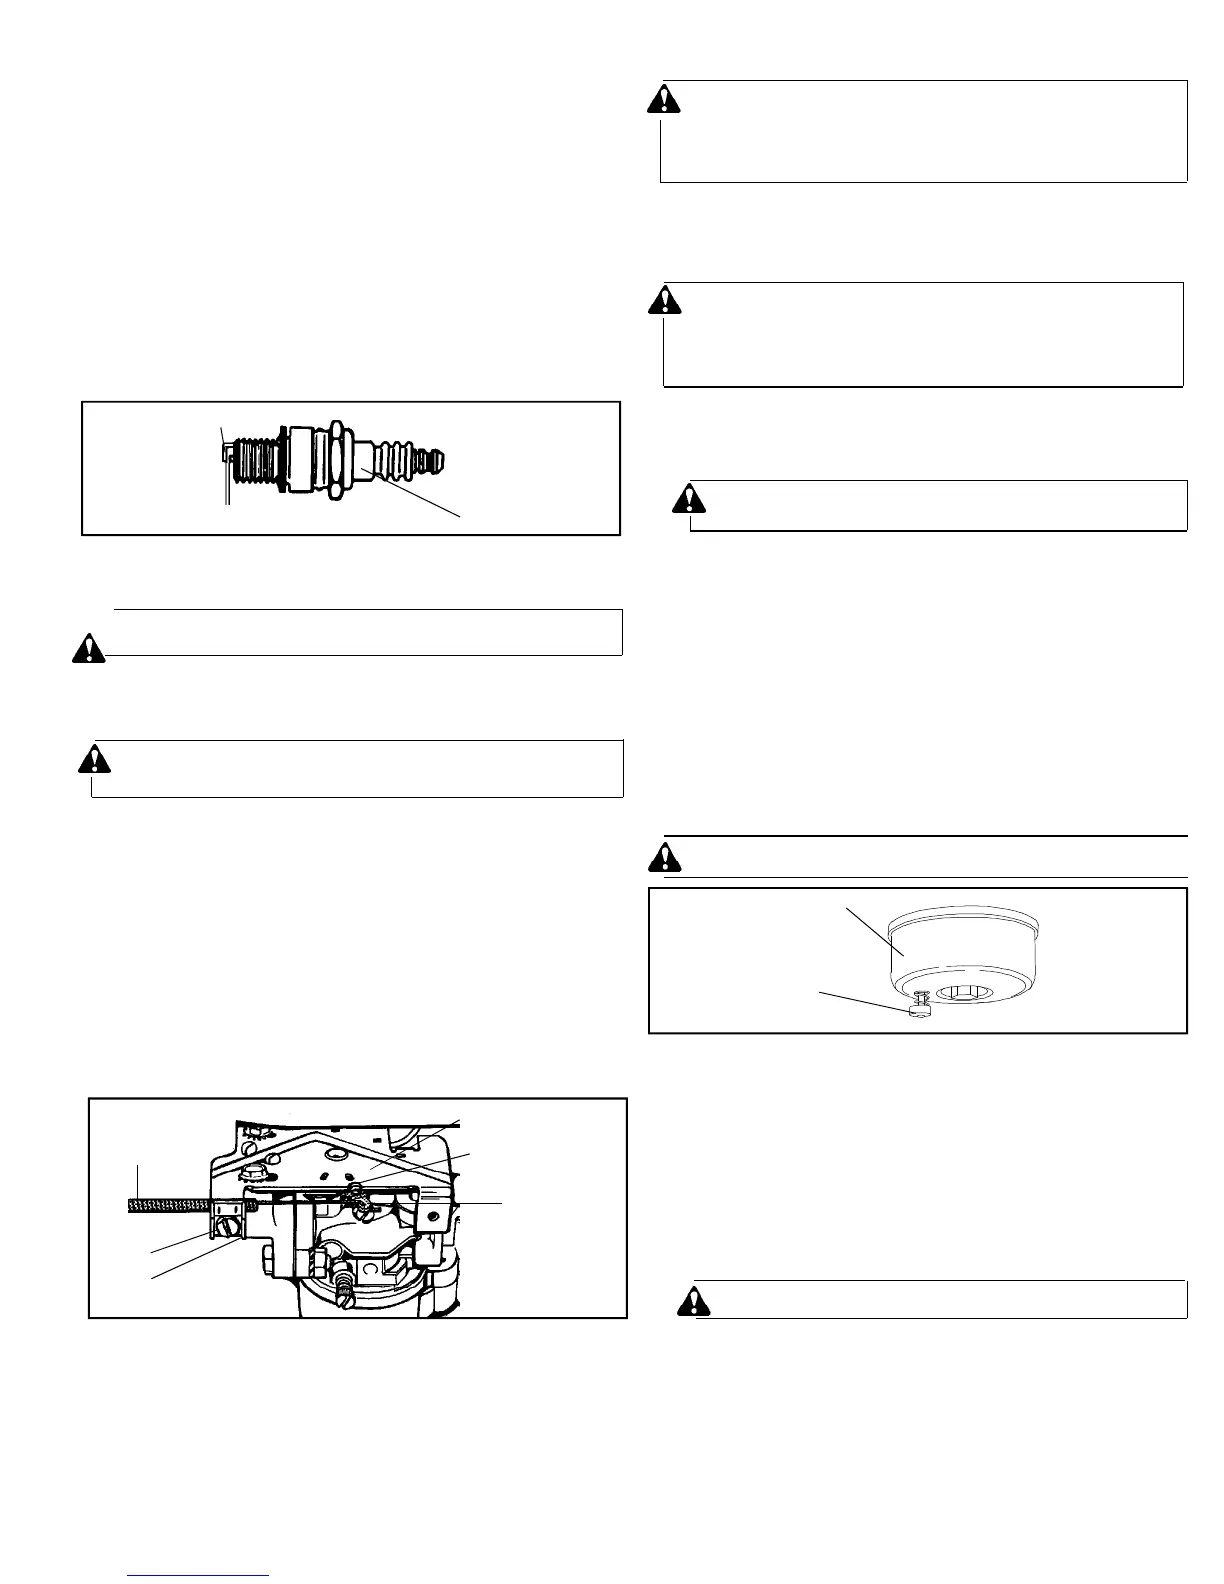
ÀÀ REMOTE CONTROL (see Figure 2 and Figure 10):
For satisfactory engine performance, engine and equipment control
must be adjusted properly. To check engine control adjustments,
proceed as follows:
A. Set equipment control at “FAST” and keep it in this position.
B. Loosen clamp screw so remote control cable can be moved in cable
clamp.
C. Move engine control lever into “FAST” and hold it in this position.
NOTE: Control lever is in “FAST” position when hole in control lever
and notch on control bracket are in line.
D. Tighten clamp screw securely so cable clamp will hold remote
control cable in place when equipment control is used.
The engine controls should now be adjusted correctly.
If more adjustments are needed, make them at the equipment
control (see equipment manufacturer’s instructions).
Page 5 181-657-14
Figure 11
ELECTRODES
.030 GAP PORCELAIN
REMOTE
CONTROL
CABLE
CLAMP
SCREW
CABLE
CLAMP
CONTROL BRACKET
NOTCH
CONTROL LEVER
FAST POSITION
(ILLUSTRATED)
Figure 10
CARBURETOR
BOWL DRAIN
ÁÁ CARBURETOR:
If you think your carburetor needs adjusting, see your nearest AUTHO-
RIZED TECUMSEH SERVICE OUTLET. Engine performance should
not be affected at altitudes up to 7,000 feet. For operation at higher
elevations, contact your AUTHORIZED TECUMSEH SERVICE OUT-
LET.