This document outlines the features, usage, and maintenance of the Tefal Pro Minute Anti-Calc steam generator iron.
Function Description
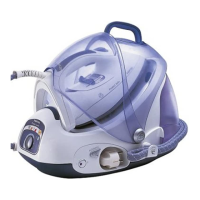
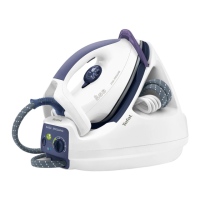
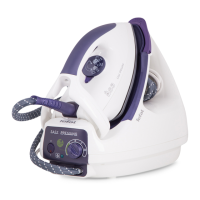
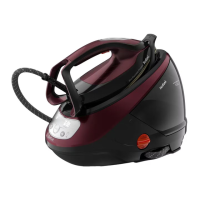
The Tefal Pro Minute Anti-Calc steam generator iron is designed for domestic use, providing powerful steam output for efficient ironing. It features a boiler that generates steam, which is then delivered to the iron's soleplate. The appliance is equipped with a Lock-System hoop (9) that secures the iron to its base (4) for easy transport and storage (fig.1, fig.2, fig.3). The control panel (6) allows users to adjust steam output and monitor the appliance's status. A removable water tank (10) facilitates easy refilling. The integrated anti-scale collector (13b) automatically collects scale that forms inside the boiler, extending the generator's lifespan and preventing scale emissions.
Important Technical Specifications
- Voltage: 230V and 240V (electrical installation with voltage between these values).
- Power Cord: Must be fully unwound from its storage space (8) before connection.
- Extension Lead: If used, must be correctly rated (10A) with an earth and fully extended.
- Safety Systems:
- Pressure release valve: releases excess steam in case of malfunction.
- Thermal fuse: prevents overheating.
- Water Tank Capacity: Indicated by a "max" mark (fig.5).
- Steam Output Control: Adjustable via a dial on the control panel (6b).
- Iron Temperature Control: Adjustable via a button on the iron (2).
- Indicator Lights:
- Green light (6a): "Steam ready" indicator.
- Red light (6c): "Water tank empty" indicator.
- Orange light (6d): "Anti-calc" indicator.
- Iron thermostat light (3).
- Boiler: Located in the base unit (14).
- Cord Fastener: (15) for the steam cord (5).
- Steam Cord Storage Space: (16).
Usage Features
Preparation:
- Placement: Place the steam generator on a flat, stable, horizontal, heat-resistant surface.
- Water Type: The iron is designed to operate with untreated tap water. For very hard water, it is recommended to mix 50% untreated tap water with 50% store-bought distilled or demineralised water. Do not use water from clothes dryers, scented/softened water, refrigerators, batteries, air conditioners, pure distilled/demineralised water, rainwater, boiled, filtered, or bottled water, as these can cause spitting, brown staining, or premature wear.
- Filling the Water Tank:
- Grasp the handle of the removable tank (12) and pull it horizontally to remove it (fig.4).
- Pour untreated tap water up to the "max" mark (fig.5).
- Replace the tank firmly in its housing until it clicks into place (fig.6).
- Power Connection:
- Completely unwind the power cord (8) and the steam cord (5) from their storage spaces (fig.23).
- Lower the retaining hoop to unlock the iron (fig.3).
- Plug the steam generator into an earthed socket.
- Starting the Generator:
- Press the illuminated on/off switch (7). The green light (6a) on the control panel will flash as the boiler heats up (fig.7).
- The appliance is ready when the green "steam ready" light stops flashing (after approximately 2 minutes).
- During first use, some fumes and smell may occur, which is normal and will disappear rapidly.
Steam Ironing:
- Temperature Setting: Adjust the iron's temperature control button (2) according to the fabric type (refer to the fabric table in the manual). The thermostat light (3) will come on. The iron is ready when the thermostat light goes out and the green "steam ready" light (6a) stays on.
- Steam Output Adjustment: Adjust the steam output control dial (6b) on the control panel.
- Steam Activation: To obtain steam, press the steam control button (1) on the iron handle (fig.8). Releasing the button will stop the steam.
- Pump Noise: The electric pump injects water into the boiler, making a normal noise. A clicking noise from the steam valve opening is also normal.
- Starch: Always spray starch onto the reverse side of the fabric.
Dry Ironing:
- Do not press the steam control button (1) on the iron handle.
Vertical Steam Ironing:
- Settings: Set the iron's temperature control button (2) and the steam output control dial (6b) to the maximum position.
- Garment Preparation: Hang the garment on a hanger and lightly tension the fabric with one hand.
- Safety: The steam produced is very hot; never de-crease a garment while it is being worn. Always use a hanger.
- Steaming: With the iron in a vertical position and tilted forward, press the steam control button (1) repeatedly, moving the iron from top to bottom (fig.10).
Refilling the Water Tank During Use:
- When the red "water tank empty" light (6c) comes on, there is no more steam (fig.9).
- Remove the removable water tank (10) by pulling its handle horizontally.
- Fill the tank with untreated tap water up to the "max" mark (fig.5).
- Replace it firmly in its housing until it clicks into place (fig.6).
- Press the "Restart" button (6e) on the control panel to continue ironing (fig.19). The steam will be ready when the green light (6a) stops flashing.
Maintenance Features
Cleaning Your Generator:
- General Cleaning:
- Do not use detergent or descaling products for cleaning the soleplate or base unit.
- Never immerse the steam generator in water or any other liquid, nor hold it under the water tap.
- Regularly clean the soleplate with a damp, non-metallic washing-up pad.
- Clean the plastic parts of the appliance occasionally with a soft, damp cloth.
- Ensure the steam generator is unplugged and cooled down for at least 2 hours before any cleaning or maintenance to avoid burns.
Descaling Your Generator (Anti-Calc Collector):
- The generator is equipped with a built-in anti-scale collector (13b) located in the tank, which automatically removes scale to prolong the appliance's life and prevent scale emissions.
- Operation:
- An orange "anti-scale" light (6d) on the control panel will start blinking, indicating that the anti-scale collector needs rinsing (fig.11).
- Important Safety Note: This operation must only be performed when the generator has been unplugged for at least two hours and has completely cooled down. Place the generator near a sink as water may flow out when opened.
- Once completely cooled, remove the anti-scale collector cap (13a) (fig.12).
- Unscrew the anti-scale collector (13b) and remove it from its housing; it will contain accumulated scale (fig.13, fig.14).
- To clean the collector, rinse it under running water to remove the scale (fig.15).
- Put the collector back into its housing and screw it in completely to ensure it is watertight (fig.16).
- Refit the scale collector cover (fig.18).
- The next time you use the iron, press the "Restart" button (6e) on the control panel to turn off the orange "anti-scale" light (6d).
- Do not use descaling substances (vinegar, industrial descalers) when rinsing the anti-scale collector, as they can damage the appliance.
Storing Your Generator:
- Press the illuminated on/off switch (7) and unplug the generator.
- Store the electrical cord (8) in its storage space (fig.17).
- Raise the retaining hoop (9) over the iron until it locks into place (audible click) (fig.2). The iron is then safely retained on its base. Warning: Do not touch the soleplate while it is still hot.
- Wind the steam cord (5) around the generator and insert it into its side storage place (16) (fig.18).
- Allow the iron (and the iron rest) to cool down for 30 minutes.
- You can then put your steam generator away, carrying it by the iron handle (fig.1).
Environment Protection:
- The appliance contains valuable materials that can be recovered or recycled.
- Dispose of the appliance at a civic waste disposal centre at the end of its life.