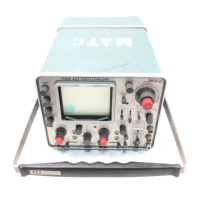
Type 422 AC-DC
SECTION 5
PERFORMANCE CHECK/CALIBRATION
Change information, if any, affecting this section will be found at the rear of this manual.
Introduction
To assure instrument accuracy, check the calibration of
the Type 422 every 1000 hours of operation, or every six
months if used infrequently. Before complete calibration,
thoroughly clean and inspect this instrument as outlined in
the Maintenance section.
As an aid to the calibration of the instrument, a
Short-Form Procedure is given prior to the complete
procedure. To facilitate instrument calibration for the
experienced calibrator, the Short-Form Procedure lists the
calibration adjustments necessary for each step and the
applicable tolerances. This procedure also includes the step
number and title as listed in the complete Performance
Check/Calibration Procedure and the page number on
which each step begins. Therefore, the Short-Form Pro
cedure can be used as an index to locate a step in the
complete procedure. Another feature of the Short-Form
Procedure is the spaces provided to record performance
data or to check off steps as they are completed. This pro
cedure can be reproduced and used as a permanent record
of instrument calibration.
The complete Performance Check/Calibration Procedure
can be used to check instrument performance without
removing the covers or making internal adjustments by
performing all portions except the ADJUST- part of a step.
Screwdriver adjustments which are accessible without
removing the covers are adjusted as part of the performance
check procedure. A note titled PERFORMANCE CHECK
ONLY gives instructions which are applicable only to the
performance check procedure and if necessary, lists the
next applicable step for the performance check procedure.
Completion of each step in the complete Performance
Check/Calibration Procedure insures that this instrument
meets the electrical specifications given in Section 1. Where
possible, instrument performance is checked before an
adjustment is made. For best overall instrument perform
ance when performing a complete calibration procedure,
make each adjustment to the exact setting even if the
CHECK— is within the allowable tolerance.
NOTE
All waveforms shown in this procedure were taken
with a Tektronix Oscilloscope Camera System.
Limits, tolerances and waveforms in this procedure
are given as calibration guides and should not be
interpreted as instrument specifications except as
specified in Section 1.
A partial calibration is often desirable after replacing
components, or to touch up the adjustment of a portion of
the instrument between major recalibrations. To check or
adjust only part of the instrument, set the controls as given
under Preliminary Control Settings and start with the
nearest test equipment picture preceding the desired
portion. If any controls need to be changed from the
preliminary settings for this portion of the calibration
procedure, they are listed under the heading Partial
Procedure following the equipment required picture. To
prevent unnecessary recalibration of other parts of the
instrument, readjust only if the tolerance given in the
CHECK— part of the step is not met. If readjustment is
necessary, also check the calibration of any steps listed in
the INTERACTION—part of the step.
TEST EQUIPMENT REQUIRED
General
The following test equipment and accessories, or its
equivalent, is required for complete calibration of the Type
422. Specifications given are the minimum necessary for
accurate calibration. Therefore, some of the recommended
equipment may have specifications which exceed those
given. All test equipment is assumed to be correctly
calibrated and operating within the given specifications. If
equipment is substituted, it must meet or exceed the
specifications of the recommended equipment.
Special Tektronix calibration fixtures are used in this
procedure only where they facilitate calibration. These
special calibration fixtures are available from Tektronix,
Inc. Order by part number through your local Tektronix
Field Office or representative.
Test Equipment
1. Variable DC power supply1. Voltage range, at least
+11 to +35 volts; current capability, at least 2.5 amperes;
output voltage monitored within 3%. For example, Trygon
Model HR40-5B.
2. Precision DC voltmeter1. Accuracy, within 0.1%;
resolution, 50 microvolts; range, zero to 100 volts. For
example, Fluke Model 825A Differential DC Voltmeter.
3. Test oscilloscope. Bandwidth, DC to five megahertz;
minimum deflection factor, one millivolt/division; accur
acy, within 3%. Tektronix Type 422 Oscilloscope
recommended (use X I0 gain feature to obtain one m illivolt
minimum deflection factor).
1 Not required for performance check only.
5-1

 Loading...