EasyManua.ls Logo

TEMPLE & WEBSTER Charlie SBC8DMGN - User Manual

TEMPLE & WEBSTER Charlie SBC8DMGN
7 pages
Print Icon
To Next Page IconTo Next Page
Loading...
ASSEMBLY INSTRUCTIONS
SBC8DMGN
Charlie 200x100cm glass dining table
Two people required
TEMPLE
WEBSTER
www.templeandwebster.com.au
2021/9/9
Question and Answer IconNeed help?

Do you have a question about the TEMPLE & WEBSTER Charlie SBC8DMGN and is the answer not in the manual?

Summary

Product Identification and General Guidance

Charlie 200 x100 cm Glass Dining Table Assembly

Main title and product name for the assembly instructions.

Essential Assembly, Care, and Safety Notes

Provides crucial advice on assembly preparation, furniture maintenance, and important safety warnings for glass components.

Components and Requirements

Tools, Time, and People Required

Details necessary tools, estimated assembly time, and the number of people recommended for assembly.

Parts List

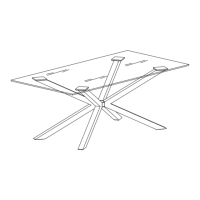
Lists the main components of the dining table, including the glass top and legs.

Hardware and Fittings Identification

Enlists all screws, bolts, washers, and tools provided for assembling the furniture.

Step-by-Step Assembly Procedure

Step 1: Attach Legs to Bracket

Loosely connect the four legs to the central leg bracket using specified bolts and washers.

Step 2: Attach Glass Top

Secure the glass tabletop to the assembled leg structure with bolts and spring washers.

Step 3: Fully Tighten Bolts

Ensure all previously installed bolts are fully tightened using the Allen key for structural integrity.

Step 4: Install Bracket Covers

Fit the top and bottom bracket covers onto the leg assembly using the provided bolt and washers.

Step 5: Final Placement and Completion

Carefully turn the assembled table upright and confirm the assembly is complete.

Overview

This document provides assembly instructions and care guidelines for the Charlie 200x100cm glass dining table (model number SBC8DMGN) from Temple & Webster.

Function Description

The Charlie dining table is a contemporary piece of furniture designed for dining purposes. It features a large glass tabletop supported by a distinctive, multi-legged base, creating a stylish and functional centerpiece for a dining area. The design emphasizes a modern aesthetic with its clear glass surface and angular leg structure.

Important Technical Specifications

  • Dimensions: The dining table has a glass top measuring 200x100cm.
  • Components:
    • Glass Top (P1): One main glass surface.
    • Legs (P2): Four individual legs that form the table's base.
  • Hardware/Fittings:
    • Leg Bracket (H1): 1 unit, used to connect the legs.
    • Bracket Top Cover (H2): 1 unit, for the top of the central bracket.
    • Bracket Bottom Cover (H3): 1 unit, for the bottom of the central bracket.
    • M8x16mm Bolt (H4): 12 units, for attaching legs to the bracket.
    • M8x10mm Bolt (H5): 16 units, for attaching the glass top to the legs.
    • M8x50mm Bolt (H6): 1 unit, for securing the central bracket covers.
    • Spring Washer (H7): 29 units (12 for legs, 16 for glass top, 1 for central bracket).
    • Washer (H8): 29 units (12 for legs, 16 for glass top, 1 for central bracket).
    • 6mm Allen Key (H9): 1 unit, for tightening bolts.
    • 50x50x3mm Felt Pad (H10): 8 units, for protecting the glass top and floor.
  • Assembly Time: Approximately 30 minutes.
  • Personnel Required: Two people are required for assembly.

Usage Features

  • Assembly: The assembly process is divided into four main steps, followed by a final turning of the table.
    1. Leg Assembly: The four legs (P2) are loosely attached to the Leg Bracket (H1) using M8x16mm Bolts (H4), Spring Washers (H7), and Washers (H8), tightened with the 6mm Allen Key (H9). This step involves 12 sets of hardware.
    2. Glass Top Attachment: Eight Felt Pads (H10) are first applied to the legs (P2). With assistance, the leg assembly is carefully placed onto the Glass Top (P1). The glass top is then loosely attached to the leg assembly using 16 M8x10mm Bolts (H5), 16 Washers (H8), and 16 Spring Washers (H7).
    3. Tightening Leg and Glass Bolts: All bolts (H4 and H5) that were loosely attached in steps 1 and 2 are fully tightened using the 6mm Allen Key (H9).
    4. Central Bracket Assembly: The Bracket Top Cover (H2) and Bracket Bottom Cover (H3) are fixed onto the Leg Bracket (H1) using one M8x50mm Bolt (H6), one Spring Washer (H7), and one Washer (H8). This bolt is then tightened with the Allen Key (H9).
    5. Table Orientation: With help, the assembled table is carefully turned over to its upright position.
  • Safety during Assembly:
    • Assemble on a soft, level surface to prevent damage to the furniture or floor.
    • Two people are recommended for easier assembly.
    • Assemble the furniture near its intended location to avoid unnecessary movement.
    • If moving the assembled furniture, remove all loose items and lift it with assistance; avoid dragging to prevent damage.

Maintenance Features

  • General Cleaning: Wipe clean with a damp cloth using only water or a gentle detergent. Wipe dry with a clean cloth.
  • Regular Checks: Regularly check and re-tighten all bolts as necessary to maintain stability.
  • Glass Care and Warning:
    • Safety First: If the glass is chipped or broken, stop using the product immediately and consult the seller.
    • Temperature Protection: Do not place very hot or cold items directly on the glass surfaces. Always use adequate thick table mats to prevent direct contact.
    • Weight Distribution: Do not sit or stand on the glass surfaces.
    • Surface Protection: Do not use the glass as a chopping surface.
    • Impact Avoidance: Do not strike the glass with hard or pointed items.
    • Cleaning Glass: Use a damp cloth with washing-up liquid or soft soap. Do not use washing powders or any abrasive substances, as these will scratch the glass.

TEMPLE & WEBSTER Charlie SBC8DMGN Specifications

General IconGeneral
BrandTEMPLE & WEBSTER
ModelCharlie SBC8DMGN
CategoryIndoor Furnishing
LanguageEnglish

Related product manuals