EasyManua.ls Logo

TEMPLE & WEBSTER HTLLSKBNT - User Manual

TEMPLE & WEBSTER HTLLSKBNT
3 pages
Print Icon
To Next Page IconTo Next Page
Loading...
A x 1
B x 1
C x 2
F x 45
D x 2
G x 2
L x 30
E x 4
H x 4
I x 2
J x 2
Kx 4
M x 30
N x 4
ASSEMBLY INSTRUCTIONS
x 16
3
1 M8*25mm
2 M8*35mm
x 8
x 8
x 24
x 24
4 Flat washers
x 28
x 8
6 M8 Hex Nuts
7
8
PART LIST
5
M8*50mm
x 4
HTLLSKBNT
Please confirm you have all the parts listed before commencing assembly.
Read these instructions and follow steps carefully to ensure you assemble the product correctly
and avoid damages. Check that all parts hardware have been provided before assembling the
products. Place all contents on a clean, soft-flat surface to avoid scratching the product.
CAUTION:
Only tighten bolts to 80% at first. Once all parts have been assembled, fully tighten all hardware.
To prevent damage to threads, do not use a power tool and do not over tighten bolts.
Use two people to lift and turn the product when assembling.
Do not attempt with only one person and do not roll on to legs.
Keep all hardware and small parts away from children.
x 1
x 1
Box 1of3: Headboard(A), Plastic cap(L&M), Wood slat(F), Hardware (Kx4)
Box 2of3: Footboard(B),Siderail(C), Middle rail(D), Support leg(E),Bed leg(N),Drawer board(Gx2);
Box 3of3: Drawer board(Hx4)(Ix2)(Jx2).
Question and Answer IconNeed help?

Do you have a question about the TEMPLE & WEBSTER HTLLSKBNT and is the answer not in the manual?

Summary

Product Overview and Parts

Part List

Lists all components and hardware required for assembly.

Assembly Steps

Step 1: Initial Frame Setup

Connect headboard and footboard with side rails and support legs.

Step 2: Attaching Side Rails

Attach side rails to the headboard and footboard using bolts.

Step 3: Installing Center Support

Insert and secure center support beams for the mattress base.

Step 4: Adding Support Legs

Attach additional support legs to the frame for stability.

Step 5: Placing Slats

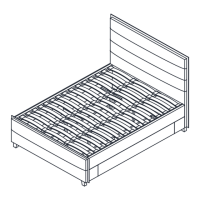
Position and secure the wooden slats across the frame.

Step 6: Assembling Drawers

Assemble the drawer boxes and attach drawer slides.

Step 7: Inserting Drawers

Slide the assembled drawers into their designated spaces.

Step 8: Final Check

Ensure all parts are tightened and the bed is stable.

Overview

This document provides assembly instructions for the HTLLSKBNT bed frame, a product from TEMPLE&WEBSTER. It is designed for home assembly and requires two people for safe and efficient construction.

Function Description:

The HTLLSKBNT bed frame serves as a foundational support structure for a mattress, elevating it and providing a stable sleeping surface. It incorporates a headboard and a drawer system for integrated storage, enhancing the functionality of a bedroom space. The design appears to be contemporary, featuring a slatted headboard and a low-profile frame. The integrated drawers offer convenient storage for bedding, clothing, or other personal items, helping to maintain a tidy living environment.

Important Technical Specifications:

Part List:

The assembly requires various hardware components and wooden panels, categorized as follows:

  • Screws/Bolts:
    • 16 x M8*25mm bolts (Part 1)
    • 8 x M8*35mm bolts (Part 2)
    • 4 x M8*50mm bolts (Part 3)
  • Washers:
    • 28 x Flat washers (Part 4)
  • Other Hardware:
    • 8 x Small cylindrical connectors (Part 5)
    • 8 x M8 Hex Nuts (Part 6)
    • 24 x Cylindrical nuts (Part 7)
    • 24 x Wood screws (Part 8)
    • 1 x Hex key (Allen wrench)
    • 1 x Screwdriver
  • Wooden/Panel Components:
    • 1 x Headboard (Part A)
    • 1 x Footboard (Part B)
    • 2 x Siderails (Part C)
    • 2 x Middle rails (Part D)
    • 4 x Support legs (Part E)
    • 45 x Wood slats (Part F)
    • 2 x Drawer boards (Part G)
    • 4 x Drawer boards (Part H)
    • 2 x Drawer boards (Part I)
    • 2 x Drawer boards (Part J)
    • 4 x Drawer boards (Part K)
    • 30 x Plastic caps (Part L)
    • 30 x Plastic caps (Part M)
    • 4 x Bed legs (Part N)

Packaging Breakdown (as described in the manual):

  • Box 1 of 3: Contains Headboard (A), Plastic caps (L&M), Wood slats (F), and Hardware (Kx4, likely referring to a specific set of hardware for the slats or a typo for K).
  • Box 2 of 3: Contains Footboard (B), Siderails (C), Middle rails (D), Support legs (E), Bed legs (N), and Drawer boards (Gx2).
  • Box 3 of 3: Contains Drawer boards (Hx4), (Ix2), and (Jx2).

Usage Features:

Assembly Process:

The assembly is broken down into eight sequential steps, with clear visual diagrams for each:

  • STEP 1: Involves attaching the bed legs (N) to the headboard (A) and footboard (B) using M8*50mm bolts (3) and flat washers (4). This step establishes the foundational upright components.
  • STEP 2: Focuses on connecting the siderails (C) to the headboard (A) and footboard (B). This step uses M8*25mm bolts (1), flat washers (4), and cylindrical connectors (5). Crucially, the instructions emphasize tightening bolts to 80% at this stage, allowing for minor adjustments before final tightening.
  • STEP 3: Involves attaching the middle rails (D) to the siderails (C). This step uses cylindrical nuts (7) and wood screws (8), indicating a secure connection for the central support structure.
  • STEP 4: Details the installation of the support legs (E) to the middle rails (D) and the bed legs (N). This step uses M8*35mm bolts (2), flat washers (4), and M8 hex nuts (6), providing additional stability to the bed frame. The instructions reiterate the 80% tightening rule for initial assembly.
  • STEP 5: Illustrates the placement of the wood slats (F) across the bed frame. Plastic caps (L and M) are used to secure the slats, ensuring even distribution and support for the mattress.
  • STEP 6x2: This step is repeated twice, indicating the assembly of two separate drawer units. It involves connecting various drawer boards (G, H, I, J, K) using cylindrical nuts (7) and wood screws (8). This step forms the complete drawer boxes.
  • STEP 7: Shows the insertion of the assembled drawers into the designated spaces beneath the bed frame. This highlights the integrated storage feature.
  • STEP 8: Represents the final assembled product, ready for use.

Safety and Handling:

  • Two-Person Assembly: Explicitly recommended for lifting and turning the product to prevent damage and ensure safety.
  • No Rolling on Legs: Users are warned against rolling the product on its legs, which could cause damage.
  • Hardware Safety: All hardware and small parts should be kept away from children.

Maintenance Features:

Assembly Best Practices:

  • Careful Reading: Users are instructed to read and follow steps carefully to ensure correct assembly and avoid damage.
  • Part Verification: Before starting, all parts and hardware must be checked against the part list.
  • Clean, Soft Surface: Assembly should be performed on a clean, soft, flat surface to prevent scratching the product.
  • Progressive Tightening: Bolts should initially be tightened to 80% to allow for adjustments. Only after all parts are assembled should all hardware be fully tightened.
  • No Power Tools: To prevent damage to threads, power tools should not be used, and bolts should not be overtightened.

This comprehensive guide ensures that users can effectively assemble and utilize the HTLLSKBNT bed frame, benefiting from its sturdy structure and integrated storage.

TEMPLE & WEBSTER HTLLSKBNT Specifications

General IconGeneral
BrandTEMPLE & WEBSTER
ModelHTLLSKBNT
CategoryIndoor Furnishing
LanguageEnglish

Related product manuals