Rear Axle Group - Axle Group (Hub)
Section 160-0030
6
SM 1968 4-00
MAINTENANCE
Proper lubrication of the axle group is essential if
axles are to deliver the service intended. Section
300-0020, LUBRICATION SYSTEM gives full
information on the proper lubrication intervals and the
lubricant which should be used.
SPECIAL TOOLS
The special tools referenced throughout this section
are available from your dealer. Refer to Section
300-0070, SERVICE TOOLS, for part numbers of
general service tools and sealants required.
AXLE DIAGNOSIS
Noises originating in the tyres, transmission, brakes
or drivelines might be attributed by mistake to the
axle components, therefore, all possible sources of
noise should be investigated before deciding the axle
is at fault.
WARNING
To prevent personal injury and property
damage, be sure wheel blocks, blocking
materials and lifting equipment are properly
secured and of adequate capacity to do the job
safely.
True axle noises may be located by lifting or jacking
the machine up until all tyres are clear of the floor or
ground. Securely block the machine in this position.
Run power train at moderate speed. Be certain all
tyres are off the ground to prevent damage to the
differential and make sure that there is no brake drag.
18. Remove sun gear shaft (17) from driver (25) and
position in planet carrier (18) in mesh with planet
gears (19).
19. Coat the face of planet carrier (18) with Loctite
574 sealing compound. Install planet carrier (18)
assembly into hub (10) and secure with bolts (22).
Tighten bolts (22) to a torque of 190 Nm (140 lbf ft).
20. Place a new 'O' ring (23) on plug screw (24) and
thread assembled plug screw into the outer face of
planetary carrier (18). Tighten plug screw (24) to a
torque of 80 Nm (60 lbf ft).
21. Install brake calliper. Refer to Section 165-0010,
BRAKE PARTS - REAR.
22. Install differential drain plug. Add gear oil of the
type specified in Section 300-0020, LUBRICATION
SYSTEM, through the differential filler/level hole until
the oil is level with the bottom of the filler/level hole.
23. Fill the planetary assemblies up to the 'Oil Level
Check Line' with gear oil of the type specified in
Section 300-0020, LUBRICATION SYSTEM.
24. Refit road wheels, securing with wheel nuts (12).
Remove stands or timber supports and lower the
machine to the ground. Fully tighten wheel nuts to a
torque of 590 Nm (435 lbf ft). Remove blocks from
the wheels.
Note: Wheel nuts should be checked and tightened if
necessary, after the first 10 hours of operation.
Check torque every 50 hours (weekly) thereafter.
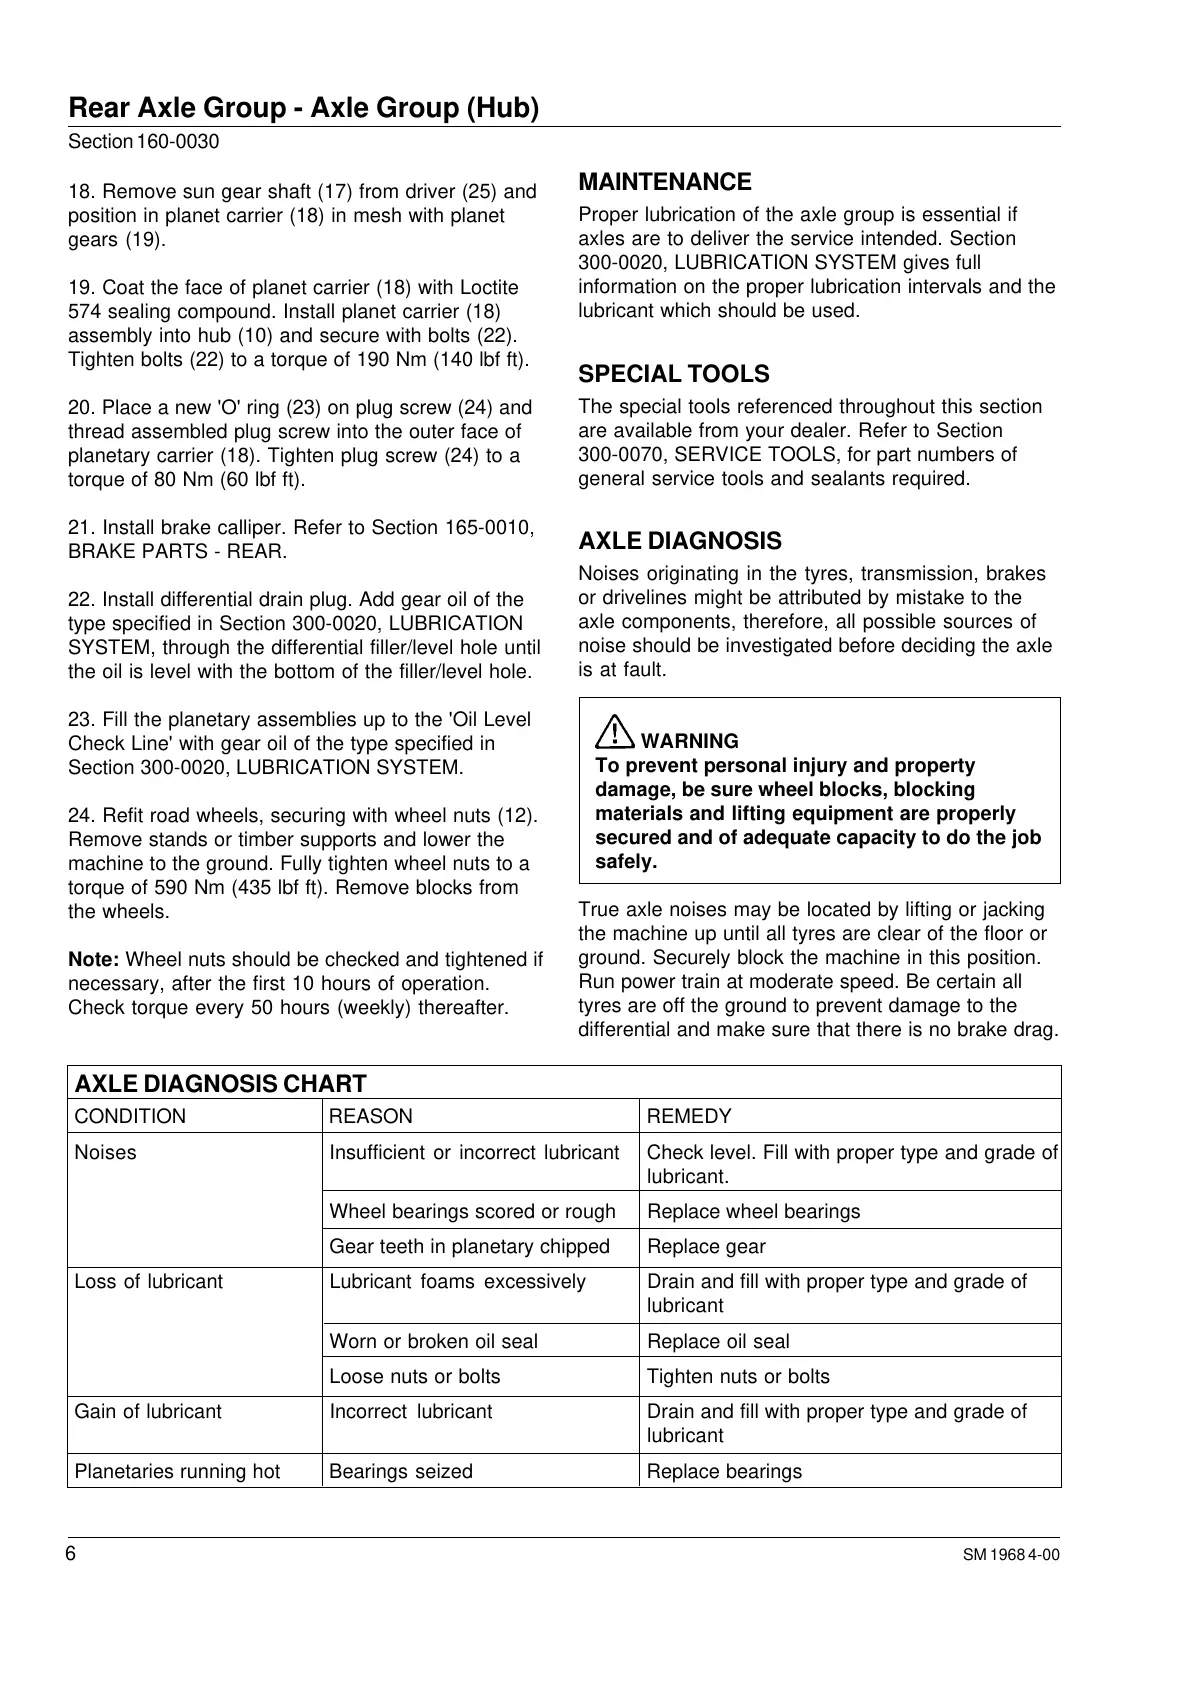
AXLE DIAGNOSIS CHART
CONDITION REASON REMEDY
Noises Insufficient or incorrect lubricant Check level. Fill with proper type and grade of
lubricant.
Wheel bearings scored or rough Replace wheel bearings
Gear teeth in planetary chipped Replace gear
Loss of lubricant Lubricant foams excessively Drain and fill with proper type and grade of
lubricant
Worn or broken oil seal Replace oil seal
Loose nuts or bolts Tighten nuts or bolts
Gain of lubricant Incorrect lubricant Drain and fill with proper type and grade of
lubricant
Planetaries running hot Bearings seized Replace bearings
Courtesy of Machine.Market
 Loading...


