Do you have a question about the Tern Atlas and is the answer not in the manual?
Warnings regarding exceeding the 80 kg load limit and never leaving children unattended on a parked bike.
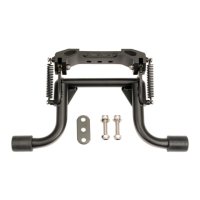
Lists the items included in the Atlas Kickstand kit: Kickstand, Oval Plate, and Bolt Set.
Details tools (wrench, Allen key, pliers) and optional parts (Chain Guide Pulley Set) not included.
Steps to remove the existing kickstand and prepare the chain for GSD S10 models by shifting gears.
Instructions on using open and close pliers to detach and reattach the master link on the bicycle chain.
Guides on positioning the oval plate and installing kickstand bolts, tightening to 35-40 Nm.
Process of threading the chain over the chain guide and securely locking the master link with pliers.
Details the one-year limited warranty, product replacement, and exclusions for misuse or third-party products.
The Atlas Kickstand is an accessory designed for Tern bicycles, specifically the GSD models, to provide stable support when the bike is parked. It is a robust kickstand with a maximum load limit of 80 kg (176 lb), emphasizing safety by warning against exceeding this limit and advising against leaving children unattended on a parked bike.
The package for the Atlas Kickstand includes the main kickstand unit, an oval plate, and a set of two bolts for installation.
For certain GSD models, specifically the GSD S00, a Chain Guide Pulley Set is required. Owners of GSD S00 can obtain this set from their Tern dealer. Installation of the Chain Guide may require professional assistance from a dealer.
To install the Atlas Kickstand, several tools are necessary:
Remove Existing Kickstand: The first step is to remove any pre-existing kickstand on the bicycle. Tern provides resources on their support site (ternbicycles.com) and recommends consulting a dealer if the user is unfamiliar with this process.
Gear Shifting (GSD S10 with Derailleur): For GSD S10 models equipped with a derailleur, the user must shift the gear to the smallest cog before proceeding with the installation.
Position Master Link: The Master Link on the chain needs to be positioned between the Chain Guide Pulley and the Motor. A zip tie should be attached in front of the Master Link to prevent the chain from falling off the chainring during the subsequent steps.
Open Master Link (GSD S00 Specific): For GSD S00 models, the Master Link outer plate must be opened using Chain Link Open Pliers. It is crucial to NOT use a chain-breaking tool for this step. If the user is unsure about this process, they are advised to visit their dealer.
Detatch and Open: After opening the Master Link, the chain can be detatched and opened.
Assembly Order: The kickstand assembly involves several components in a specific order:
Position Oval Plate: The Oval Plate is positioned on the GSD frame, serving as an interface between the frame and the kickstand.
Install Bolts and Torque: The bolts are then installed, securing the kickstand to the frame. These bolts must be tightened to a specific torque of 35-40 Nm to ensure proper and secure installation.
Thread Chain over Chain Guide: Once the kickstand is securely mounted, the chain needs to be threaded back over the Chain Guide.
Close Master Link: The two halves of the Master Link connector are pressed together, and Chain Link Close Pliers are used to lock the outer plates into place. A distinct "click" indicates that the link is properly secured. The user should then verify that the Master Link rotates freely and without stiffness, ensuring proper chain function.
The manual does not explicitly detail ongoing maintenance features for the kickstand itself, but proper installation, including torquing the bolts correctly and ensuring the chain's free movement after reassembly, contributes to its longevity and performance.
The Atlas Kickstand comes with a ONE (1) YEAR Limited Warranty from the date of retail purchase by the original end-user. This warranty covers material or workmanship defects, leading to replacement if a valid claim is received within the warranty period. Mobility Holdings, Ltd. is not liable for damages to personal property due to misuse or improper care and maintenance. The warranty does not cover the replacement or cost of any third-party product used with or connected to the kickstand.
Tern, the Tern Werd (logotype), the Tern Berd (device), Atlas, and GSD are trademarks or registered trademarks of Mobility Holdings, Ltd.
Overall, the Atlas Kickstand is presented as a sturdy and essential accessory for Tern GSD bicycles, designed for user-friendly installation with clear instructions, while also highlighting safety precautions and specific requirements for different bike models.
| Brand | Tern |
|---|---|
| Model | Atlas |
| Category | Bicycle Accessories |
| Language | English |