Do you have a question about the TerraMaster TDAS D5-300 and is the answer not in the manual?
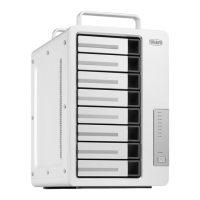
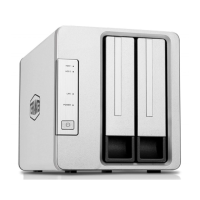
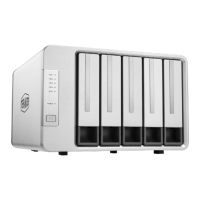
Details about the hard disk tray, indicator, and power button on the front panel.
Describes the Power Jack and USB Type-C interface on the rear of the device.
Explains the status (red, blinking green, off) of the hard disk indicator.
Explains the status (steady on, off) of the power indicator.
Step-by-step guide on how to install hard disks into the device.
Detailed steps for connecting the device to a computer and power.
Instructions on how to download the necessary RAID Manager software.
Outlines the steps for creating and modifying disk groups using RAID Manager.
Explains the automatic data recovery feature for faulty hard disks in RAID5.
The TerraMaster TDAS D5-300 is a Direct Attached Storage (DAS) device designed for users who need a reliable and expandable solution for their data storage needs. This product belongs to the TerraMaster TDAS series, offering a straightforward approach to managing and protecting your digital assets. It's particularly suited for individuals and small businesses looking for a robust external storage unit that connects directly to their computer, providing high-speed data transfer and various disk management options.
The primary function of the TerraMaster TDAS D5-300 is to provide external storage capacity for your computer. It acts as a housing for multiple SATA hard disks (2.5-inch or 3.5-inch), allowing you to consolidate and expand your storage significantly beyond your computer's internal drives. The device supports the creation of different disk groups, including various RAID configurations, which are crucial for data protection, performance enhancement, or simply combining multiple drives into a single, larger volume.
The D5-300 connects to your computer via a USB Type-C interface, ensuring fast data transmission. This direct attachment means it functions much like an external hard drive, but with the added benefits of multi-drive support and advanced disk management capabilities. It's designed to be a plug-and-play solution once the hard disks are installed and the disk group is configured, making it accessible even for users without extensive network storage experience.
A key aspect of its functionality is the ability to manage disk groups through dedicated software, the TerraMaster HW RAID Manager. This software, available for both Windows and Mac OS, allows users to create, modify, and delete disk groups, tailoring the storage solution to their specific requirements. Whether you prioritize data redundancy, maximum capacity, or a balance of both, the RAID Manager provides the tools to achieve your desired setup.
Setting up the TerraMaster TDAS D5-300 involves a few straightforward steps, starting with the physical installation of hard disks. The device features easy-to-use hard disk trays that slide in and out, simplifying the process of adding or replacing drives. Users need to secure their 2.5-inch or 3.5-inch SATA hard disks into these trays using the provided screws, then insert the trays back into the unit.
Once the hard disks are in place, the device needs to be connected to your computer and powered on. The USB Type-C cable facilitates the data connection, while the power adapter ensures the unit receives the necessary 12V DC power. It's crucial to use the original power adapter to prevent potential malfunction or damage to the device. After powering on, the D5-300's power indicator will illuminate, signaling that it's ready for operation.
The hard disk indicators on the front panel provide visual feedback on the status of each drive. A blinking green light indicates active reading or writing, while a steady red light signals a faulty disk or data restoration in progress. If no hard disk is detected, the indicator will be off. This visual system helps users quickly identify and address any issues with their drives.
The core of the D5-300's usage lies in its disk group management. Through the TerraMaster HW RAID Manager software, users can choose from various RAID configurations (e.g., RAID 0, RAID 1, JBOD, RAID 5, RAID 10, CLONE) to suit their needs. RAID 0 offers maximum performance by striping data across drives, but without redundancy. RAID 1 provides data mirroring for protection against single drive failure. JBOD (Just a Bunch Of Disks) combines drives into a single large volume without redundancy or performance benefits. RAID 5 offers a balance of performance and data protection with parity. RAID 10 combines striping and mirroring for both performance and redundancy. CLONE creates an exact copy of a drive.
Before creating a disk group, users are advised to delete any existing disk groups, especially if the device is new or being reconfigured. The software guides users through selecting the desired RAID type and applying the changes. After the disk group is created, the final step involves formatting the new volume through the computer's Disk Management (Windows) or Disk Utilities (Mac) to make it usable. It's important to note that creating or changing a disk group will format the hard disks, leading to data loss, so backing up data beforehand is essential.
The TerraMaster TDAS D5-300 is designed with ease of maintenance in mind, particularly concerning hard disk issues and data recovery. The device supports automatic data recovery, a significant feature for maintaining data integrity. If a hard disk within a RAID 5 disk group fails (indicated by a red hard disk indicator), users can simply replace the faulty drive with a new one. The system will then automatically begin the data recovery process, rebuilding the data onto the new hard disk.
During this data recovery process, it is crucial that the product remains powered on and connected to the computer. The capacity of the new hard disk must be equal to or greater than that of the faulty drive to ensure successful recovery. The duration of data recovery can vary significantly, ranging from a few hours to tens of hours, depending on the capacity of the hard disk. Patience is key during this period, and ensuring an uninterrupted power supply is vital.
The visual indicators on the device also play a role in maintenance, allowing users to quickly diagnose potential problems. A persistently red hard disk indicator, even after reinstallation, suggests that the hard disk may be damaged or incompatible, prompting the user to replace it. This immediate feedback helps in proactive maintenance and minimizes downtime.
Furthermore, the product's design, with easily accessible hard disk trays, simplifies the physical aspect of maintenance. Swapping out a faulty drive or upgrading to larger capacity drives is a straightforward process, requiring minimal tools and effort. The emphasis on user-friendliness extends to the software, where the RAID Manager provides clear options for managing disk groups, making it easier for users to perform necessary configurations or troubleshooting.
Regular checks of the hard disk indicators and adherence to the recommended power supply guidelines contribute to the overall longevity and reliable operation of the D5-300. By following the instructions provided in the manual and utilizing the device's built-in features, users can effectively maintain their storage solution and ensure the safety of their data.
| Device Type | Direct Attached Storage |
|---|---|
| Model | TDAS D5-300 |
| Drive Bays | 5 |
| Interface | USB 3.0 |
| Max Single Disk Capacity | 16TB |
| Material | Aluminum alloy |
| Compatibility | Windows, macOS, Linux |
| Compatible Drive Type | 2.5" SATA HDD |
| Supported RAID Levels | RAID 0, RAID 1, RAID 5, RAID 10, JBOD |
| Maximum Raw Capacity | 80TB |
| Cooling | Cooling Fan |