2120
Radio-controlled alarm clock
• Avoid contact with skin, eyes and mucous membranes when handling leaking
batteries. In case of contact, immediately rinse the affected areas with water
and consult a doctor.
Important information on product safety!
• Do not expose the device to extreme temperatures, vibrations or shocks.
• Protect it from moisture.
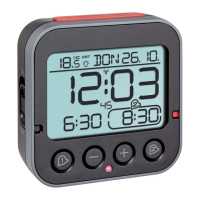
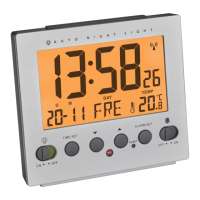
5. Elements
A: Display:
A 1: Time, seconds
A 2: Day of the week
A 3: Date
A 4: Alarm time 1 (activated)
A 5: Radio-controlled time symbol
A 6: Temperature
A 7: Alarm time 2
B: Buttons:
B 1: SNOOZE/LIGHT button
B 2: SET 1 button
B 3: – button
B 4: + button
B 5: SET 2 button
Radio-controlled alarm clock
B 6: AL 1 ON/OFF switch
B 7: AL 2 ON/OFF switch
B 8: AUTO LIGHT ON/OFF switch
B 9: SET button
C: Housing:
C 1: Battery compartment
C 2: Color mark for the alarm time 1 ON / OFF
C 3: Color mark for the alarm time 2 ON / OFF
C 4: Light sensor
6. Getting started
• Open the battery compartment and insert the two batteries 1,5 V AA. Make
sure the polarities are correct.
• Close the battery compartment again.
• The device will alert you with a beep and all LCD segments will be displayed
for a short moment.
• The clock will now scan the DCF frequency signal and the DCF symbol will
be flashing on the LCD. When the time code is received successfully after 3-8
minutes, the radio-controlled time, the date and the DCF symbol are displayed
steadily in the LCD.
• The DCF reception always takes place at 3:00 o’clock in the morning. If the
reception is not successfully received at 3:00 o’clock, it shall be held further
attempts at 4:00 and 5:00 o’clock.
• If there is no reception possible, manual initialization can be helpful.
TFA_No. 60.2539_Anleitung_06_24 12.06.2024 9:11 Uhr Seite 11