2322
Radio-controlled alarm clock
Radio-controlled alarm clock
B: Buttons (Fig. 1-2):
B 1: SNOOZE/LIGHT button
B 2: button
B 3: – button
B 4: + button
B 5: button
B 6: Alarm time 1 ON/OFF switch
B 7: Alarm time 2 ON/OFF switch
B 8: AUTO LIGHT ON/OFF switch
B 9: SET button
B 10: ALARM /
ALARM switch
C: Housing (Fig. 1-2):
C 1: Battery compartment
C 2: Colour mark for alarm time 1 ON / OFF
C 3: Colour mark for alarm time 2 ON / OFF
C 4: Light sensor
6. Getting started
• Open the battery compartment and insert the three AA 1.5 V batteries.
Make sure the polarities are correct.
• Close the battery compartment again.
• Batteries must not be thrown into a fire, short-circuited, taken apart
or recharged. Risk of explosion!
• Low batteries should be changed as soon as possible to prevent
damage caused by leaking.
• Avoid contact with skin, eyes and mucous membranes when han-
dling leaking batteries. In case of contact, immediately rinse the
affected areas with water and consult a doctor.
Important information on product safety!
• Do not expose your product to extreme temperatures, vibrations or
shocks.
• Protect it from moisture.
5. Elements
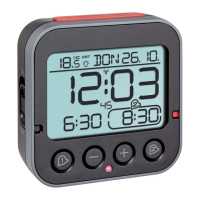
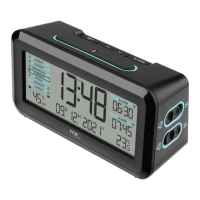
A: Display (Fig. 1):
A 1: Temperature
A 2: Symbol for Auto-Light (activated)
A 3: Day of the week, date
A 4: Time, seconds
A 5: DCF symbol (activated)
A 6: Alarm time 1 (activated)
A 7: Alarm time 2 (activated)
TFA_No. 60.2550_Anleitung_02_23 21.02.2023 15:04 Uhr Seite 12