2524
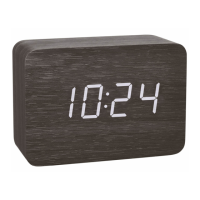
CLOCCO – Wood style radio-controlled alarm clock with large LED digits
CLOCCO – Wood style radio-controlled alarm clock with large LED digits
6.1 Reception of the DCF frequency signal
• Press and hold the DOWN button for 2 seconds. The clock will now scan the DCF frequency signal and the DCF symbol flashes.
• To avoid interference, the backlight turns off during the reception of the radio controlled clock.
• When the time code is successfully received after 2-12 minutes, the radio-controlled time and the DCF symbol will be shown steadily on the display.
• The DCF reception always takes place at 2:00 and 3:00 o'clock in the morning. If the reception is not successfully received at 3:00 o'clock, further
attempts will be taken until 5:00 o'clock.
• To end the DCF reception attempt, press the DOWN button again.
• Note: When the CR2032 battery is used up or not inserted, the DCF signal will be received automatically. After a test run ( 0000 until 9999 appear on the
display) the clock will scan the DCF frequency signal and the DCF symbol flashes on the display.
• There are three different reception states:
Symbol flashing – reception is active
Symbol solid – signal is found
Symbol solid – reception is very good
5.3 Housing (Fig. 2)
C 1: Battery compartment CR2032 C 2: Inner battery compartment cover
C 3: Battery compartment 3 x 1,5 V AAA C 4: Battery compartment cover
C 5: Power adapter jack
6. Getting started
• The alarm clock can be operated with the 3 x 1,5 V AAA batteries (not included) or with the supplied power adaptor.
• For a permanent display light and to conserve battery power, use the supplied power adapter.
• The CR2032 button cell (included) is a back-up battery to keep the clock operational in the event of a blackout or other power failure.
• Open the alarm clock's battery compartment.
• Remove the battery interruption strip for the button cell battery in the inner battery compartment (screwed).
• Optional: Insert three new AAA 1.5 V batteries, polarity as illustrated.
• Close the battery compartment again.
• Insert the power adapter pin into the device jack and connect the plug to a wall socket.
• Important! Make sure that your household voltage is no more than 240V! Otherwise your device may be damaged.
• A beep tone is heard and 0:00 appears on the display.
TFA_No. 60.2549_Anleitung_07_20 08.07.2020 9:45 Uhr Seite 13