SPRING
– Wireless weather station
14 15
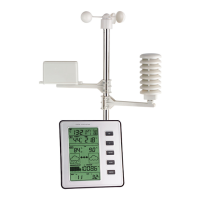
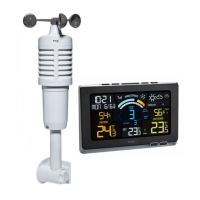
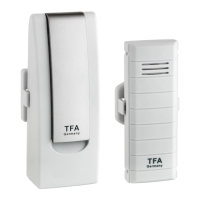
D: Outdoor transmitter (Fig. 4):
Housing
Front:
D 1: LED control lamp
D 2: Battery compartment
D 3: TX button inside of the battery compartment
Backside:
D 4: Wall mount hole
6. Getting started
• Place the base station and the transmitter on a desk with a distance of approximately 1.5 meter. Avoid
getting close to possible interference sources (electronic devices and radio installations).
• Remove the protective foil from the display of the base station.
• Connect the base station to the attached power adapter. Insert the adapter into the jack at the base sta-
tion and connect the power adapter to a wall socket. Important! Make sure that your household voltage
is 230V! Otherwise your device may be damaged.
• The device will alert you with a beep and all LCD segments will be displayed for a short moment.
6.1 Inserting of the batteries in the outdoor transmitter / Reception of the outdoor values
• Slide down the battery compartment lid of the outdoor transmitter.
• Insert two new batteries 1,5 V AA. Make sure the polarities are correct.
• After the batteries are inserted, the outdoor values will be transmitted to the base station.
• As soon as the base station receives the outdoor values, the values are permanently shown.
• If the reception of the outdoor values fails, “- -” appears on the display. Check the batteries and try it
again. Check if there is any source of interference.
• You can also start the outdoor transmitter search manually later on (for example when the outdoor trans-
mitter is lost or the batteries are changed).
• Hold the HEAT/DEW button on the base station for three seconds.
• “---” appears on the display.
• Press the TX button in the battery compartment of the outdoor transmitter.
• The device will alert you with a beep and the base station receives the values from the outdoor transmit-
ter.
• After successful installation close the battery compartment of the outdoor transmitter carefully.
6.2 Reception of the DCF reception signal
• After the reception of outdoor values, the clock is now trying to receive the reception signal and the DCF
reception symbol will be flashing.
• When the time code is received successfully after 3-10 minutes, the radio-controlled time and the DCF
symbol are displayed steadily in the LCD.
• The DCF reception always takes place at 1:00, 2:00 and 2:00 o'clock in the morning. If the reception is
not successfully received at 3:00 clock, it shall be held further attempts until 5:00 clock.
• You can also activate the DCF reception manually.
• Press the TIME SET button.
• The DCF reception symbol will be flashing.
• There are three different reception symbols:
flashing – reception is active
stays – reception is good
No symbol – no reception
• By default, the DCF reception is activated and after successful reception of the DCF signal no manual
adjustment is necessary.
• In case the clock cannot detect the DCF-signal (for example due to disturbances, transmitting distance,
etc.), the time can be set manually.
• The clock will then work as a normal quartz clock. (see: Manual settings).
SPRING
– Wireless weather station
Caution!
Risk of injury:
• Keep these instruments and the batteries out of the reach of children.
• Batteries contain harmful acids and may be hazardous if swallowed. If a battery is swallowed, this can
lead to serious internal burns and death within two hours. If you suspect a battery could have been swal-
lowed or otherwise caught in the body, seek medical help immediately.
• Batteries must not be thrown into a fire, short-circuited, taken apart or recharged. Risk of explosion!
• Low batteries should be changed as soon as possible to prevent damage caused by leaking. Never use a
combination of old and new batteries together, nor batteries of different types.
• Wear chemical-resistant protective gloves and safety glasses when handling leaking batteries.
Important information on product safety!
• Do not place your product near extreme temperatures, vibrations or shocks.
• Protect it from moisture.
• The outdoor transmitter is protected against splash water, but is not watertight. Choose a shady and dry
position for the transmitter.
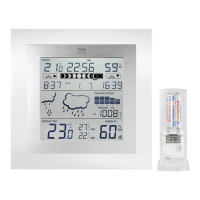
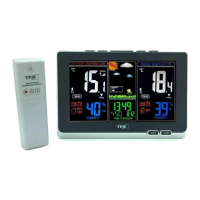
5. Elements
Wireless weather station (base station)
A: Display (Fig. 1):
Left display
A 1: Outdoor temperature and humidity
A 2: Tendency indicators
A 3: Symbol for temperature alarm
A 4: Symbol for the outdoor transmitter
Middle display
A 5: Weather symbols
A 6: Tendency indicator
A 7: Time, weekday and date
A 8: DCF-reception symbol
A 9: Alarm / snooze / DST symbol
Right display
A 10: Indoor temperature and humidity
A 11: Tendency indicators
A 12: Symbol for temperature alarm
B: Buttons (Fig. 1+2):
Front
B 1: ALERTS button
B 2: ALARM button
Top
B 3: ▼ button
B 4: TIME SET button
B 5: SNOOZE/LIGHT (HI – LOW - OFF) button
B 6: HEAT/DEW button
B 7: ▲ button
C: Housing (Fig. 3):
C 1: Wall mount holes
C 2: Battery compartment
C 3: Stand (fold out)
C 4: Connection mains adapter
C 5: Cable slot
TFA_No. 35.1129_Anleit_12_20 22.12.2020 11:13 Uhr Seite 8
 Loading...