EasyManua.ls Logo

TheMagicTouch HTP123 - User Manual

TheMagicTouch HTP123
4 pages
Print Icon
To Next Page IconTo Next Page
Loading...
WARNING! - CAUTION!
Note: This device must be operated by one
professional operator only! Keep hands
clear from moving parts! Hot surface!
Don't touch Heater during operation!
Remove from power supply for all
maintenance and servicing
to avoid electrical
shock!
Operator Manual
HTP123 HeatPress
Copyright TheMagicTouch, Germany 2018
Specifications
Dimensions, open (L x W X H)
63 x 41 x 86 cm
Printable Area
38 x 38 cm / 15” x 15”
Weight
36 kg
Voltage
110-120/220-240 V
Amperage 120V - 16A / 240V - 8A
Maximum Wattage
1800 W
Environmental Conditions 10-40°C / 50-105 , 30-70% RH°F
Temperature Range 80°C / 176°F to 220°C / 430°F
Timer Range 0-999 Seconds
Warranty 10 Years on HeatPlaten / 1 Year Parts
Controller
LCD Display
Handle
Power
Switch
Power
Socket
Circuit
Breaker
Pressure
Knob
Counter Range 0-999
Machine Legend
Question and Answer IconNeed help?

Do you have a question about the TheMagicTouch HTP123 and is the answer not in the manual?

Summary

Safety Warnings and Precautions

General Safety Instructions

Operate by one professional operator only, keep hands clear, avoid hot surfaces and electrical shock.

Product Specifications

Key Specifications Overview

Details dimensions, printable area, weight, voltage, wattage, environmental conditions, temperature, timer, counter, and warranty.

Machine Components Identification

Machine Diagram and Labels

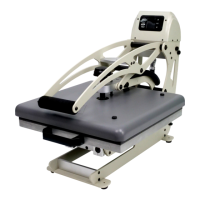
Identifies key components like pressure knob, controller, LCD display, handle, power switch, circuit breaker, and socket.

Control Panel and Display

Control Panel Elements Explained

Details LCD display, set temperature/time indicators, C/F indicator, and navigation buttons (Up/Down, Set).

Controller Assembly Instructions

Steps for Controller Installation

Instructions for inserting the controller, tightening hand screws, and attaching the heat platen cable.

Setting Operating Parameters

How to Adjust Temp, Time, Counter, and Pressure

Guide on using buttons to set temperature, time, and counter, and using the pressure knob.

Temperature Unit Selection

Switching Between Celsius and Fahrenheit

Press Set and Up buttons together for 3 seconds to switch between C and F temperature ranges.

Calibration Procedures

Entering and Using Calibration Mode

Press Set and Down buttons for 3 seconds to enter calibration, adjust value with Up/Down, and press Set to quit.

Exploded View and Parts Identification

Component Parts List

Detailed list of parts with part numbers, quantities, and descriptions for the heat press machine.

Electrical Schematics

Wiring Diagrams for Voltage Ranges

Provides electrical schematics for both 110-120V and 220-240V operating voltages.

Overview

This document is an operator manual for the HTP123 HeatPress, a device designed for professional heat transfer applications.

Function Description

The HTP123 HeatPress is a professional heat transfer machine used for applying designs to various materials. It operates by applying controlled heat and pressure to transfer images or designs from transfer paper onto a substrate. The device features a platen that heats up to a specified temperature, and a mechanism to apply pressure, ensuring a successful transfer. The manual emphasizes that the device must be operated by one professional operator only, highlighting safety precautions such as keeping hands clear from moving parts, avoiding contact with hot surfaces and the heater during operation, and disconnecting from the power supply for all maintenance and servicing to prevent electrical shock.

Important Technical Specifications

The HTP123 HeatPress has the following key specifications:

  • Dimensions (open, L x W x H): 63 x 41 x 86 cm
  • Printable Area: 38 x 38 cm / 15″ x 15″, indicating a square platen suitable for various transfer sizes.
  • Weight: 36 kg, suggesting a robust and stable build.
  • Voltage: It supports dual voltage operation, 110-120V and 220-240V.
  • Amperage: 120V - 16A / 240V - 8A, which is typical for high-wattage heating elements.
  • Maximum Wattage: 1800 W, indicating significant heating power for quick heat-up times and consistent temperature.
  • Environmental Conditions: Designed to operate within a temperature range of 10-40°C (50-105°F) and 30-70% relative humidity.
  • Temperature Range: The adjustable temperature range is 80°C (176°F) to 220°C (430°F), accommodating a wide variety of transfer materials and substrates.
  • Timer Range: 0-999 Seconds, allowing for precise control over transfer duration.
  • Counter Range: 0-999, useful for tracking production volume.
  • Warranty: The device comes with a 10-year warranty on the HeatPlaten and a 1-year warranty on parts, reflecting confidence in its durability and components.

Usage Features

The HTP123 HeatPress is equipped with several features to facilitate its operation:

  • Controller with LCD Display: The machine features a digital controller with an LCD display that shows the set temperature, set time, and counter.
  • Control Panel Legend: The LCD display indicates "Set Temperature when lit," "Set Time when lit," and "Set Counter when lit." It also includes a C/F Temperature Range Indicator, Up/+ Button, Mode Selection Button, Down/- Button, and a "Warm-up when moving" indicator.
  • Adjusting Temperature, Time, Counter, and Pressure:
    • Temperature and Time: Users can adjust these settings by pressing the "Set" button. When "Set Temp" is lit, the Up or Down buttons adjust the temperature. Pressing "Set" again lights "Set Time," allowing adjustment with the Up or Down buttons.
    • Counter: After adjusting time, pressing "Set" again lights "Counter," and the Down button can be used to reset the counter to 1.
    • Pressure: Pressure is adjusted by turning the "Pressure Knob." Turning clockwise increases pressure, and counter-clockwise decreases it. The manual advises setting high pressure to the point where the press can just still be closed and locked.
  • Switching between C and F: To switch between Celsius and Fahrenheit temperature ranges, the "Set" and "Up" buttons must be pressed together and held for 3 seconds. The selected unit is shown by the C/F Temp Indicator.
  • Calibration Mode: The device allows for temperature calibration. By pressing the "Set" and "Down" buttons together for 3 seconds, the machine enters "Calibration Mode" (indicated by "Calibrate" being lit). The Up or Down buttons can then be used to adjust the calibration value, and pressing "Set" again exits the mode.
  • Machine Legend: The device includes a Pressure Knob, Controller with LCD Display, Handle, Power Switch, Circuit Breaker, and Power Socket.
  • Controller Assembly: The manual provides clear steps for assembling the controller:
    1. Insert the controller between the frame.
    2. Insert and tighten the hand screws.
    3. Attach the Heat Platen Cable and tighten the screw ring. After assembly, the power cable is attached, and the machine is switched on, which should illuminate the Controller LCD.

Maintenance Features

While the manual does not detail specific routine maintenance procedures, it does provide critical safety information that implies maintenance requirements:

  • Electrical Shock Prevention: The warning section explicitly states, "Remove from power supply for all maintenance and servicing to avoid electrical shock!" This indicates that any maintenance, whether routine cleaning or part replacement, requires the machine to be disconnected from power.
  • Parts List and Explosion View: The manual includes an "Explosion View and Parts List" with detailed diagrams and a table listing all components by part name (Chinese and English), part number, and quantity. This is invaluable for identifying parts for replacement or repair, suggesting that component-level maintenance is anticipated. Examples of listed parts include Thread pins, Nylon Washers, Metal Bushings, Heat Platen Holder, Supporting Blocks, Bridge Links, Gas Springs, Rubber Feet, Connectors, Machine Side Body, Aviation Plugs, Terminal Blocks, TempControl Triacs, Voltage Labels, On/Off Switches, Circuit Breakers, Magnet Switches, and various structural components.
  • Electrical Schematics: Separate electrical schematics for 110-120V and 220-240V operations are provided. These schematics are crucial for troubleshooting electrical issues and performing repairs, indicating that the device is designed for serviceability by qualified technicians.
  • Troubleshooting Support: The manual directs users to contact their local TheMagicTouch Office, Distributor, or Dealer, or TheMagicTouch GmbH in Germany, for operating trouble, emphasizing professional support for complex issues.

TheMagicTouch HTP123 Specifications

General IconGeneral
BrandTheMagicTouch
ModelHTP123
CategoryPower Tool
LanguageEnglish