Do you have a question about the ThermoPro TP-06 and is the answer not in the manual?
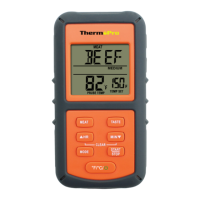
Displays icons, temperature, and timer. Backlight changes color based on temperature relative to set point.
Defines CLIP, Sensor socket, and BATTERY COMPARTMENT for probe and battery access.
Details functions of MODE, HR/MIN, START/STOP, TASTE, and °F/°C buttons for operation.
Select meat type and doneness level. Unit alerts when preset temperature is reached.
Manually set desired temperature using HR/MIN buttons for personalized cooking.
Instructions for countdown and count up timer functions, including start, stop, and clear.
Step-by-step guide for cooking steak to medium and timing hot dogs on a grill.
Tips for display errors (LLL/HHH), rapid temperature changes, and proper probe placement.
Guidelines on handling, age limits, water exposure, and microwave use.
Instructions for safely cleaning the probe and the main unit using appropriate methods.
Details the warranty coverage for defects in parts, materials, and workmanship.
Provides contact information including telephone, email, and operating hours for support.
The ThermoPro Digital Food Thermometer, Model No. TP-06, is a versatile kitchen tool designed to assist in precise cooking by monitoring food temperatures and timing. It features an intuitive LCD display that shows all relevant icons, temperature readings, and timer information. The device is equipped with a soft rubber sleeve for comfortable handling and a belt clip for convenient portability during use. Power is supplied by two AAA batteries housed in a dedicated compartment.
The thermometer's primary function is to measure the internal temperature of food, ensuring it reaches desired doneness levels. The LCD backlight provides visual cues based on temperature changes: it flashes blue when the temperature increases by 10°F, turns green when within 15°F of the set temperature, and glows red upon reaching the target temperature. This color-coded feedback system allows for quick and easy monitoring of cooking progress.
Users can select between thermometer and timer modes using the MODE button. In thermometer mode, the device offers preset USDA doneness levels for various meat types, including PROG (program), GBEEF (ground beef), GPOUL (ground poultry), BEEF, VEAL, CHCKE (chicken), PORK, POULT (poultry), LAMB, and FISH. The MEAT button allows selection of the specific meat type, while the TASTE button enables choosing the desired doneness level (RARE, MED RARE, MEDIUM, MED WELL, and WELL DONE). The display will show the preset temperature (TEMP SET) corresponding to the selected USDA doneness level. For instance, Well Done Beef is set at 165°F. Once the meat reaches this preset level, the unit will beep, and the LCD backlight will turn red, signaling that the food is ready.
Beyond USDA presets, the TP-06 allows for custom temperature settings. In thermometer mode, users can adjust the target temperature up or down using the HR ▲ and MIN ▼ buttons. Holding these buttons for 2 seconds will rapidly increase or decrease the temperature by 10 degrees per second. When a custom temperature is set, the display will change to PROG (program). Pressing the MEAT button will revert to the preset USDA ranges. The device also supports temperature readings in both Celsius and Fahrenheit, switchable by pressing and holding the °F/°C button for 2 seconds.
The timer mode offers both countdown and count-up functionalities. For countdown, users set the desired hours and minutes using the HR ▲ and MIN ▼ buttons. Holding these buttons for 2 seconds will rapidly adjust the time by 10 hours or 10 minutes per second, respectively. The START/STOP button initiates or pauses the timer. When counting down, a " " icon will blink every second. If the timer counts down below 1 hour, the display switches to minutes and seconds (e.g., 59'59"). Upon reaching 0'00", the unit will beep for 60 seconds and begin counting up, with the timer and " " icon blinking. Pressing START/STOP stops the beeping. To clear the timer setting, both HR ▲ and MIN ▼ buttons can be pressed simultaneously, or the CLEAR button can be used in count-up mode.
The device incorporates a probe sensor that is inserted into the thickest part of the food, avoiding bones or heavy fat areas, to accurately measure internal temperature. The probe cable should be positioned to prevent contact with flames or being pinched by a grill cover. The sensor socket serves as the outlet for the probe cable.
Maintenance of the TP-06 involves careful handling and cleaning. Users should always wear heat-resistant gloves when touching the stainless steel probe sensor or wire during or after cooking, as these components can become very hot. The probe sensor and wire should be kept away from children. After each use, the stainless steel probe tip should be washed with hot soapy water and thoroughly dried. The probe should never be immersed in water. The transmitter and receiver units can be wiped with a damp cloth but should not be immersed in water or exposed to rain, as they are not waterproof. It is crucial to prevent water or liquid from entering the plug of the stainless steel probe or the corresponding hole in the transmitter, as this can lead to bad connections and faulty readings. The unit should not be exposed to direct heat or hot surfaces, and the stainless steel probe should not be used in a microwave oven.
The device also provides helpful hints for troubleshooting. If the display shows LLL or HHH instead of a temperature, it indicates that the probe may have shorted out due to moisture or heat damage, or it needs time to reach room temperature. If the temperature readings seem too high or increase too quickly, it suggests that the probe tip might be poking through the food and needs to be repositioned in the center. The TP-06 is designed for ease of use and durability, making it a reliable companion for various cooking applications, from grilling to roasting.
| Temperature Range | -58°F to 572°F (-50°C to 300°C) |
|---|---|
| Probe Material | Stainless steel |
| Display | LCD |
| Backlit Display | Yes |
| Magnet and Stand | Yes |
| Waterproof Probe | Yes |
| Alarm | Yes |
| Cable Length | 40 inches |
| Auto Shut-off | Yes |
| Timer Range | 99 minutes 59 seconds |
| Probe Length | 6.5 inches |
| Battery | 2 x AAA batteries |