Do you have a question about the Thetford 23709 and is the answer not in the manual?
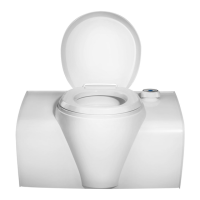
| Color | White |
|---|---|
| Category | Toilet |
| Type | Portable |
| Flush Mechanism | Manual |
| Material | Plastic |
Detach the waste holding tank from the toilet unit.
Loosen the bowl retainer bracket and remove the inner bowl.
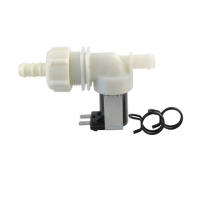
Detach the retaining clip and remove the old electric valve.
Position hose clamp and insert the new electric valve.
Connect the tube to the valve and secure the hose clamp.
Arrange the tubing around the toilet bowl for proper connection.
Reinstall the inner bowl and reconnect the tubing.
Secure the retainer by rotating it back to its original position.
Carefully peel back the control panel sticker with a sharp knife.
Use a flat screwdriver to detach the control panel.
Unplug the electrical connectors from the control panel.
Install the new control panel following previous steps in reverse.
Rotate the drain fitting to access it from the outside.
Use a screwdriver to loosen the old drain and install the new one.
Turn the pour out spout anticlockwise to remove it.
Insert the new pour out spout and turn clockwise to secure.
Detach the waste holding tank from the toilet.
Use the sliding cover as a lever to rotate the mechanism.
Unscrew the three screws holding the retainer.
Press ribs to detach retainer and remove the blade arm.
Unscrew bushing and remove the blade driver.
Detach the bushing and remove the blade.
Press ribs to release the blade opener from the other side.
Unscrew seal retainer and remove the lip seal.
Detach the seal from the mechanism.
Reassemble the mechanism by following the steps in reverse.
Use sliding cover as lever to rotate mechanism anti-clockwise.
Take the complete mechanism out and place it upside down.
Remove the old seal and install a new one.
Follow the reverse steps to reassemble the mechanism.
Locate the sliding cover and the arrow pointing to a solid dot.
Detach the sliding cover and insert it from the opposite end.
Use the sliding cover as a lever to rotate the mechanism anti-clockwise.
The complete disc and mechanism can now be removed.
Find the float housing between the wheels near the top of the tank.
Unclip the old float and clip the new one into place.
Reinstall the mechanism and rotate it back into its original position.
Invert the waste holding tank.
Place hand on the side of the wheel and pull it out.
Locate the sliding cover and arrow pointing to a solid dot on the tank.
Detach the sliding cover and insert it from the opposite end.
Use the sliding cover as a lever to rotate the mechanism anti-clockwise.
Remove the disc/mechanism and reverse process to re-attach.
Invert the waste holding tank.
Use a flat screwdriver to pry out one complete rib.
Insert screwdriver in handle and push down to remove.
Pull the guide of the handle up and remove the spring.
Install the new pull handle, following steps in reverse.
Use the sliding cover as a lever to rotate the mechanism anti-clockwise.
Take the complete mechanism out and place it upside down.
Unscrew the three screws holding the retainer.
Press ribs to detach retainer and remove the blade arm.
Unscrew bushing and remove the blade driver.
Detach the bushing and remove the blade.
Reassemble the new blade by following the steps in reverse.
Detach the waste holding tank from the toilet.
Use the sliding cover as a lever to rotate the mechanism anti-clockwise.
Place flat screwdriver under plate and press it out.
Press vent lifter from top to turn out the float stem.
Identify the float stem inside the waste holding tank.
Pull the vent lifter up to replace the spring.
Detach the waste holding tank from the cassette toilet.
Place screwdriver between bracket and bowl, push bracket left.
Detach the bowl retainer bracket.
Place new bracket and push right to lock it.
Detach the waste holding tank from the cassette toilet.
Remove one screw from saddle and screw new saddle in.
Detach the waste holding tank from the toilet.
Use a flat screwdriver to lift the handle grip cover.
Press ribs on inside handle and take handle off.
Place the new handle grip cover onto the handle.
Detach the waste holding tank.
Remove and turn bowl retainer brackets to detach.
Unscrew retainer brackets, turning bowl to access last bracket.
Carefully lift the toilet bowl.
Detach the water diverter and the ring blade mechanism.
Push the handle with a screwdriver to remove it.
Connect the handle to the new mechanism and reinstall diverter.
Put the bowl back in position, checking tube alignment.
Follow previous steps C-B-A to finish the toilet assembly.
Lift the toilet seat and cover.
Push the right side backwards to remove the seat and cover.
Follow steps B-A to correctly place the new seat and cover.
Carefully peel back the overlay with a sharp object.
Remove the old overlay and place the new one.
Detach the waste holding tank.
Unscrew the two screws securing the PCB.
Unplug the electrical connectors from the reed switch.
Pull the clips to detach the reed switch.
Detach the housing unit for the reed switch.
Place the new reed switch housing and complete the toilet.
Detach the waste holding tank.
Unscrew the two screws securing the reed switch.
Unplug the electrical connectors from the reed switch.
Pull the clips to detach the reed switch.
Connect the cable to the new reed switch.
Install the new reed switch.
Follow instruction D-C-B-A to complete the toilet.
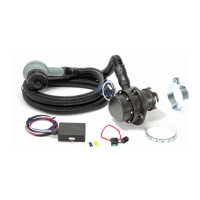
Place screwdriver under sticker, pull sticker off, then lift panel.
Pull connectors loose and remove screws from console cover.
Take out flush system, pull vacuum breaker, push grommet seal.
Pull water tube, install new pump, and reassemble system.
Detach the waste holding tank.
Remove and turn bowl retainer brackets to detach.
Unscrew retainer brackets, turning bowl to access last bracket.
Lift the bowl and replace the water diverter.
Put the bowl back in position, checking tube alignment.
Follow steps C-B-A to complete the toilet assembly.
Detach the waste holding tank.
Turn the left bracket to detach it.
Turn the right bracket to detach it.
Pull at the backside of the bowl to remove the upper part.
Push clip down with screwdriver while pushing nozzle.
Remove the old flush tube and cut the new one to length.
Follow instruction F-E-D-C-B-A to complete the toilet.
Detach the service cover at the back of the bowl.
Detach the flush tube from the nozzle.
Unscrew the nut and remove the plastic washer.
Detach the flush tube from the vacuum breaker.
Install the new flush tube, cut to the same length.
Follow instructions D-C-B-A to complete the toilet.
Detach the waste holding tank from the toilet.
Slide the saddle brackets to the side to remove them.
Unscrew the three brackets around the toilet bowl.
Once parts are unscrewed, the toilet bowl can be taken off.
Push the upstanding rib downwards and take the handle off.