Do you have a question about the Thetford 2384978 and is the answer not in the manual?
| Brand | Thetford |
|---|---|
| Model | 2384978 |
| Category | Plumbing Product |
| Language | English |
Turn tank upside down, use screwdriver to lift clip.
Remove old clip and insert new one.
Remove handle assembly from link inside vehicle.
Disconnect handle from its link.
Install new bracket and connect shaft to handle.
Reassemble handle and bracket with screws.
Remove blade driver by unscrewing bushing.
Remove bushing and then the blade.
Release blade opener by pressing ribs on both sides.
Remove seal retainer screws and take out lip seal.
Remove the seal from the main mechanism.
Reassemble mechanism by reversing the disassembly steps.
Rotate mechanism using cover lever until arrow aligns with second dot.
Remove the mechanism and place it upside down.
Remove old seal and install a new one.
Reassemble the mechanism by following steps in reverse order.
Rotate mechanism using cover lever until arrow aligns with second dot.
Remove the mechanism and place it upside down.
Unscrew the retainer using three screws.
Release blade arm by pressing ribs on retainer.
Remove blade driver by unscrewing bushing.
Remove bushing and then the blade.
Reassemble the blade assembly by reversing the steps.
Rotate mechanism using cover lever until arrow aligns with second dot.
Remove the complete mechanism from its housing.
Press button and pull seal retainer loose from inside.
Insert new seal retainer into the button hole.
Press the button with its spring back into place.
Reinstall mechanism and sliding cover back into the tank.
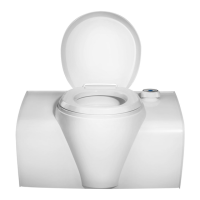
Identify the toilet model for the repair.
Detach the handle from the toilet unit.
Remove the control panel and its associated well.
Take out the seal from the control well.
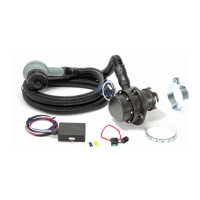
Remove the pump assembly from the water tank.
Strip insulation from pump wires for connection.
Connect new pump wires and secure with shrink tube.
Shrink the protective tubing using a blow dryer to prevent shorts.
Install the new pump and replace the seal in the control well.
Reinstall the control well and then the control panel.
Attach the handle back onto the toilet unit.
Identify the toilet model for the repair.
Detach the handle and remove the control panel.
Unscrew and remove the relay from its connection.
Install the new relay and secure it into the control well.
Reinstall the control panel.
Reattach the handle to the toilet unit.
Remove the waste tank from the cassette toilet.
Remove the blade fuse and the reed switch.
Install new blade fuse, replace reed switch, and reattach waste tank.
Identify the toilet model for the repair.
Detach the handle and remove the control panel.
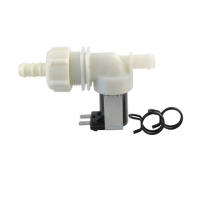
Remove control well, vacuum breaker, and electrical connectors.
Unscrew hose barb and remove water tube from electric valve.
Attach the water tube to the new electric valve.
Screw hose barb and connect electrical connectors to the new valve.
Reinstall vacuum breaker, control well, and control panel.
Reattach the handle to the toilet unit.
Rotate mechanism using cover lever until arrow aligns with second dot.
Remove the mechanism and place it upside down.
Release blade opener by pressing ribs on retainer.
Release blade opener from the other side while holding mechanism.
Reassemble the blade opener assembly by reversing the steps.
Rotate mechanism using cover lever until arrow aligns with second dot.
Remove the mechanism and place it upside down.
Unscrew the retainer using three screws.
Release blade arm by pressing ribs on retainer.
Remove blade driver by unscrewing bushing.
Remove bushing and then the blade.
Remove float arm by prying between retainer and rib.
Release blade opener by pressing ribs on both sides.
Remove seal retainer screws and take out lip seal.
Remove the seal from the main mechanism.
Reassemble mechanism by reversing the disassembly steps.
Rotate mechanism using cover lever until arrow aligns with second dot.
Remove the complete mechanism from its housing.
Remove float arm by prying between retainer and plate.
Install the new float arm by pressing it into the retainer.
Reinstall mechanism and sliding cover back into the tank.
Rotate mechanism using cover lever until arrow aligns with second dot.
Remove the complete mechanism from its housing.
Pry the plate loose using a flat screwdriver.
Take the plate off the mechanism.
Press float to remove foam-float and pull out seal.
Reassemble the automatic vent by reversing the steps.
Invert the waste-holding tank.
Remove the wheel from its mounting.
Install the new wheel into its mounting.
Detach the handle and remove the control panel.
Disconnect and reconnect electrical plugs on the control panel.
Reinstall the control panel and attach the handle.
Detach the overlay from the control panel.
Install the new overlay onto the control panel.
Remove the waste-holding tank from the toilet unit.
Swing out and press down the waterfill funnel.
Install new waterfill funnel by pushing rear first, then front.
Remove waste tank and reed switch by lifting green clip.
Disconnect old reed switch and connect the new one.
Reinstall reed switch and waste tank into the toilet.
Identify the toilet model for the repair.
Remove waste tank and unscrew reed switch WT.
Disconnect old WT reed switch and connect new one.
Reinstall WT reed switch and waste tank into the toilet.
Remove waste tank and pull handle from control panel.
Detach the control panel from its mounting.
Cut tie-wrap and release connector by pressing housing lip.
Swing the waterfill funnel outwards.
Locate shaft pivot, remove 3 screws, and remove spring.
Unscrew and remove the pivotting bracket.
Remove tie-wraps from cables on the toilet's inside and back.
Release reed switch housing by pressing side lips.
Release connector and follow reverse steps to install new harness.
Remove the waste-holding tank from the cassette toilet.
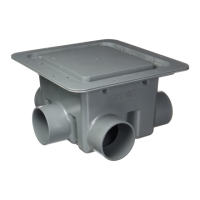
Remove cover, drill hole in toilet base at vent location.
Insert tube into cover and pass through base hole.
Remove foam protection and place it on the cover.
Reinstall cover into the toilet base.
Swing out funnel, remove cap, and insert extension.
Store waterfill extension under the waste-holding tank handle cover.
New float box component.
Empty tank, remove handle, control panel, and well.
Disconnect the nozzle inside the water tank by pulling down.
Remove pump, flush tube, float box; install new float box.
Position the float box correctly inside the tank.
Reinstall pump, flush tube, and push nozzle until it clicks.
Reattach the control panel and the handle.
Rotate mechanism using cover lever until arrow aligns with second dot.
Remove old mechanism and install the new one.
Install new mechanism and sliding cover back into the tank.
Turn pour out spout counter-clockwise and remove it.
Install new pour out spout and turn clockwise to secure.
Remove waste tank and pull handle from control panel.
Detach the control panel from its mounting.
Swing the waterfill funnel outwards.
Locate shaft pivot, remove 3 screws, and remove spring.
Unscrew and remove the pivotting bracket.
Remove link and shaft; follow reverse steps to install new shaft.
Remove old handle and install the new one.
Remove black tube from bracket and sight tube from drainplug.
Remove the black tube from the toilet.
Remove the bracket if replacement is needed.
Reinstall the new drain tube by reversing the steps.