Do you have a question about the Thor Kitchen HRD3001U and is the answer not in the manual?
Details critical safety warnings regarding fire, explosion, and gas leaks, outlining actions to take.
Emphasizes the limitations of smell in detecting gas leaks and recommends a gas detector.
Provides warnings required by California law regarding chemicals known to cause cancer or reproductive harm.
Highlights the risk of tipping and the necessity of properly installed anti-tip devices for safety.
Prohibits using the appliance as a space heater due to risks of carbon monoxide poisoning and overheating.
Instructs to use smothering methods or dry chemical/foam extinguishers for grease fires, not water.
Warns against touching hot heating elements and interior surfaces even after use until they cool.
Mandates electrical grounding according to national and local codes by a qualified technician.
Requires a manual shut-off valve for the gas supply to be installed in an accessible location.
Reiterates the severe risk of tipping and the need for proper installation and engagement of the anti-tip device.
Advises avoiding cabinet storage directly above surface units to prevent burn or fire risks from reaching over hot areas.
Specifies minimum clearance requirements between the cooking surface and unprotected wood/metal cabinets.
Diagram showing dimensions and specifications for the 30-inch dual fuel range model.
Diagram showing dimensions and specifications for the 36-inch dual fuel range model.
Diagram showing dimensions and specifications for the 48-inch dual fuel range model.
Strictly prohibits installation closer than 12mm from any adjacent surface, ensuring proper clearance.
Specifies a minimum vertical clearance of 18 inches between adjacent cabinets and the cooking surface.
Limits the maximum depth of cabinets above cooking tops to less than 13 inches for safety and clearance.
Provides crucial safety precautions to reduce risks of fire, shock, and injury during appliance use.
Specifies that range installation must adhere to local codes or the National Fuel Gas Code.
Emphasizes the necessity of proper installation and grounding by a qualified professional.
Warns that stepping, leaning, or sitting on doors/drawers can cause serious injury and range damage.
Prohibits storing/using flammable materials near the appliance due to explosion and fire risks.
Warns of fire/shock risks if the wrong cord kit is used, instructions are ignored, or the strain relief bracket is removed.
Details critical safety warnings related to electrical shock hazards during installation and operation.
Details the grounding requirements for the appliance, including wiring systems and connectors.
Provides step-by-step instructions for connecting the four-conductor wire to the range.
Refers to the wiring diagram located on the access cover for reference.
States the maximum allowable gas supply pressure for Liquid Propane (LP) gas.
Specifies the factory setting for the appliance regulator's outlet pressure for LP gas.
Provides detailed steps for connecting the range to the gas supply safely and correctly.
Mandates leak testing of the appliance according to manufacturer's instructions.
Lists essential checks to perform after the range has been installed.
Reiterates checking gas connections for leaks using a detector, not a flame.
Illustrates the appearance and configuration of the 30-inch, 4-burner dual fuel range.
Illustrates the appearance and configuration of the 36-inch, 6-burner dual fuel range.
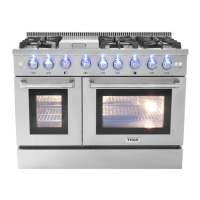
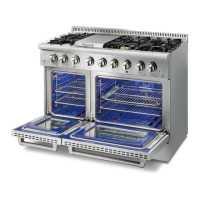
Illustrates the appearance and configuration of the 48-inch dual fuel range with griddle and two ovens.
Identifies the control knobs for the top burners.
Identifies the switch controlling the oven's interior light.
Identifies the heating element located at the base of the oven.
Specifies the wattage for the electric broiler (top) heating element.
Lists essential preparation steps before using the range for the first time.
Explains the process of conditioning the oven to remove manufacturing residues.
Illustrates the different shelf positions within the oven cavity.
Instructs holding the shelf firmly by its sides to maintain a horizontal position.
Warns against leaving the cooktop unattended during operation to prevent accidents.
Instructs to turn utensil handles inward to prevent accidents and interference with other burners.
Instructs users to check burner flames for regularity and proper appearance.
Details how to set the temperature for oven bake using the control knob.
Explains the simmer and boil functions and their appropriate uses.
Advises against touching burner components while the igniter is sparking.
Describes the ideal burner flame: steady and blue.
Provides guidance on operating the range during a power outage.
Emphasizes the importance of correctly positioning burner grates before cooking.
Explains the operation of the oven's bake heat elements and controls.
Explains the operation of the oven's top heat element, typically for broiling.
Cites USDA guidelines on holding temperatures (40-140°F) for food safety.
Reiterates the warning against covering oven slots or racks with foil.
Describes the traditional bake setting using natural heat circulation within the oven cavity.
Describes the infrared broil function using a glowing metal screen for searing.
Explains the convection bake function, using a fan for even heat circulation.
Explains the convection roast function for moist and tender results.
Explains the convection defrost function, using fan without heat.
Provides general instructions for defrosting food.
Explains the convection dehydrate function for removing moisture from food.
Explains the operation of the oven's top heat element, typically for broiling.
Provides guidance on preheating the oven for certain cooking methods.
Provides instructions for the broiling cooking process.
Strictly prohibits using the broil pan without its insert for safety.
Warns against covering the broil pan insert with foil due to fire risk from exposed grease.
Provides steps for setting the oven to the broil function.
Provides preparation steps before using the griddle.
Provides instructions on how to operate the griddle.
Provides a warning for the initial use of the appliance.
Provides a list of recommended actions for cleaning the range.
Lists actions to avoid during range cleaning and maintenance.
Prohibits use of abrasive cleaners, scouring pads, or steel wool to avoid scratching.
Provides instructions for cleaning burner caps and flame spreaders.
Provides cleaning instructions for the control panel, handle, and housing.
Provides cleaning instructions for side racks.
Provides cleaning instructions for oven shelves.
Provides cleaning instructions for the broil/roast pan and grid.
Provides information about cleaning bake and broil burners.
Provides cleaning instructions for porcelain surfaces.
Provides cleaning instructions for the oven window.
Provides instructions for cleaning the oven door gasket.
Provides cleaning instructions for stainless steel surfaces.
Illustrates the components of the burner assembly for replacement.
Warns against lifting the oven door by its handle to prevent damage.
Warns that the oven door is heavy and requires care during handling.
Explains that misalignment can cause dangerous flames and poor performance.
Provides steps for safely reattaching the oven door.
Instructs fully opening the levers on both sides of the oven door hinges.
Instructs opening the oven door fully as part of the replacement process.
Provides steps for replacing the oven light bulb, referencing figures.
Addresses issues with cooktop ignition and burner functionality.
Troubleshoots why cooktop burners might not light.
Addresses issues with large and yellow cooktop burner flames.
Troubleshoots noisy oven fan issues.
Troubleshoots issues related to food cooking too slowly, too quickly, or burning.
Troubleshoots issues with uneven oven cooking.
Troubleshoots issues where the oven is not functioning.
Addresses issues with oven temperature increasing over time.
Troubleshoots issues with the oven light not working.
Lists exclusions from warranty coverage, including damage from misuse, accidents, and unauthorized service.
Details the duration and scope of the product's warranties.
Outlines what costs Thor Group will cover under the warranty.
Lists costs and services that are not covered by the warranty.
Excludes costs for removing/reinstalling the range from inaccessible locations or if not installed per instructions.
States that the warranty is void if the serial number is altered or removed.
Provides information regarding warranty and product registration.
Requires proof of purchase and installation date for in-warranty service.
Identifies the location of the dual fuel range regulator.
Provides measurement for the distance from the gas pipe inlet to the right side of the range.
Provides measurement for the distance from the gas pipe inlet to the ground.
Provides measurement for the distance from the gas pipe inlet to the right side of the range.
Provides measurement for the distance from the gas pipe inlet to the ground.
Provides measurement for the distance from the gas pipe inlet to the right side of the range.
Provides measurement for the distance from the gas pipe inlet to the ground.
| Brand | Thor Kitchen |
|---|---|
| Model | HRD3001U |
| Category | Convection Oven |
| Language | English |