5015927_02 5 of 6
7
ATTACHING HOLD FAST ANTI-SWAY CAGES
FIXATION DES CAGES STABILISATRICES À PRISE RAPIDE
INSTALACIÓN DE LAS JAULAS ANTI-BALANCEO HOLD FAST
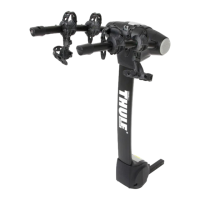
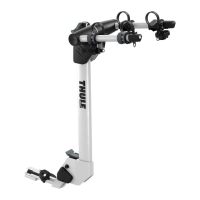
• To attach anti-sway cage, hold horizontal with smooth edge facing down and slide C-slot opening onto Anti Sway Extension / Cradle. Swing down to vertical position.
Place smooth curved surface against bicycle and attach strap as shown.
Pour fixer la cage stabilisatrice, tenez-la à l’horizontale avec la surface lisse orientée vers le bas et faites glisser l’ouverture de la fente en C sur la rallonge/cage stabilisatrice. Faites-la
basculer à la position verticale. Appuyez la surface lisse courbée contre le vélo et fixez la sangle, comme illustré.
Para montar la jaula anti-balanceo, manténgala en posición horizontal con el borde acolchado hacia abajo y hágala deslizar en la abertura con ranura en C en la parte
inferior de la prolongación / soporte anti-balanceo. Hágala girar hasta quedar en posición vertical. Coloque la superficie curvada acolchada contra la bicicleta y monte la
correa tal como se muestra.
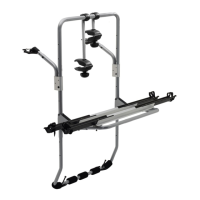
• Mount bikes in alternate directions.
Montez les vélos en alternant la direction.
Monte las demás bicicletas en sentidos alternados.
A B
8
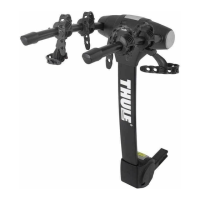
• Secure bikes to mast of carrier with black strap.
Fixez les vélos au mât du porte-vélos avec la sangle noire.
Fije las bicicletas en el mástil del soporte con la correa negra.
9
NOTE: BIKES MUST BE REMOVED TO LOWER CARRIER.
REMARQUE: LES VÉLOS DOIVENT ÊTRE RETIRÉS POUR ABAISSER LE PORTE-VÉLOS
NOTA: SE DEBE RETIRAR LAS BICICLETAS PARA BAJAR EL SOPORTE.
• Firmly hold the mast of the carrier with one hand.
Retenez fermement d’une main le mât du porte-vélos.
Sostenga firmemente el mástil del soporte con una mano.
• Lift lower Hitch Switch lever as illustrated.
Soulevez le levier Hitch Switch inférieur, comme illustré.
Levante la palanca inferior del Hitch Switch tal como se muestra.