450 CROSSROAD RAILING FOOT
4502 CROSSROAD RAILING FOOT HALF PACK
PARTS INCLUDED•PIÈCES INCLUSES•PIEZAS INCLUIDAS
Railing Foot / Pied de rail / Pie de la barra lateral
Handle Assembly / Poignée / Ensamblaje del asa
Endcap / Capuchon / Tapa de extremo
A
B
C
2
2
2
part
pièce
pieza
753-3399
753-20064
853-3593
description
description
descripción
part number
numéro de pièce
número de pieza
qty.
qté
cant.
4502450
4
4
4
qty.
qté
cant.
A B C
PARTS NOT INCLUDED•PIÈCES NON INCLUSES•PIEZAS NO INCLUIDAS
Complete your Load Carrier with the recommended Load Bar
for your vehicle as stated in the Thule Fit Guide.
Complétez votre coffre de toit avec les barres de toit indiquées pour votre
véhicule dans le guide d’adaptation Thule.
Complete su portacargas con la barra de carga recomendada para su
vehículo según se indica en la Guía de ajuste de Thule.
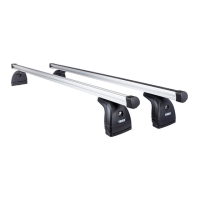
LOAD BARS
BARRES DE TOIT
BARRAS DE CARGA
THULE ONE KEY SYSTEM
SYSTÈME THULE À UNE CLÉ
SISTEMA DE UNA SOLA LLAVE DE THULE
544
596
588
LB50, LB58, LB65
WARNINGS/LIMITATIONS
The load you are carrying plus the weight of the rack
must not exceed the maximum weight limitation of
the vehicle’s factory rack.
AVERTISSEMENTS/RESTRICTIONS
Le poids total du chargement et des barres de toit ne doit
pas dépasser la limite de charge maximale des barres
installées en usine.
ADVERTENCIAS/LIMITACIONES
La carga que transporte más el peso del portacargas no
pueden superar la limitación de peso máximo del portacar-
gas de fábrica del vehículo.