41
1. Put the baby unit somewhere in the nursery where your
baby will not be able to reach it. An optimal distance
between baby and the baby unit is from 1 to 2 m.
2. Insert the mains adapter plug into the socket
14
of the
baby unit
10
.
3. Insert the plug into a power socket standard that
matches the rating given in the technical data
(see
"11. Technical data" on page 42).
The baby unit is unlike the parent unit ready to be used
once it is plugged in for the first time.
This function is a safety programming which ensures
that baby unit will start automatically again after a
power outage. However, if you turn the baby unit off
manually by pressing the
power ON/OFF button
12
the
unit will stay off during a power outage.
7.3 Connecting baby unit and parent unit
Once both units are supplied with electricity and are turned
on, they start connecting automatically. During the pairing
process the red of the five LED indicators
2
on the parent
unit
1
and the link indicator
11
on the baby unit
10
light up
red. When the link is established both indicators will turn
green.
Always ensure that the parent unit remains within the range
for the pairing process.
In the event that the connection between the parent unit
and the baby unit breaks down, the devices will
automatically attempt to establish a new one. If a new
connection is not established within 30 seconds, the parent
unit
1
will emit a regular beep and the link indicator
2
will
light up red. You may need to move the parent unit to a
different location before a new connection can be
established.
8. Alerts, warnings and indicators
This baby monitor has several ways to warn or alert you.
If you hear an alert pay close attention to the parent unit.
Note:
Red LEDs need your attention and reaction
immediately.
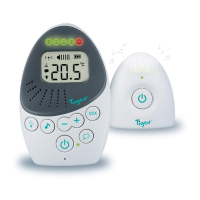
On the parent unit
1
are 5 LEDs
2
(4 green, 1red). These
LEDs have multiple purposes.
9. Activation of features
9.1 Volume adjustment
To adjust the volume of the parent unit you can use the
volume adjustment buttons
4
. All together there are 5 levels
of volume and the option to mute the parent unit (see
"Mute Setting“ on page42).
Each time you press one of the buttons you will hear a
beep at the volume that is currently set and the
Sound alert Indicator Meaning What to do
Alarm every 30 s Link indicators
2
and
11
are
red
Parent unit is either out of
range or you lost the link to
the baby unit for another
reason
Move the parent unit to a different
location so a new connection can be
established
Alarm every 60 s LED indicator
5
is flashing
red
Battery is low Connect the mains adapter
Activated function Meaning
No function is activated
(frequently illuminated LEDs)
Indicating the noise level in the nursery. The more LEDs are lit, the louder are the
noises.
Adjusting volume
(steady illuminated LEDs)
The more LEDs are lit, the higher the volume level on the parent unit.
Adjusting VOX sensitivity
(flashing LEDs)
The more flashing LEDs the higher is the VOX Level and the more the microfon on
the baby unit is reacting to small noises. Level 5 will continuesly transmitt all noises
without activating the Eco-Mode
Eco-Mode
(no illuminated LEDs)
Indication that maybe the Eco-Mode is activated and your baby is sleeping.
Only the red LED lights up Lost link/no connection between parent unit and baby unit or indication for low
battery status.
 Loading...