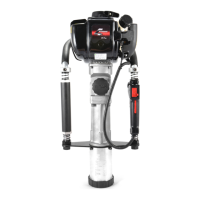
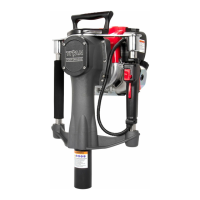
The Titan Gas-Powered Post Driver is a self-contained, powerful, and lightweight tool designed for driving posts and rods into the ground. It is powered by a Honda GX35 engine, which is inclinable and designed to operate at any angle, making the driver versatile for various terrains and applications. The device is available in two models: the PGD2000 with a 2" barrel and the PGD3200 with a 3 1/4" barrel, accommodating different post sizes.
Function Description:
The primary function of the Titan Post Driver is to efficiently drive posts and rods into the ground using its gas-powered hammering mechanism. It is 100% self-contained, meaning it does not require external power sources like hydraulics or air compressors. The driver is designed for optimal performance when used with low-grade viscosity grease, specifically Titan EP 0, to ensure smooth operation and minimize wear on internal components.
Important Technical Specifications:
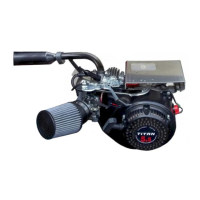
- Engine: Honda GX35 engine.
- Models: PGD2000 (2" barrel), PGD3200 (3 1/4" barrel).
- Grease Type: Titan EP 0 low-grade viscosity grease (non-approved grease types will void warranty).
- Fuel Type: Unleaded fuel with 86 octane or higher.
- Engine Oil: SAE 10W-30 oil.
- Noise Level: Can reach above 100 decibels during operation.
- Crank Pin Torque (Reassembly): 228 inch-pounds (left-hand thread).
- Bottom Housing Bolts Torque (Reassembly): 132 inch-pounds.
Usage Features:
- Self-Contained Operation: No external power sources required.
- Reducer Sleeves: Various sizes are available for both PGD2000 and PGD3200 models to accommodate ground rods, rebar, and other stakes. Using the correct sleeve ensures proper impact and minimizes wear.
- Honda GX35 Engine: Designed for operation at any angle.
- Anti-Vibration Handles: Internal spring-dampened handles reduce vibration transmitted to the operator.
- Operating Posture: Maintain a firm stance with weight evenly distributed, feet shoulder-width apart, and a solid balance.
- Down-Pressure: Always maintain 10-12 pounds of down-pressure on the handles to help the internal hammer mechanism remain in the correct operating position and prevent dry-fire or misfire.
- Square Alignment: Keep the driver square to the post when driving to prevent damage to the machine or post.
- Throttle Control: Engage the throttle gently until hammer action is felt, then fully depress to drive the post. Release the throttle fully to stop hammer action before removing the driver from the post.
- Dry-Fire/Misfire Re-engagement: If dry-fire or misfire occurs, lift the driver and set it back down on the post with pressure to re-engage the anvil.
- Barrel Clearance: Do not allow the barrel to contact the ground while driving.
- Refueling: Always turn off the engine and allow it to cool before refueling. Refuel in a well-ventilated area.
Maintenance Features:
- Engine Oil Check (Before Each Use): Check oil level in an upright position, top off with SAE 10W-30 if necessary. Do not overfill.
- Engine Air Filter Check (Before Each Use): Clean or replace if soiled.
- Fastener Check (Before Each Use): Check and retighten all post driver fasteners. If reinstalling bolts, clean with parts cleaner and use new Loctite.
- Anvil/Barrel Inspection (Before Each Use): Visually check for debris or foreign objects.
- Fluid Leak Check (Before Each Use): Inspect for any fluid leaks.
- First 10 Hours Use:
- Change engine oil (refer to Honda GX35 manual).
- Check and retighten all fasteners.
- Check grease level: Remove crank housing cover. Grease ring around crank case wall should be at least 1¼". Add Titan EP 0 grease if low (approx. 3-4 tablespoons to the bottom of the crank pin if completely removed). Do not overfill.
- Every 10 Hours Use: Check grease level as described above.
- Every 3 Months or 25 Hours Use:
- Change engine oil.
- Replace air filter (more often in dusty conditions).
- Check and retighten all fasteners, using new Loctite if necessary.
- Every 12 Months or 250 Hours Use:
- Perform all 3-month/25-hour maintenance.
- Remove and service hammer and anvil.
- Replace all O-rings and housing seals (rebuild kit available from Titan Post Drivers).
- Grease Management: Critical for performance and service life. Use only Titan-approved EP 0 grease.
- Loctite Use: Always use LOCTITE BLUE 243 when reassembling fasteners. Clean fasteners and holes with parts cleaner to remove grease residue for effective adhesion.
- Hammer/Anvil Servicing (Rebuild):
- Wear eye protection.
- Remove lower driver body bolts.
- Inspect damper section (O-rings, steel components) for wear/debris, noting orientation for reinstallation.
- Remove and clean anvil, replace Viton O-ring.
- Remove piston and connecting rod by removing left-hand thread crank pin. Inspect for excessive play and replace if needed. Replace piston Viton O-ring.
- Clean and inspect cylinder and crank case.
- Clean and lubricate inner handle springs and handle cups.
- Reassembly:
- Wear eye protection.
- Apply EP 0 grease to O-ring and outside of piston, gently push into housing.
- Add small amount of EP 0 grease to crank pin shoulder, reassemble (left-hand thread), torque to 228 inch-pounds.
- Apply EP 0 grease to outside of hammer, gently push into housing with O-ring toward top.
- Apply EP 0 grease to anvil, push into guide tube.
- Reassemble damper assembly with EP 0 grease, ensuring hammer guide ring is oriented correctly ("round to the ground").
- Install metal damper washer.
- Install bottom guide section with new bottom housing O-ring.
- Insert anti-vibration springs into handlebars and reinstall into handle cups.
- Reinstall bottom housing bolts with new Loctite (clean bolts and holes), torque to 132 inch-pounds.
- Add approximately 4 tablespoons of new EP 0 grease to crank area, reinstall crank cover bolts with new Loctite.
- Troubleshooting: Guidelines for issues like anvil not hammering, overheating, or lodged posts.
- Warranty Registration: Register online at https://www.titanpostdrivers.com/warranty-registration/ within 30 days of purchase for warranty validity.
- Honda Engine Service: Contact local Honda service dealer for engine-related issues. Titan Post Drivers does not handle Honda engine parts or warranty.