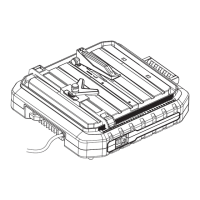
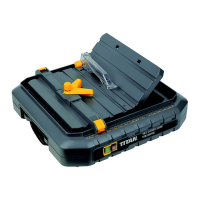
This document describes the TITAN TTB903TCH 500W Tile Cutter, a power tool designed for cutting tiles.
Function Description
The TITAN TTB903TCH is a 500W tile cutter intended for cutting tiles to a required size or shape. It is not suitable for cutting inflammable, explosive, or toxic materials, nor other materials harmful to health. This appliance is designed for private and household use, not for professional or industrial applications. It features a diamond cutting disc that operates with water cooling to prevent overheating and dust generation. The machine includes several safety devices, such as an upper protective guard, a lower protective guard, and a metal bracket, all designed to protect the operator from the cutting disc and flying debris. The upper protective guard is designed to rise and fall freely as the workpiece is pushed towards the cutting disc. The product is equipped with an On/Off switch for easy operation.
Important Technical Specifications
- Input Voltage: 220-240V~50Hz
- Power Input: 500W
- No Load Speed: 5200min⁻¹
- Insulation Class: Class I
- Diamond Disc Size: Ø115mm x 2.1mm x Ø22.2mm
- Table Size: 330mm x 360mm
- Table Tilt Range: 0°/45°
- Maximum Cutting Depth: 20mm
- Net Weight: 5.9kg
- A-weighted sound pressure (LpA): 94dB(A)
- A-weighted sound power (LWA): 107dB(A)
- Uncertainty: 3dB(A)
- Degree of protection: IPX4 (water ingress)
- Supply: Must be supplied through a residual current device (RCD) and fed via a 10A fuse min.
- Ambient conditions for use: Between 15°C and 30°C.
Usage Features
The tile cutter offers various cutting capabilities:
- Straight Cuts: Adjust the parallel cutting guide (12) to the desired width. Position the tile firmly against the parallel cutting guide and pass the cutting disc in a smooth action. Hold the edges of the tile and press down firmly to prevent tile lifting during the cut.
- Mitre or Diagonal Cuts: Use the mitre cutting guide (13) in conjunction with the parallel cutting guide (12). The mitre cutting guide clips onto the parallel cutting guide and can be set to a desired angle (0°~45°). Ensure the tile is held firmly in the guide before cutting.
- Angle or Bevel Cuts: Utilize the 45° vertical fence (1) for angle or bevel cuts on the tile edge. Raise the vertical fence to approximately 45°, fold out the holder (31), and position it in the locator (32). Ensure the fence is securely fastened before cutting. Internal or external bevel cuts can be made by turning the tile face up or down.
Before Starting:
- Unpack: Lay all parts on a flat, stable surface, remove packing materials, and check for completeness and damage. Ensure all accessories and tools for assembly and operation are present.
- Fit Base Feet: Insert the four base feet (10) into the openings (18) on the underside of the product.
- Fit Cutting Disc: Unplug the tile cutter. Raise the 45° vertical fence (1) and remove it. Loosen screw (19) and pull off the lower protective guard (6). Attach the angle disc spanner (20) to the arbor nut (21), lock the motor shaft (22) with the straight disc spanner (23), and turn the arbor nut anti-clockwise to remove it and the outer flange (24). Place the cutting disc (15) on the inner flange (25), attach the outer flange (24), and screw the arbor nut (21) onto the motor shaft (22) clockwise. Tighten the arbor nut using the angle disc spanner and straight disc spanner. Re-attach the lower protective guard and the 45° vertical fence. Observe the rotational direction and free-wheeling of the cutting disc.
- Assemble/Adjust Metal Bracket: Unplug the tile cutter. Raise and remove the 45° vertical fence. Loosen screw (19) and remove the lower protective guard (6). Remove screw (26) and washer (27) from the metal bracket (16). Push the metal bracket through the gap in the housing from below, ensuring the L section faces forwards. Attach the metal bracket to the screw and washer, gently tighten, align with the cutting disc, then fully tighten. Replace the 45° vertical fence.
- Mount Upper Protective Guard: Unplug the tile cutter. Push the upper protective guard (3) onto the metal bracket (16). Push the socket head bolt (28) through the guard and bracket. Push the flat washer (29) onto the bolt and screw the locking knob (17) onto the bolt. Ensure the guard covers the cutting disc, moves freely, and does not touch the disc. Do not over-tighten.
- Mount Parallel Cutting Guide: Unplug the tile cutter. Open the locking knobs (8) for the parallel cutting guide. Position the guide (12) on the rail (30) and push down the locking knobs.
- Mount Mitre Cutting Guide: Place the mitre cutting guide (13) on the parallel cutting guide (12). Loosen locking knob (14), set the desired angle, and tighten the knob.
- Fill with Water: Unplug the tile cutter. Raise the 45° vertical fence and remove it. Insert the water reservoir plug (9) into the drain opening. Fill the tank with clear water until water drains from the plug opening. The water level must never drop below the MIN marking (33) during use. Never use chemicals or cleaning agents.
- Pre-operation Check: Before plugging in, check for visible defects, firm attachment of all parts, faultless safety devices, free-running cutting disc, and sufficient cooling water.
Operation:
- Switching On: Press the green I-Button on the On/Off Switch (7). Wait until the cutting disc reaches maximum speed before starting work.
- Switching Off: Press the red 0-Button on the On/Off Switch (7). The disc will continue to rotate for a few seconds after switching off. Wait for it to stop before removing the workpiece or making adjustments.
- Safety: Always maintain an adequate distance from the cutting disc. Do not reach into the working range of the spinning disc. Stop immediately if there is undue vibration.
Maintenance Features
- General Care: Always switch off and disconnect from power before inspection, maintenance, or cleaning. Keep the work area clean and remove debris after each use. Regular and proper cleaning ensures product longevity.
- Cleaning: Never spray the product with water or expose it to water. Do not use detergents or solvents. Wipe the product with a slightly damp cloth. Keep ventilation slots clean and dust-free.
- Replacing Cooling Water: Raise and remove the 45° vertical fence. Place a collector below the drain opening. Remove the water reservoir plug (9) and drain dirty water. Refill with clear water as described in "Filling the product with water."
- Replacing Cutting Disc: Unplug the tile cutter. Raise the vertical fence (1) and remove it. Loosen screw (19) and pull off the lower protective guard (6). Attach the angle disc spanner (20) to the arbor nut (21), lock the motor shaft (22) with the straight disc spanner (23), and turn the arbor nut anti-clockwise to remove it, the outer flange (24), and the cutting disc (15). Thoroughly clean the outer flange, inner flange, and motor shaft. Fit the new cutting disc following the installation steps. Always wear protective gloves and ensure the metal bracket is aligned parallel to the cutting disc. Never use segmented cutting discs.
- Repair: This product contains no consumer-repairable parts. Contact a qualified specialist for checks and repairs. Worn or damaged parts should be replaced immediately by qualified personnel.
- Power Cord: If the power cord is damaged, it must be replaced by the manufacturer, its service agent, or a similarly qualified person. If replacing the plug, follow the wiring instructions: Green & yellow to Earth (E or ÷), Blue to Neutral (N), Brown to Live (L). Only fit an approved 5 Amp BS1363/A plug and the correct rated fuse. Never connect live or neutral wires to the earth terminal.
- Storage: Store the product and accessories in a dry, frost-free place, inaccessible to children. The ideal storage temperature is between 10°C and 30°C. Store in the original packaging or covered with a suitable cloth to protect against dust.
- Transport: Dismantle any protruding components. Use original packaging for shipping. Protect the product from heavy impact or strong vibrations. Secure the product to prevent slipping or falling during transport.