Do you have a question about the Topgreener TGT01-H and is the answer not in the manual?
Lists key capabilities, technical parameters, and bulb compatibility of the timer.
Crucial safety instructions, emphasizing turning off power before installation and using copper wire.
Outlines essential conditions for timer operation, such as neutral wire need and installation type compatibility.
Provides guidance and diagrams for connecting the timer in single-pole and 3-way configurations.
Illustrates the wiring for a single-pole timer installation.
Instructions on how to safely remove the existing face cover and install a new one.
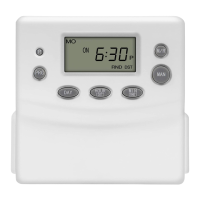
Explains the main display elements and the function of each button for navigation and operation.
Illustrates and explains indicators displayed on the timer's screen during programming.
Step-by-step guide to setting the current time, AM/PM, year, month, and day.
Details the importance of selecting the correct region for accurate Dusk/Dawn feature operation.
Explains how to manually enable or disable Daylight Savings Time on the timer.
Explains how geographical region affects daylight calculations and potential need for Dusk/Dawn time adjustments.
Provides instructions on manually adjusting the specific Dusk and Dawn times for the timer's automatic feature.
How to cycle through existing programmed ON/OFF schedules using the PRG button.
Detailed steps to add a new ON or OFF program, including setting time and days of the week.
Demonstrates programming the timer to use automatic Dusk for ON and Dawn for OFF settings.
Instructions on how to remove a specific program from the timer's schedule.
Steps to perform a factory reset, clearing all custom settings and programs.
How to select the operating mode (Automatic, Manual, or Random) using the MODE/DELETE button.
Instructions for activating and setting the countdown timer function for a specific duration.
The TGT01-H Astronomic In-Wall Programmable Timer is a sophisticated device designed to automate lighting control in your home, offering convenience, security, and energy efficiency. This timer is engineered to replace a standard wall switch and provides a wide array of programmable settings to suit various needs.
At its core, the TGT01-H timer allows users to schedule when lights turn on and off automatically. Its standout feature is the astronomic function, which intelligently adjusts dusk and dawn times throughout the year, ensuring your lights operate in sync with natural light cycles without constant manual adjustments. This means your outdoor lights, for example, will automatically turn on at sunset and off at sunrise, regardless of seasonal changes.
The timer supports a total of seven "on" and seven "off" programmable settings, providing ample flexibility to create complex lighting schedules for different days of the week or specific events. This extensive programmability is ideal for managing multiple lighting scenarios, such as turning on porch lights in the evening, interior lights for security when away, or accent lighting for ambiance.
Beyond simple scheduling, the TGT01-H offers a "Random On/Off" operation mode. This security feature is particularly useful when you are away from home, as it randomly turns lights on and off within a 30-minute window before or after programmed times. This creates the illusion that someone is home, deterring potential intruders.
The device also includes a manual override function, allowing you to temporarily bypass the programmed schedule to turn lights on or off as needed, without disrupting the stored settings. This is convenient for unexpected guests or when you simply want to adjust the lighting for a short period.
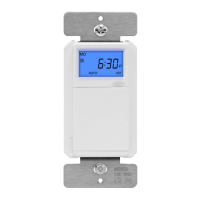
For ease of use and visual feedback, the timer features a back-lit LCD screen. This screen displays the current time, day of the week, program status (on/off), and various indicators for different modes and settings, making it easy to navigate and understand the timer's operation, even in low light conditions.
The TGT01-H is versatile in its application, compatible with single-pole or three-way installations, making it suitable for a wide range of existing wiring setups. It works with various bulb types, including CFL, LED, and incandescent bulbs, ensuring broad compatibility with modern lighting fixtures.
Setting up and operating the TGT01-H timer involves a series of intuitive steps guided by the device's buttons and LCD display.
Before programming schedules, the timer requires initial setup of the clock, year, month, and day. This is done by pressing the "SET" button multiple times to cycle through these settings, using the up/down arrow buttons to adjust values. The AM/PM indicator ensures accurate time setting.
A crucial step for the astronomic feature is selecting your geographical region (North United States, Central United States, South United States, Mexico, Puerto Rico, or Hawaii). This informs the timer's internal calculations for accurate dusk and dawn times. While the timer does not transmit or receive signals, manual region selection ensures the astronomic feature functions optimally. Users may need to fine-tune dusk/dawn times after region selection for precise local accuracy.
The timer includes a setting for Daylight Savings Time. It's important to note that DST does not automatically change; users must manually turn DST on or off through the settings menu when the time change occurs.
To create a schedule, you press the "PRG" button to access program slots. For each "ON" and "OFF" program (up to seven of each), you set the desired time and select the specific day or days of the week for the program to run. The up/down arrows are used to adjust the time, and the "SET" button confirms selections.
Instead of a fixed time, you can program "ON" or "OFF" events to occur at dusk or dawn. After selecting the program slot, you press the dusk/dawn button, and the timer will automatically use the calculated astronomic times for that event. This is particularly useful for outdoor lighting or security lights.
The "MOD/DEL" button allows you to cycle through three operating modes:
The timer also features a countdown mode. By pressing and holding the ON/OFF button for three seconds, you can activate a countdown timer, setting a specific duration for the lights to remain on or off. This is useful for temporary lighting needs, such as a child's nightlight or a temporary workspace light.
A quick press of the ON/OFF button in Automatic mode will manually turn the connected load on or off, overriding the current program until the button is pressed again.
The TGT01-H timer is designed for minimal maintenance, focusing on user convenience and long-term reliability.
A crucial maintenance feature is the built-in battery backup. This ensures that all programmed settings, including the clock and schedules, are saved during power outages. When power is restored, the timer resumes operation without requiring reprogramming, saving significant time and effort.
For troubleshooting or to clear all existing programs, the timer includes a factory reset function. By pressing and releasing the "R" (Reset) button, all settings revert to their default state, providing a clean slate for reprogramming. This is also recommended before initial setup to ensure no residual settings from manufacturing or testing interfere with new programming.
The timer comes with an interchangeable face cover, specifically in white. While other colors like Light Almond and Black are not included, the design allows for easy replacement of the face cover. This feature is primarily for aesthetic customization, allowing the timer to better match the decor of the room or switch plate. To replace, simply pry off the existing cover using a flathead screwdriver at the designated slots, and then snap the new cover into place, top first.
The device requires a neutral wire in the switch box for correct operation. Users are advised to check their existing wiring; if only two wires are present, the timer will not function. It is also designed for single-pole or three-way installations but will not work in a four-way setup. For safety and proper installation, it is recommended that a qualified electrician performs the installation, adhering to the National Electric Code and local regulations. The timer is designed for use with copper wire only.
In summary, the TGT01-H Astronomic In-Wall Programmable Timer is a robust and user-friendly solution for automated lighting control, offering advanced features like astronomic adjustment and random operation, backed by practical maintenance features such as battery backup and easy aesthetic customization.
| Type | Digital Timer |
|---|---|
| Amperage | 15A |
| Timing Increments | 1 Minute |
| Display | LCD |
| Certification | ETL Listed |
| Voltage | 120V |
| Timer Modes | Countdown |
| Operating Temperature | 0°C to 40°C |
| Backup Battery | Yes |
| Load Type | Resistive, Motor |
| Installation | Wall-mounted |
| Wattage | 1800W (Resistive) |