14
SET-UP INSTRUCTIONS
Figure 19
1. Thrust washer
2. Carrier frame
3. Lynch pin
1
3
2
3. Grease all lift arm and carrier frame pivot points.
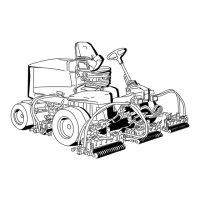
IMPORTANT: Make sure hoses are free of twists or
sharp bends and rear cutting unit hoses are routed
as shown in Fig. 20. Raise cutting units and shift
them to the left (Model 03201 only). Rear cutting
unit hoses must not contact traction cable bracket.
Re-position fittings and / or hoses, if required.
4. Route a tipper chain up thru slot in end of each
carrier frame. Secure tipper chain to top of carrier
frame with a capscrew, washer and locknut (Fig. 21).
Figure 20
Figure 21
1. Tipper chain
1
MOUNT CUTTING UNIT DRIVE MOTORS
(Fig. 22 & 23)
1. Position cutting units in front of lift arm pivot rods.
2. Remove weights and gasket (Fig. 22) from inside
end of right hand cutting unit. Remove plug from
bearing housing on outside end of right hand cutting
unit and install weights and gasket. Locate spider
coupling (Fig. 23) shipped in bearing housing.
Figure 22
1. Weights
2. Gasket
1
2
3. Remove shipping plug from bearing housings on
remaining cutting units (Fig. 18).
4. Insert O-ring (supplied with cutting unit) on flange
of drive motor.
Figure 23
1. Spider coupling 2. Reel motor 3. O-ring
1
2
3
5. Mount the motor and the spider coupling to the
drive end of the cutting unit and secure with two
capscrews provided with cutting unit.