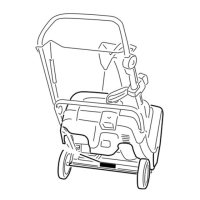
Figure34
1.Screw(4)3.Sparkplug
2.Shroud4.Spark-plugwire
5.Removethefueltankcap.
6.Removetheshroud(Figure34).
7.Installthefueltankcap.
8.Disconnectthewirefromthesparkplug.
9.Cleanaroundthesparkplug.
10.Removethesparkplugfromthecylinderhead.
Important:Replaceacracked,fouled,or
dirtysparkplug.Donotcleantheelectrodes
becausegritenteringthecylindercandamage
theengine.
11.Setthegapontheplugto0.030inch(0.76mm)
(
Figure35).
Figure35
1.Centerelectrodeinsulator3.Airgap(nottoscale)
2.Sideelectrode
12.Installthesparkplugandtorqueitto20–22ft-lb
(27–30N-m).
13.Connectthewiretothesparkplug.
Note:Ensurethatthebreathertubeisroutedabove
thesparkplugwireasshownin
Figure36.
Figure36
1.Breathertube
2.Carburetordrainbolt
14.Removethefueltankcap.
15.Installtheshroudwiththescrewsyouremovedin
step
4.
Note:Ensurethattheupperandlowershroudst
togetherinthesidegrooves.
16.Installthefueltankcap.
17.Installthechuteseal,thedischargechute,andthe
dischargechutehandleontothemachineusingthe
hardwareyouremovedinstep
3.
Note:Thesmallscrewgoesthroughthesmallhole
inthechutesealatthefrontofthedischargechute
opening.
ReplacingtheDriveBelt
Ifdrivebeltbecomesworn,oil-soaked,excessively
cracked,frayed,orotherwisedamaged,replacethebelt.
1.Removethedrivebeltcoverbyremovingthe3bolts
asshowninFigure37.
15